


Jump to...
![]()
![]()
![]()
![]()

![]()

![]()
![]()
![]()
![]()
![]()
![]()
![]()
![]()
![]()
![]()
Create Your Session
To create your EventMobi studio you will first need to create a session in the Sessions library. We have two ways that you can add a session, using the Add Session button or by Excel Import.
Our platform allows you to livestream video directly into a session, so that you can take advantage of networking, engagement, and survey features to create an amazing experience for your attendees all in one place!
Adding a Session
The first step you will need to do is create a Session in your Sessions Library. You have the option of adding your sessions manually using our Add Session button, or you can import an excel spreadsheet to mass upload multiple sessions at the same time.

Choosing EventMobi Studio inside a Session
Once your session is created, you can now click on it to start editing the contents of the session. You will see a tab labelled Experience. Here is where we can define what type of experience will be held in the session.
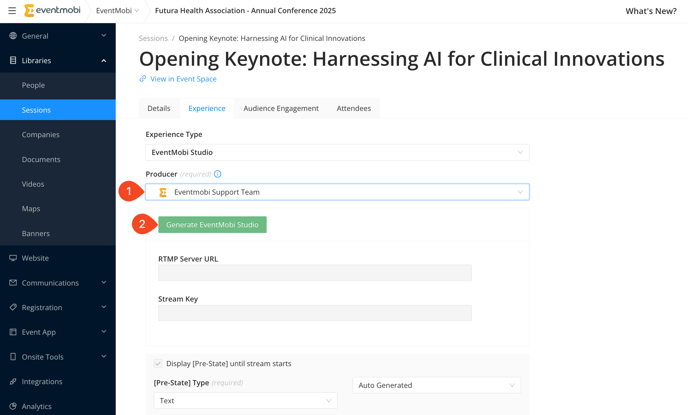
Inside this tab you can select EventMobi Studio from the dropdown menu for Experience Type.
You'll also see two new options when you select EventMobi Studio: Producer & Generate EventMobi Studio.
Once you have designated a Producer for your session, simply click the green button labeled "Generate EventMobi Studio." This action will automatically create the necessary stream keys and integrate them into your livestream studio. After completing this step, remember to click "Save" to finalize the setup and generate the session room.
If you're interested in learning more about the different Experience types available, this article will provide you with more information.
Producer & Speakers Role
Delivering a successful livestream session relies on people who can play different roles that contribute to presenting the session content, and to also managing the session flow and delivery. We've separated those roles into two categories: Producer & Speaker. Each role will include a different set of options and responsibilities within the Livestream Studio.
Producers will have options that allow them to manage the overall look and flow of the session, for example doing such things as setting the presentation layout, adding background music and displaying captions.
Speakers will have less options as they will want to focus on delivering the session content. Speaker roles will have access to control their camera, microphone, and screen share.
Anyone that you would like assign as a Producer or Speaker will first need to be added into the People Library. This is required to allow the producer and speakers to access the Livestream Studio from their session in the Event App.
Producer is a required field to generate the Livestream Studio room. Producers are given full admin access in the Livestream Studio and are responsible for letting speakers in, starting the stream, controlling the layout, as well as adding and removing people from the livestream. Producers will access the studio by clicking "Join the Studio as Producer" button from the session in the Event App.
Entering a producer into this field will not display their profile from the session. If you would like the producer's profile picture to appear in the session, you can add them as a Speaker, or assign them to a Role in the sessions library.
Only 1 Producer can be assigned to each EventMobi Studio session.
Speakers on the other hand, is an optional field that is not required to generate the EventMobi Studio. Those that are assigned as Speakers will have access to the 'Join the Studio as Speaker' button from the session in the Event App. When speakers join the studio, they will have the option to update their name and control their camera, microphone, and screen share.
Entering a speaker into this field will display their profile on the session details page.
While there is no limit on the number of Speakers for your session, please keep in mind that only 10 participants are supported in the EventMobi Studio at a given time.
When you assign a role to a person in your people list, your Event App will automatically send out a notification to invite your Speaker & Producers to join the session. These emails will send out at two different points - when you first assign them and 10 minutes before the session starts.
This email will confirm the session date/time of the session, information about their role and features, and a call to action bringing them right to their session.
Email Examples

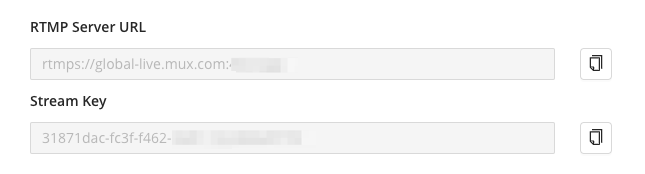
RTMP Server URL and Stream Keys
When creating your livestream session, you will notice two additional fields, RTMP Server URL and Stream Key appear. These fields are typically used to add the appropriate credentials into the livestream platform you are working with - however, since the Livestream Studio is integrated directly into the session, no action will be required on your end. The fields are simply offered as confirmation that the link between your session and the Livestream Studio has been set.
If you would like additional information about what RTMP is and how it works, you can read about our RTMP breakdown here.
Billable Hours Going Live
Our EventMobi Studios can be used endlessly to upload your logos, backgrounds, and video clips
before you're ready to go live. You can freely join the studio with your speakers to test out the room with no limitations.
Billable hours will only start when clicking Go Live from within the studio and live stream into the EventMobi Event App. Every hour that you're live streaming into the Event App will count towards the hours you have purchased in your package.

A 12 hour delay will apply to your Viewer Time Usage Summary analytics.
Pre/Post Stream Images
Pre and Post Stream Images help in letting your attendees know when the live stream session is set to begin and when it has ended. A default image will be available, or you can choose to upload your own image to tie into your branding and/or to provide additional information to your attendees.
Pre and Post Stream Images can also be set to link to a website URL of your choice, which offers a great way of directing attendees to additional resources or even on to the next session.
Custom Pre/Post Stream Images
To upload your custom image, you will just need to select Custom Image and upload your image through our drag and drop area.
Additionally, you can click on the upload area to select the image file that you would like to use.
Image size can be dependent on the size of screen that your attendees are viewing the image from, so below you will find some recommendations to make it look consistent across most platforms.
Recommended: 1920x1080
Minimum: 1200 px by 675 px (or a ratio of 16:9)

When uploading your file, you can use the crop tool to select which part of the image you would like to display.
Link to allows you to add a hyperlink to the image so that you can guide attendees to another webpage or even another page within the Event App itself.
Simply input the relevant URL, and attendees will be directed to this page when they click on the Pre or Post Stream Image.
Once you've entered all of the information that you would like to add to your EventMobi Studio, you will need to select Save to make sure all changes and updates you've made are applied to the session.
If needed, you can go back and make changes to the session or media source that you've previously added.
