Sessions: Types of (Video) Experiences and Custom Pre/Post States
Learn how to customize sessions in your Event App with experience types, pre and post states, using images, videos, and interactive tools to engage attendees.
Jump to
- Types of Experiences for Sessions
- Setting Up Pre and Post States
Types of Experiences for Sessions
Bringing your event to the virtual world doesn't have to be scary or complicated. The Event App allows you to incorporate different image and video options into your sessions, depending on the type of experience that you are looking to create for your attendees.
Within the Sessions library you can find an Experience option available that will provide you with the following options:
| None | for sessions that do not require any specific experience type |
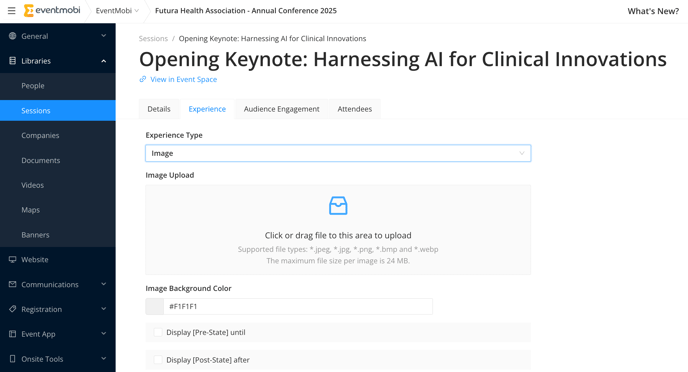
| Image | for displaying virtual posters or images |
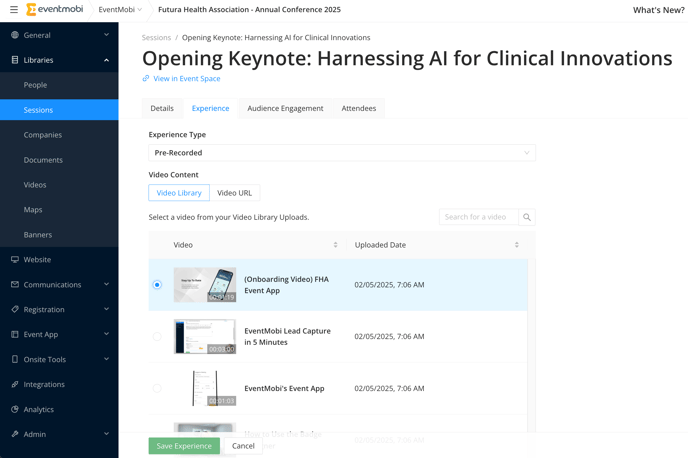
| Pre-Recorded | for embedded on-demand video content. |
| EventMobi Studio | for live streaming video directly through the EventMobi platform. |
| Custom Live Stream | for streaming live video using RTMP through an external platform or service. |
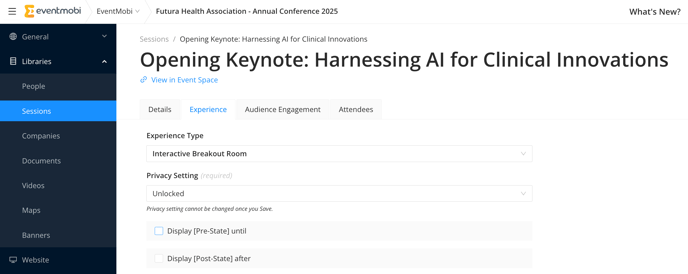
| Interactive Breakout Room | for a dynamic meeting space that accommodates up to 200 participants to engage and collaborate. |
| Video Conference | to provide a direct link to a virtual conference platform or service. |
None
When you choose "None" as the Experience Type, the section for images and videos will remain empty. This option is ideal for in-person sessions that do not require video or streaming, as well as for activities like breaks or networking events.Image
Sessions can be customized using the Image option as the Experience Type. This provides an opportunity to showcase posters and other graphics that help in sharing additional information and branding within the sessions page.
Adding a Featured Image to your Session
-
- Click into the session that you have added to the Sessions library
- Click on the Experience tab of the session
- Select the Image option from the Experience Type dropdown menu
- Upload an image that is under 24 mb and in ..jpeg, *.jpg, *.png, *.bmp and *.webp format
- Update the Image Background Color by selecting a color or entering a hex code
- Save your changes.

Pre-Recorded
The Pre-Recorded type can be used to embed an external Video from a Video Hosting website such as Vimeo, YouTube or Wistia or displaying a Video uploaded to your Video Library of Experience Manager directly in the session.
-
Embedding Video Using Video URL:
-
In the Experience Manager, locate the session in the sessions library where you want to embed your video.
-
Next, go to the Experience tab in the top menu of your session and select the Pre-Recorded option from the dropdown list.
-
Then, choose the Video URL option and paste the URL you copied from your preferred external video hosting site.
-
Finally, don’t forget to save your changes.
-

- Embedding Video from your Video Library:
-
In the Experience Manager, locate the session in the sessions library where you want to embed your video.
-
Next, go to the Experience tab in the top menu of your session and select the Pre-Recorded option from the dropdown list.
-
Then, choose the Video Library option and select the video that you want to embed into this session from the list of videos uploaded in your Video Library.
-
Finally, don’t forget to save your changes.
-

For more details how to manage your video uploads, please refer to this article.
EventMobi Studio
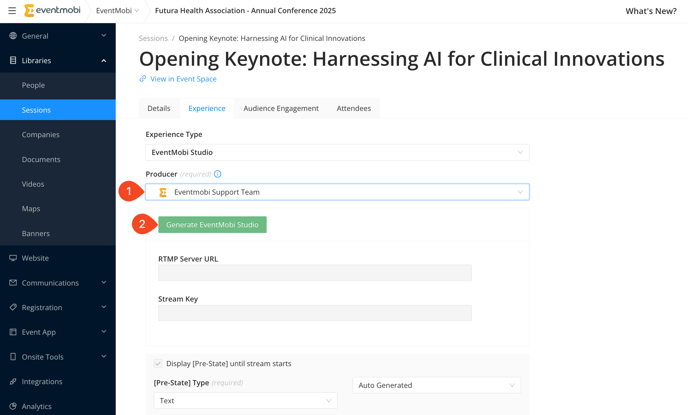
EventMobi Studio is a browser-based platform that lets you create a fully customized and engaging live stream experience, with features like branded visuals, dynamic layouts, seamless transitions, background music, and interactive content.
Steps to Set Up an EventMobi Studio:
- In the Experience Manager, locate the session in the sessions library where you want to use EventMobi Studio.
- Navigate to the Experience tab in the top menu of your session and select EventMobi Studio from the dropdown list.
- Assign a producer to the session (required to generate the studio). Note that only one producer can be assigned per EventMobi Studio session.
- Click the Generate EventMobi Studio button to create the studio and generate the RTMP Server URL and Stream Key.
- Save your changes to finalize the setup.

For more detailed instructions and step-by-step guides on setting up and using EventMobi Studio, please refer to our EventMobi Studio User Guide.
Custom Live Stream (RTMP)
The Custom Live Stream experience allows you to integrate an external RTMP stream into your session, providing flexibility for streaming content from other platforms or devices directly into your Event App.
Steps to Set Up a Custom Live Stream:
-
In the Experience tab, select Custom Live Stream from the Experience Type dropdown.
-
Click the Generate Custom URL button to automatically generate your RTMP Server URL, Stream Key and Video URL.
-
Once these are generated, click on the copy icon so that the content in the relevant field can be pasted into your live stream platform.
-
Click Save to apply your changes and finalize the setup of your RTMP stream.

Recommended Video Encoder Settings
If you are using software or hardware to mix and send your stream to our platform (i.e. OBS, vMix, Wirecast, etc.) then the following settings are recommended:
| 720p |
Bitrate: 3500 kbps Keyframe Interval: 2 seconds |
| 1080p |
Bitrate: 5000 kbps Keyframe Interval: 2 seconds |
For further information about RTMP, we recommend exploring the article.
Interactive Breakout Room
Our Interactive Breakout Room feature enables you to create interactive experiences where up to 200 participants can engage in two-way sessions, meetings, or activities, promoting connection and engagement between speakers, attendees, and other stakeholders at your Virtual or Hybrid event.
Interactive Breakout Rooms are perfect for:
- Post-session discussions with speakers or sponsors
- Workshops
- Brainstorming sessions
- Networking events
- Social activities
Steps to Set Up an Interactive Breakout Room:
-
In the Experience Type dropdown, choose Interactive Breakout Room to enable this feature for your session.
-
Choose Privacy Setting, by selecting Locked or Unlocked for your room’s privacy setting. Please be aware that the privacy setting cannot be modified after you save your changes.
- Locked: Attendees need to request permission to join and be approved by a Moderator assigned to this session in Experience Manager.
- Unlocked: Attendees can join the room without approval.
- Click Save to apply your changes and finalize the setup of your Interactive Breakout Room.

Additional Information:
-
Maximum Attendees: Each room can hold up to 200 participants. Only 24 can share video, while others will be represented by initials and can participate by voice.
-
Supported Languages: English, French, German, Norwegian, Portuguese, Spanish, Japanese. The language will match the Event App language settings.
-
Private Rooms: You can set the room as Locked for privacy, requiring moderator approval for entry.
-
Room Full: If the room reaches its maximum capacity, attendees will receive a notification indicating that the room is full. However, they can still engage in chat, participate in live polls, and Q&A, provided these features are enabled in the Audience Engagement tab of the session within Experience Manager. Please note that they will be unable to enter the room itself.
-
Moderator Controls: Moderators can mute participants, turn off cameras, spotlight specific participants, and manage screen sharing and recordings.
-
Breakout Groups: Attendees can be assigned to up to 20 breakout groups. Moderators can shuffle, assign, or group participants.
For more detailed information, refer to the Interactive Breakout Room Guide.
Video Conference
The Video Conference Experience type allows you to host interactive virtual sessions by linking to an external video platform, such as Zoom, Microsoft Teams, or any other conferencing tool. This enables a more engaging, two-way communication format where participants can actively collaborate and interact.Once set up, attendees will be directed outside the Event App to join the external conference.
A Join Now button or customizable text is provided for seamless access to the video meeting.
Steps to Set Up a Video Conference with URL:
-
Go to the Sessions Library in the Experience Manager and choose the session you would like to update.
-
Navigate to the Video Experience tab available at the top of the session page.
-
Select Video Conference from the dropdown under Experience Type.
-
Paste the URL of the video conference or meeting platform that you are using (e.g., Zoom, Microsoft Teams, etc.).
-
You can modify the Button Text to something more suitable, such as "Join Zoom," "Enter Meeting," or any text that fits your event's tone.
-
Click Save to apply your changes and finalize the setup of your Video Conference session.

Steps to Set Up a Video Conference with our Native Zoom Integration:
-
Go to the Sessions Library in the Experience Manager and select the session you would like to update.
-
Navigate to the Experience tab available at the top of the session page.
-
Select Video Conference from the dropdown under Experience Type.
-
Choose Integrations and then select Zoom.
-
Select either Meeting or Webinar from your Zoom account and pick the specific session you want to link.
-
Modify the Button Text as needed (e.g., "Join Zoom," "Enter Meeting," or something that matches your event's tone).
-
Click Save to finalize the setup and connect the session to Zoom.

For more detailed instructions regarding our native Zoom Integration, please refer to this article.
Additional Information:
-
External Link Redirect: When you provide a conference or meeting link, attendees will be redirected outside of the Event App to join the platform you're using. This ensures that interactive elements like video conferencing and collaborative features are accessible.
- Button Color: The color of the Join Now button (or your customized button text) is automatically set to match the Link color chosen in the Event Design Studio under Event Space Products. This ensures consistent branding and design throughout your event.
-
Embedding Videos: If your session has a video embedded directly (e.g., a live stream), you can’t offer both an embedded video and a meeting link at the same time. Instead, you should either:
- Embed the video in the session and provide the conference link as a clickable link within the session description.
- Or, use the External Link feature in the session's details tab to provide the meeting link.
Setting Up Pre and Post States
Pre State Image and Post State Image options are available for all experience types and are designed to help in addressing attendees before the session begins and after it has concluded.
By default, your Pre and Post Stream Images will display as a grey screen that includes text. For the Pre Stream Image, you will notice the session name, session date, and start time outlined for attendees before the session begins.
The Post Stream Image, by default, will display the session name and text indicating that the session has ended.
Default Pre State Image:

Default Post State Image:

To offer a fully branded, and custom experience to your attendees consider using one of the custom options such as Custom Text, Image or Video.
Custom Text:
To customize the text instead of using the default auto-generated options, select "Customized" from the dropdown menu after choosing "Text" for either the Pre or Post State Type. This action will open a Rich Text Editor where you can input your own text, add links, and incorporate images. Additionally, you can personalize the Background Color by entering a specific HEX code or utilizing the Color Picker tool for your desired shade.
Image:
You can upload an image up to 24 MB to align with your event's theme or your organization's branding. The required image size will depend on the display screen, but it must be at least 1200 x 675 pixels (16:9 ratio). Supported file formats include .jpeg, .jpg, .png, .bmp, and .webp.
Video:
A video can be used as a Pre-State or Post-State to enhance the session experience and engage attendees with additional content. The video URL must come from a supported hosting platform, such as YouTube, Vimeo or Wistia.
The recommended minimum resolution for the video is 720p to ensure a high-quality display across devices.

Link To:
You can also provide URLs for all Pre and Post State Types to guide attendees to relevant content before or after the session. To set this up, simply enter the desired URL in the 'Link To URL' field.

