Table of Contents:
- Video Tutorial: How to Create and Manage Sessions
- Creating New Sessions
- Linking Speakers and other Session Roles to Sessions
- Using Tracks to Organize Sessions
- Adding Experience Types to Sessions (Videos, Images, Live Streams)
- Displaying your Sessions in Agenda Sections
- Best Practices
- Settings & Troubleshooting
Video Tutorial: How to Create and Manage Sessions
Creating New Sessions
Manually Adding Sessions
You can manually add sessions through the Sessions Library of the Experience Manager
- Go to the Sessions Library: Navigate to the Libraries > Sessions within the Experience Manager menu.
- Click the Green "Add Session" Button: This will open a form where you can input session details.
- Fill Out Session Information: Input all necessary information such as the session title, description, speakers, and times.
-
Session Name: Choose a title for your session that will appear in the agenda of your app.
-
Date: Choose a date within your Event Date Range. Sessions cannot be scheduled outside of the Event Dates specified in Event Details.
-
Time Range: Select a start and end time. Sessions must conclude by the end of the same day (latest: 11:59 PM)
-
Location Type: Choose from "None" (no location needed), "Text" (descriptive text), or "Map" (link to a map uploaded in your Maps library).
-
Tracks / Sub-Tracks: If tracks already exist, assign one or more from the dropdown menu.
-
- Save the Session: Click Save & Continue to proceed to the session details page, or Save & Close to return to the Sessions Library.

Adding Information via the Sessions Details Page
After saving, you'll land on the Sessions Details Page where you can add:
- About: Use the Rich Text Editor to add descriptions, images, and other relevant content.

- Location: Enter descriptive text or select a location pin from an Image Map or Google Map uploaded to your Maps library.

- Tracks/Sub-Tracks: Select checkboxes for each relevant track in the dropdown.

- Roles: Link people profiles to assign session roles such as Speaker or Moderator.

- Documents: Connect documents from your Documents library so attendees can access presentation slides and other materials.

- External Links: Add links to relevant external websites like blogs or podcasts.

Managing Session Settings
Along with the above, you'll find two important settings on the Session Details Page:
- Session Access Control: Controls which attendee groups can see and access this session in the Event App. Attendees who don't belong to a permitted group won't see the session in their agenda or on linked pages (such as a speaker profile). Use this to keep VIP-only or member-exclusive sessions private.
- Session Capacity: Sets the maximum number of attendees who can register for this session. Attendees can see available seats and will be notified when the session is full.

- Allow Overlap: Choose Yes or No to control whether attendees can add this session to their personal schedule if it overlaps with another session they've already added.

- Visibility: Controls which attendees can see this session. The value will never be blank on export — it will show either All People or a list of specific People Groups (e.g., People Group A, People Group B).

Uploading Sessions Using Excel
Uploading multiple sessions in bulk using Excel can save significant time, especially for larger events.
- Download the Template: Go to the Sessions Library, click Import/Export, and then select Export Sessions. This downloads the Excel template.
- Fill in the Details: Add session titles, dates, times, and other information. The columns are:
- Session Name (Required): Choose a title for your session that will appear in the agenda.
- Description: Descriptive text for the session. Use HTML tags for formatting.
- Date (yyyy-mm-dd): Must fall within your Event Date Range.
- Start Time (hh:mm)*: Use 24-hour format (e.g., 14:00 for 2:00 PM).
- End Time (hh:mm): Use 24-hour format. Latest possible time is 23:59.
- Map: Enter the name of a Map from your Maps library. Leave blank if using the Location column for plain text.
- Location: Enter descriptive text or the exact name of a location pin from your Maps library.
-
- Speakers (External IDs): External IDs of speakers linked to this session, separated by commas.
- Moderator (External IDs): External IDs of moderators linked to this session, separated by commas.
- Attendee (External IDs): External IDs of attendees. This adds the session directly to their personal agenda in the Attendee Dashboard.
- Tracks: Enter the Track name to assign the session. For multiple tracks, separate names with a comma and space. For sub-tracks, use the format Track Name::Sub-Track Name.
- External ID: Leave blank for new sessions (the system will assign one automatically). For existing sessions, keep the existing External ID populated. External IDs cannot be modified or deleted once created.
-
- Allow Overlap: Enter Yes or No to control whether attendees can add this session to their schedule even if it conflicts with another session.
- Visibility: Enter All People to make the session visible to everyone, or enter one or more People Group names (e.g., VIP, Speakers) to restrict visibility. This field will never be blank in an export.
- Capacity: Leave blank for unlimited capacity, or enter a number to cap registrations for this session.

- Upload the File: Return to the Sessions Library, click Import/Export, then select Import Sessions to upload your file.
- Check for Errors: The system will notify you if any issues arise after import. Do not modify the structure of the template (e.g., deleting or rearranging columns), as this will cause errors.
🔍 If a column is left blank on import, the existing value is preserved — blanks do not wipe data.
✅Session edits made in Excel round-trip cleanly through export and re-import. Edit in place, re-upload, done.
Linking Speakers and Other Session Roles to Sessions
Linking Individual Speakers/Session Roles
Speakers can be linked to sessions one at time directly within the Sessions Details Page.
- From the Sessions library, click into the relevant session.
- Scroll to the bottom, click Add Speaker and enter the speaker’s name in the field.
- Click on the speaker from the list that appears.
- Click Save Details

Linking Speakers and other Session Roles in Bulk Using Excel
You'll need to export both your People list and your Sessions list first.
- Navigate to the People library and click Import/Export > Export People to download the template. Note the External ID column. If you haven't added your speakers yet, you can fill out the People template at this point.

- Navigate to the Sessions library and click Import/Export then Export Sessions to download the People template. Note the Speaker column.

- For each session, take the relevant speakers' External IDs from the People spreadsheet and paste them into the Speakers column of the Sessions template, separated by commas and a space (e.g., 1, 2, 3). Save when done.

- Go to the Sessions library, click Import/Export > Import Sessions > Choose Files, and select your updated file. A green confirmation box will appear showing how many records were updated.

Adding New Session Roles
"Speakers" and "Moderators" are pre-defined for every event and cannot be removed, but they can be renamed. You can also create additional roles without any limit — click Add Role, enter the name, and click Save.

⚠️If no individual profiles are linked to a session role, that role won't appear on the session page in the app.
Re-Ordering Session Roles
To set the display order for Roles across all sessions, select Re-Order Roles in the Sessions Library and drag roles into your preferred order. Click Save Order to apply.
People added to session roles appear in reverse chronological order by default, but you can customize this by dragging and dropping them into the order you want within the Event App.

Is it Possible to Change the Order of Session Roles for Individuals within a Session?
People that you are adding to session roles will appear in reverse chronological order by default, however, this order can be customized by simply dragging and dropping each person into the order that you wish it to display within the Event App.

Tracks categorize sessions and help attendees find content relevant to their interests.
- Click Add Track, enter a Track Name, and choose a Track Color.
- If needed, create sub-tracks within the main track.

- Save the session.

- Export your current sessions from the Sessions Library via Import/Export > Export.
- In the Sessions Excel template, enter track names in the Tracks column.
- For sub-tracks, use the format Track Name::Sub-Track Name.
- Upload the modified file back via Import/Export > Import.

Reordering Tracks
- Go to the Tracks tab in the Sessions Library.
- Click "Reorder Tracks"
- Drag and drop tracks into your preferred order.
- Click "Save Changes"
Adding Experience Types to Sessions (Videos, Images, Live Streams)
Each session can have an Experience Type assigned to enhance its content. The default is "None." To change it, click into the session, go to the Experience tab, and select an Experience Type from the dropdown (options include Image, Pre-Recorded, or EventMobi Studio).
For details on each Experience Type, see this article.
Displaying your Sessions in Agenda Sections
When you create an event, a default Agenda Section appears under Event App > Menu Sections. It displays all sessions from your Sessions library, visible to all users.
To modify it, click Edit next to the Agenda section, make your changes in the popup, and click Save.
Note: Access Control settings override Agenda Section filters. If a session is restricted to a specific group, only members of that group will see it — even if the Agenda Section is set to display all sessions.
When editing an Agenda Section, you can adjust:

When editing an Agenda Section, you can adjust the following details:
|
Setting |
Description |
| Section Icon | Choose an icon for the section in the Event App menu. Use the search bar to explore all available options. |
| Section Name |
The name that appears in the left-hand menu. |
| Section Content |
Select "All" content or filter by "Specific Tracks." |
| Section Visible to | All users, or restricted to specific People Groups. |
| Hide Section |
Toggle visibility of the section in the Event App menu. Hidden sections are not accessible to any users. |
-
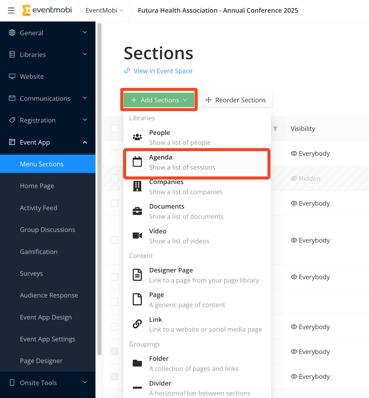
To add a new Agenda Section, click Add Sections, select Agenda from the dropdown, fill out the details, and click Add Section.
Best Practices:
Reordering Sessions in the Agenda
Sessions sort in this exact order:
- Date
- Start time
- End time
- Track order
- Alphabetical order

This logic cannot be customized per event, but you can adjust the sorting variables to control the outcome.
Example - Adjusting Session Titles:
Prefix titles with numbers to force a specific order (e.g., 1. Dendrology 101, 2. Anthropology 101, 3. Biology).
- 1. Dendrology 101
- 2. Anthropology 101
- 3 Biology 101
Example: Adjusting Start Times Using Excel
Add seconds to start times to control order without visible changes. Only hours and minutes display in the Event App, so 10:00:00 vs. 10:00:01 won't be visible to attendees. Set the cell format to "Text" when entering seconds. Apply this only after finalizing all session details, as edits in Experience Manager may overwrite seconds added via Excel.
- Set Dendrology 101 to start at 10:00:00.
- Set Anthropology 101 to start at 10:00:01
- Set Biology 101 to start at 10:00:02, and so on.
Tip: Only the hour and minute are displayed in the Event App, so these second-level adjustments won’t affect the visible start times.

Cell Formatting: When entering seconds for your session's start time, set the cell format to "Text" to ensure accurate recognition and ordering.
Important: Note that seconds will not be visible in the Experience Manager or Event App, and any changes made in the Experience Manager may overwrite the seconds entered via Excel Import. Therefore, apply this method only after finalizing all session details.
Creating Hidden Sessions for Selected Attendees
Three Approaches:
- Session Access Control: Restrict visibility to specific People Groups. Only members of those groups will see the session in the agenda or on linked pages.
- Personal Schedules: Assign sessions directly to specific attendees without displaying them in the app for everyone. See How to Create Personal Schedules.
- Agenda Sections with Specific Tracks and People Groups: Update the default Agenda Section to display only sessions assigned to specific tracks. Ensure private sessions are assigned to tracks not included in any public Agenda Section.

Read this article to learn How To Create Personal Schedules.
Defaulting to Today's Sessions in the Agenda
Agenda sections default to today's date if sessions are scheduled. During your event, attendees automatically see that day's sessions. An On Now option highlights sessions currently in progress.
If you're outside the event dates or there are no sessions scheduled for today, the Agenda defaults to the first day of scheduled sessions.

Note: If you are accessing the Event App outside of the event dates and/or if there are no scheduled sessions for today's date, then the Agenda section will default to the first day of scheduled sessions.
Set Session Capacity for High-Demand Sessions
Workshops and breakout sessions often benefit from limited seating. Setting capacity manages expectations and avoids overcrowding.
You can combine Session Access Control with a capacity limit. For example, a "Leadership Training" session could be visible only to managers and capped at 50 seats.
Leave the Capacity field blank for unlimited attendance, or enter a number to set the limit.

Settings & Troubleshooting
Handling Data Set Too Large Issue in Export
If many attendees have built personal schedules and you export your sessions list, you may see DO-NOT-MODIFY - Data set too large in the Attendee column. This appears when the total character count in that column exceeds Excel's 32,767-character limit.
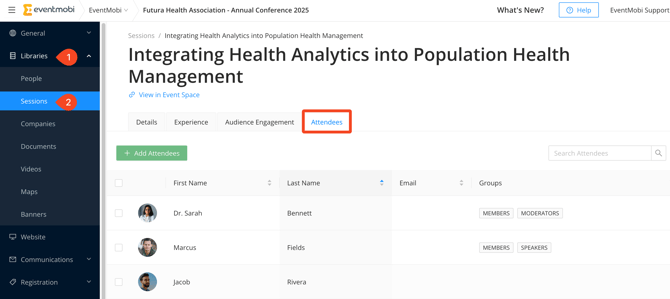
Do not edit those cells — doing so will overwrite existing personal schedules. To make changes to personal schedules for these sessions, go to Experience Manager, open the session, and use the Attendees tab to adjust manually.
Any modifications made to cells marked with "DO-NOT-MODIFY - Data set too large" in the Sessions Excel template will overwrite existing personal schedules, resulting in the loss of previously saved content.
Removing "Add to Your Schedule" and "Tweet from this session"
Add to Your Schedule: Navigate to Event App > Event App Settings and uncheck Allow attendees to manage their own schedules. Organizers can still assign or remove sessions from attendees' personal schedules, and attendees can still view their personal schedule through the Attendee Dashboard.

Tweet About Session:
In the same Event App Settings area, uncheck Allow attendees to tweet from session to remove the "Tweet About Session" button from the session details page.

Session Not Appearing in the Event App
Double-check the Access Control settings. The attendee may not belong to a group permitted to see the session.
Sesssion Capacity Has Been Reached
Once a session hits its limit, attendees will see it marked as full. To expand capacity, update the Capacity setting for that session in Experience Manager.