
Libraries
Libraries can be seen as a central point where data can be collected for all of your products to use. The type of data that you are working with will depend on the library that you will need to import it to.
People
This library is a place where you can upload all of the relevant information that will need to be included in profiles within the Event Space, such as Attendee, Speakers, and Staff. These people can later be displayed within specific sections you have established for your Event Space product.
Sessions
The Sessions library is where you will add the information that will be used to create your Agenda. In addition to this you can create Tracks that will allow you to organize the sessions you are including in the Event Space, and to assign roles for the sessions you are displaying (i.e. Speakers and Moderators).
Companies
This library is where you will want to add in the relevant information to create profiles for any Sponsors, Exhibitors, Partner, Vendors, etc. that you will need to promote and highlight on the Event Space. In addition to creating profiles, you will have the option to establish Groups to organize them according to such things as sponsorship tier, or product type.
Documents
The Documents library is where you will want to upload any relevant resources that should be made accessible to your users through the Event Space. These files can also be organized into Groups which you can later assign to display in sections you have created within the Event Space.
Videos
The Videos Library offers you access to manage video content that you have shared, or plan to share through the Event Space. In addition to providing you with access to your Live Stream recordings (using the Custom Live Stream or EventMobi Studio Experience Types), you will also notice an Uploads tab where you can add video content for your event.
Maps
This library allows you to host any image and Google maps that will need to be referenced within the Event Space.
Surveys
In this library, you will have access to create and edit any event and session feedback surveys that you wish to use at your event.
Page Designer
The Page Designer provides you with all of the tools that you need to create incredible custom designs with ease - no design experience required.
Products
The Products section of Experience is where you will have access to build, customize and manage the relevant products you have purchased for your event such as:
- Event Space
- Badge Designer
- Gamification
- Audience Response
- Live Display
- Announcements
- Check-In
- Lead Capture
- Integrations
An arrow icon will indicate when a dropdown menu is available, and can be used to access additional areas related to the product. These areas allow you to build out or update various features.
-1.png?width=190&height=646&name=Screenshot%20(9)-1.png)
Adding Data From Your Library To Sections
Libraries may be a great way to add and organize your data, but Sections are how you will determine where this data is displayed in the Event Space.
Adding Data From Your Library To Sections
A Sections area can be found within the Event Space option of your Products list. In this area you will find a set of Sections that have been created by default on the Event Space, and which can be edited, hidden or displayed according to your preference. Additional Sections can also be created using the Add Section option at the top left hand side of the page.
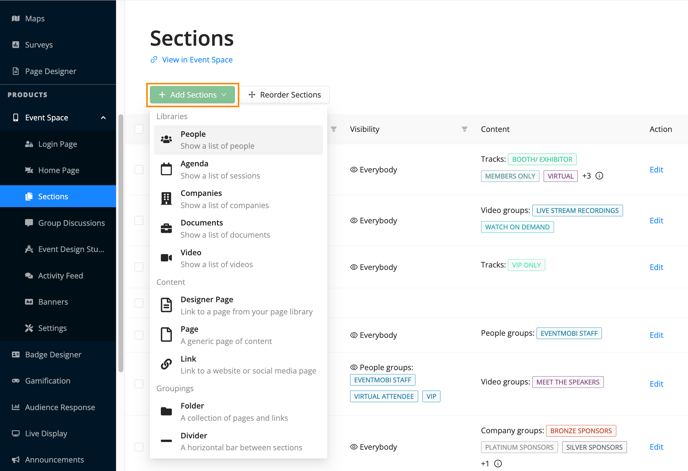
Clicking into an existing Section will allow you to update the Section Name and Icon, as well as determine if All or Specific data should be included in the section you are working with. You also have the option to determine the visibility of this section in the Event Space. You can choose to make it visible to everyone or specific people groups.
-3.png?width=688&height=557&name=Screenshot%20(10)-3.png)
Section Types
When creating new sections, you will want to consider what type of data you are looking to display.
People
People sections are used to display profile information, typically those of your Attendees and Speakers.
Agenda
The Agenda section type is used to display sessions and tracks that are relevant to the schedule established for your event.
Companies
Company sections are intended to display profile information for companies that may be exhibiting, sponsoring, or participating in your event at some capacity. These profiles can also be organized into groups to display such things as sponsorship tier and product type.
Documents
This section type is intended to provide access to resources that your users will need to reference for your event. Although groups can be established, keep in mind that they are not meant to act as categories within the app, but instead as a method to organizing your files so that you can display them within specific sections later on.
Videos
Video sections are a powerful tool to showcase your event's video content. With the Video section, you can easily display and organize uploaded videos or recorded live streams within your Event Space and can be organized in groups.
Designer Page & Generic Page
Page Sections & Designer Page Sections are an effective way to share event relevant information, either over a simple text page or by getting a custom designed page over EventMobi’s page designer.
Link
Adding a Link section establishes a direct link to a URL from the Event Space menu. You can also direct users to a specific page within the Event Space by using the web browser to copy and paste the page's URL into this section type.
Folder
To include non-library information and links, you can utilize the folder section. This section provides the flexibility to incorporate a combination of pages and direct links. For more information on how and when to use folder sections, please refer to our Knowledge Base.
Divider
The last type of section is the divider, which is used to visually separate different sections of the menu for better organization and clarity.