Jump to..
Adding Widgets to Your Designer Page
Previewing & Saving Your Design
A well designed Event App can make all of the difference when it comes to establishing your branding, and in setting the tone for your event. Design can help in making your event technology look professional, it can help in creating a wow-factor with your attendees, and it can help you to improve the user experience for your event - especially for virtual events that rely heavily on using technology to direct attendees to sessions, companies and/or people.
The Page Designer provides you with all of the tools that you need to create incredible custom designs with ease - no design experience required.

Creating Your Designer Page
Visit the Page Designer area located in the Event App menu of your Experience Manager to begin building out a page for your Event App. You can select the default Home Page option available, if applicable, or select the New Page option to create a new one.

When creating a new page, you will be asked to input a name so that you can easily reference each page when it comes to editing or assigning it later on. Once the name has been entered, you will have the option of selecting the Template Type that you would like to work with.

General Templates will offer you the best experience when building out an Event App for virtual or hybrid events, as they are optimized for desktop but can also be adjusted for mobile devices.
Mobile-Focused Templates on the other hand, are best suited to in-person events as they are optimized specifically for mobile device users.
With each template type, you will find a few options available to help you in getting started, or you can choose the Blank template option to create your own design from start to finish.
Designing Your Page
Adding a Banner can help to set the tone and theme of your event - since this image is located at the top of the Page, it is one of the first things that your attendees will see when they access it. Using this prime real estate can help you to display your branding and logo to make the Designer Page look customized and professional.
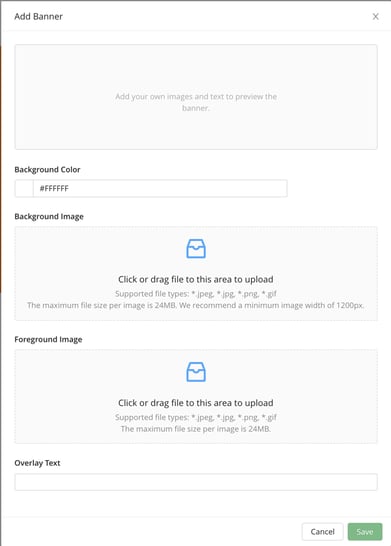
When creating your Banner, you can choose to include an image and/or color to display. When both
options are included, the background color will help to fill in any spaces that are not covered by the image that you are using.
The Foreground image will display over the background image or color that you have selected - this image is a great place to include important details such as the event name, event dates, the timezone the event will take place in (virtual events), etc.
If the image that you are using does not include all of the text that you wish to include on the Designer Page banner, simply use the Overlay Text option to include these details.
To update or edit the Banner, simply hover over the Banner area, and select the pencil icon that appears in the menu displayed.

To customize the Event App even further, consider adding a custom Background colour or image to extend the design further down the Designer Page.
If you are adding an image as your background, you can further customize it by selecting if the image should fill the screen, appear as tiled, or if it should stay fixed (to avoid it from scrolling with the content).

The background for the Designer Page can be edited using the Edit Background button found to the top left-hand side of the page.

Adding Widgets To Your Designer Page
Widgets allow you to create an intuitive user experience that helps to guide attendees to where they need to go to actively participate with your event - whether it is directing them to a virtual session, highlighting your speakers and stakeholders (sponsors and exhibitors) or encouraging them to join in on your event game or active discussion groups.
The Page Designer is already set with some default options for you to use or edit as needed, based on the template that you have selected.
To the top left-hand side of the page you will find a button to Add Widget where you have the option to add more widgets, or incorporate other types of widgets into your Designer Page.

To determine which widget is best suited for your event, use the following guide:
Banner: Add a banner image or color to help in creating sections on your Designer Page.
Tip: To set a transparent background color on certain Widgets such as Banner, Image, remove the background color, you just detente the color HEX code and save
Image: Use an image to direct attendees to a page, section or website where they can find more information.
Text Block: Incorporate a block of text within the Designer Page that will help you to provide additional details to attendees. This option works great for sharing a brief bio or description when needed.
Button: Create a button that will help direct attendees to a section in your Event App, or a website that they will need to visit. This options is ideal when it comes to directing attendees to your livestream or main stage.
Video: Embed a video URL to share video content directly from the Designer Page.
Countdown: Create a countdown to the start date and time of your event. You can also set an action to take place once the countdown is complete.
Gamification: Display a mini leaderboard to showcase the top 3 players of your game, outline the standing and points of the user, and provide direct access to your event game from the Designer Page.
Google Map: Display a map to showcase where the event venue or your company headquarters are located.
Space: Include white space on the Designer Page to help in breaking up your widgets.
Note: The Personal Agenda, Gamification and Group Discussion widgets can only be added once to the page.
Widget Limitations
| WIDGET TYPE | MAXIMUM NUMBER OF WIDGETS |
| Banner | 30 |
| Image | 100 |
| Google Map | 5 |
| Countdown | 10 |
| Agenda | 1 |
| Gamification | 1 |
| Group Discussion | 1 |
| Space | 100 |
| Video | 10 |
| Rich Text | 100 |
| Button | 30 |
Editing Widgets
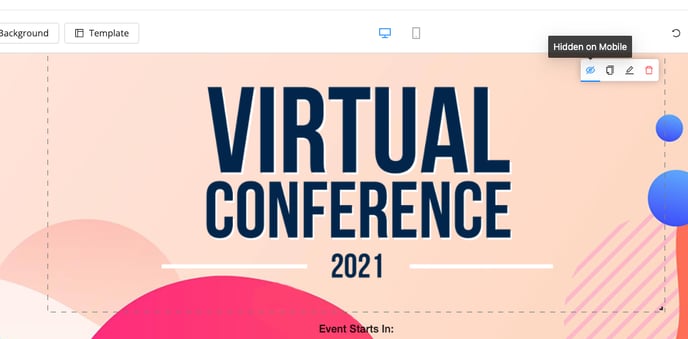
Hovering over any widget on your designer page will produce a menu that will provide you with the following options:
- Eye Icon to hide or show a widget from the mobile version of the Event App
- Copy Icon to duplicate the widget
- Pencil Icon to edit the widget
- Bin Icon to delete the widget
Previewing & Saving Your Designer Page
Changes that are made to the Page Designer will display as they will appear on the Event App you are working on. At the top center of the page you will notice an icon for Desktop and Mobile that will help you to see how the design you have created will appear on both device types.
Note: If you have selected a Mobile-Focused template, then these icons will not be displayed as your design will be optimized for mobile only.
Your Event App will still be accessible via desktop if needed, but the design will not be optimized for this device type.
To create a better mobile experience for your attendees, visit the Mobile view to move and resize the existing widgets as needed. (Note that a maximum of two widgets can be placed side by side on the Mobile view).
Once your changes have been applied you can choose to Publish or Discard the updates that have been made to your Designer Page. In the event that another organizer has made changes to the Page at the same time that you were applying your updates, a warning will be provided before publishing.

Assigning Your Designer Page
Once your page has been saved, you can then assign it to display as the Home Page or as a Section page in the Event App.
Assigning Your Designer Page as the Home Page
To use a Designer Page as the Home Page of your event, visit the Event App menu of the Experience Manager and select the 'Home Page' option available.
On this page, you will find a dropdown menu where you can selection from the Designer Pages that you have created.

Assigning Your Designer Page to a Section
To use a Designer Page as a Section in the Event App Menu, visit the Menu Sections area instead. In this area of the Experience Manager you will find an Add Sections button where you can select Designer Page as the section type.

On the pop-up that appears, you can customize the Section Name and Icon in addition to a drop down menu where you can select the page that you would like to use. You can also set who the Section is visible to to determine who sees the section available within the menu after logging into the Event App.
