

Jump too..


Producing a Session
The EventMobi Studio makes it very easy to upload the assets that are needed and adjust how the livestream looks in real time. Everything that is available to you in the EventMobi studio can be uploaded in advance, and ready to go on the day of the event.
We will go over some best practices that will help you to offer the highest quality presentation possible. As the Producer, you will have full control over the look and feel of the live stream as well as how Speakers will be able to present during the livestream.
It is important to note that since the session is being streamed through RTMP, a 20-30 second delay will occur between the Livestream Studio and the EventMobi session itself.
Make sure to consider this delay before ending the livestream.
Joining Your Session
Automated Invitation
When you're assigned as a Producer for a session, you will be automatically sent an email from the organizer inviting you to produce their session.
This email will confirm your role in the session, the date/time, a brief description of your features and a call to action that will take you right to your session.
Joining The Studio
When you get to your session, you will find a Join Studio as Producer button. Clicking this will open a new tab that brings you right to the studio will be producing this session from.
Themes & Live Stream Quality
Now that you know how to change the theme and colors of any names and captions, let's go over the available options and how each one will display.
Default
Default theme will a great option to use as a general banner throughout the presentation. When you only have 1 speaker being live streamed, you can also use this as a lower third to display their name and title. The Primary color that is set in the graphics, will apply to the far left portion of the lower thirds and Primary Text of the caption that you enter.
News
News is very representative of its name, it is best utilized for news or something that you want to call great attention to. When your session is running late, or you have a special guest - this will be your best option! The Primary Color defined in graphics will apply to the entire lower thirds and Primary text area of the caption.
Rounded
Rounded is a nice option to add fun messages throughout the messages as it doesn't carry a formal tone like Default & News. This will be great to highlight gamification codes or any exciting news throughout the presentation. The Primary color set in graphics will apply to the background of the lower thirds and the back layer of the primary text and background of any secondary text that was entered in the caption.
Settings
The Settings area is where you will control your personal camera, microphone settings, as well as the Live Stream Quality located under the Advanced Settings. This is where you will have the ability to lower the stream quality in the case that you, your speakers, or attendees cannot handle the bandwidth of the stream.
Speakers will also have this option but will only control their video, audio input, and personal video resolution. Their advanced settings controls the advanced microphone settings such as stereo and background noise cancellation - the producer cannot control these settings for each speaker.
Video Input 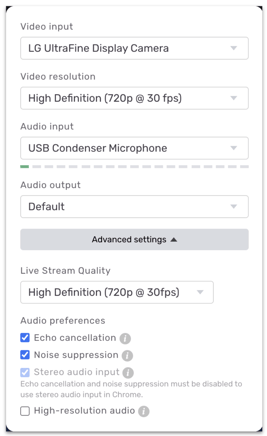
This is your camera that will be recording you. By default it will try to select the default camera you have setup on your computer but this may need to be adjusted this if you have a webcam on an external monitor from the dropdown.
Video Resolution
This is the video resolution of the camera. This can be updated in real time in the case that the speaker's internet can't handle the 720p quality.
Advanced Settings
This dives down into more options to provide better sound quality with stereo microphone and noise cancelling options. Only producers will see Live Stream Quality option.
Manage Speakers
Add Speakers
As a producer, you have full control over what is and isn't visible in the live stream. On the left hand side, you will see all the speakers that have joined the studio, here you can see a preview of their camera, internet connection, update their name, and remove them.
Adding and removing speakers from the live stream is as easy as toggling their feed on or off. There will be built in animations that will make the transition smooth and effortless to ensure your live stream quality is not affected by the change.
Rename/Remove Speaker
If you notice someones name is incorrect or maybe cut off due to having too many characters, you can change their name with the 3 vertical dots
Volume Control
It is proven that attendees will leave sessions that have bad audio or large irregularities in the audio of live presentations.
The volume slider located on each speaker allows you to adjust the volume of each speaker to keep the sound levels consist across the presentation. If one speaker is louder than another speaker, you can level out their volume so that they are similar volume to avoid audio issues.

It is important to note that the only thing you can't control is the audio from Video Clips, the volume of this will be adopted from the video file that has been uploaded.
Manage Presentation
Add Source
The two sources you have the ability to add is a Local Video that you upload from your computer or Background music, you can choose from a list of pre-uploaded background music.
Adding a source gives us the option to upload a local video to the session or play background music that is automatically uploaded by the Livestream studio.
To add a Local video, you will just need to select the video that has been uploaded to your computer. You will then see the video located in your feed options on the left.
Local video and Video Clip will look similar for attendees but have a very important element that makes them different. Local videos will depend on the hardware of the device you're using and your internet connection as it is streaming right from your device. Video clip will be less demanding as it is streamed through the studio (and has 300mb video limitation to add up to 10 videos).
Recommended Hardware:
Desktop: i5+ Processors
Laptop: i7+ Processors
It is very important to abide by the recommended hardware as you run the risk of lowering the quality of the live stream due to diminished local video quality.
Background music will give you royalty free options to select from depending on the genre and mood you would like play in the background of your live stream. Once it is selected, the song will show up in the left hand menu with your speakers to control the volume and remove/add to the live stream whenever you wish.

Private Chat
When someone messages throughout the live stream, the private chat window will automatically open up to let you know that someone is typing in there. This message does not create any sound and will allow anyone in the room to communicate freely throughout the session.
When you're done messaging, you can collapse the private chat to remove it from your screen.
Layouts
One of the best features of Livestream studio is the ability to quality re-orient the speakers layout by using the templates below the presentation feed.
We will go through each option and what it does to the presentation when selected.
Contain
The first and most likely most popular option will be Contain. This will put all speakers that are live in a nice grid and expose the background image that has been uploaded.

Cover
Cover will bring the feeds to the forefront and cover the background. When you have multiple speakers, this will resemble new casters where they have multiple feeds side by side.

Half Screen
Half screen will expand the left half of the screen to show a feed more predominately over the other feeds. This will generally have 2 people stacked on the right and one taking the full height of the left feed.
It doesn't work great for presenting slides.

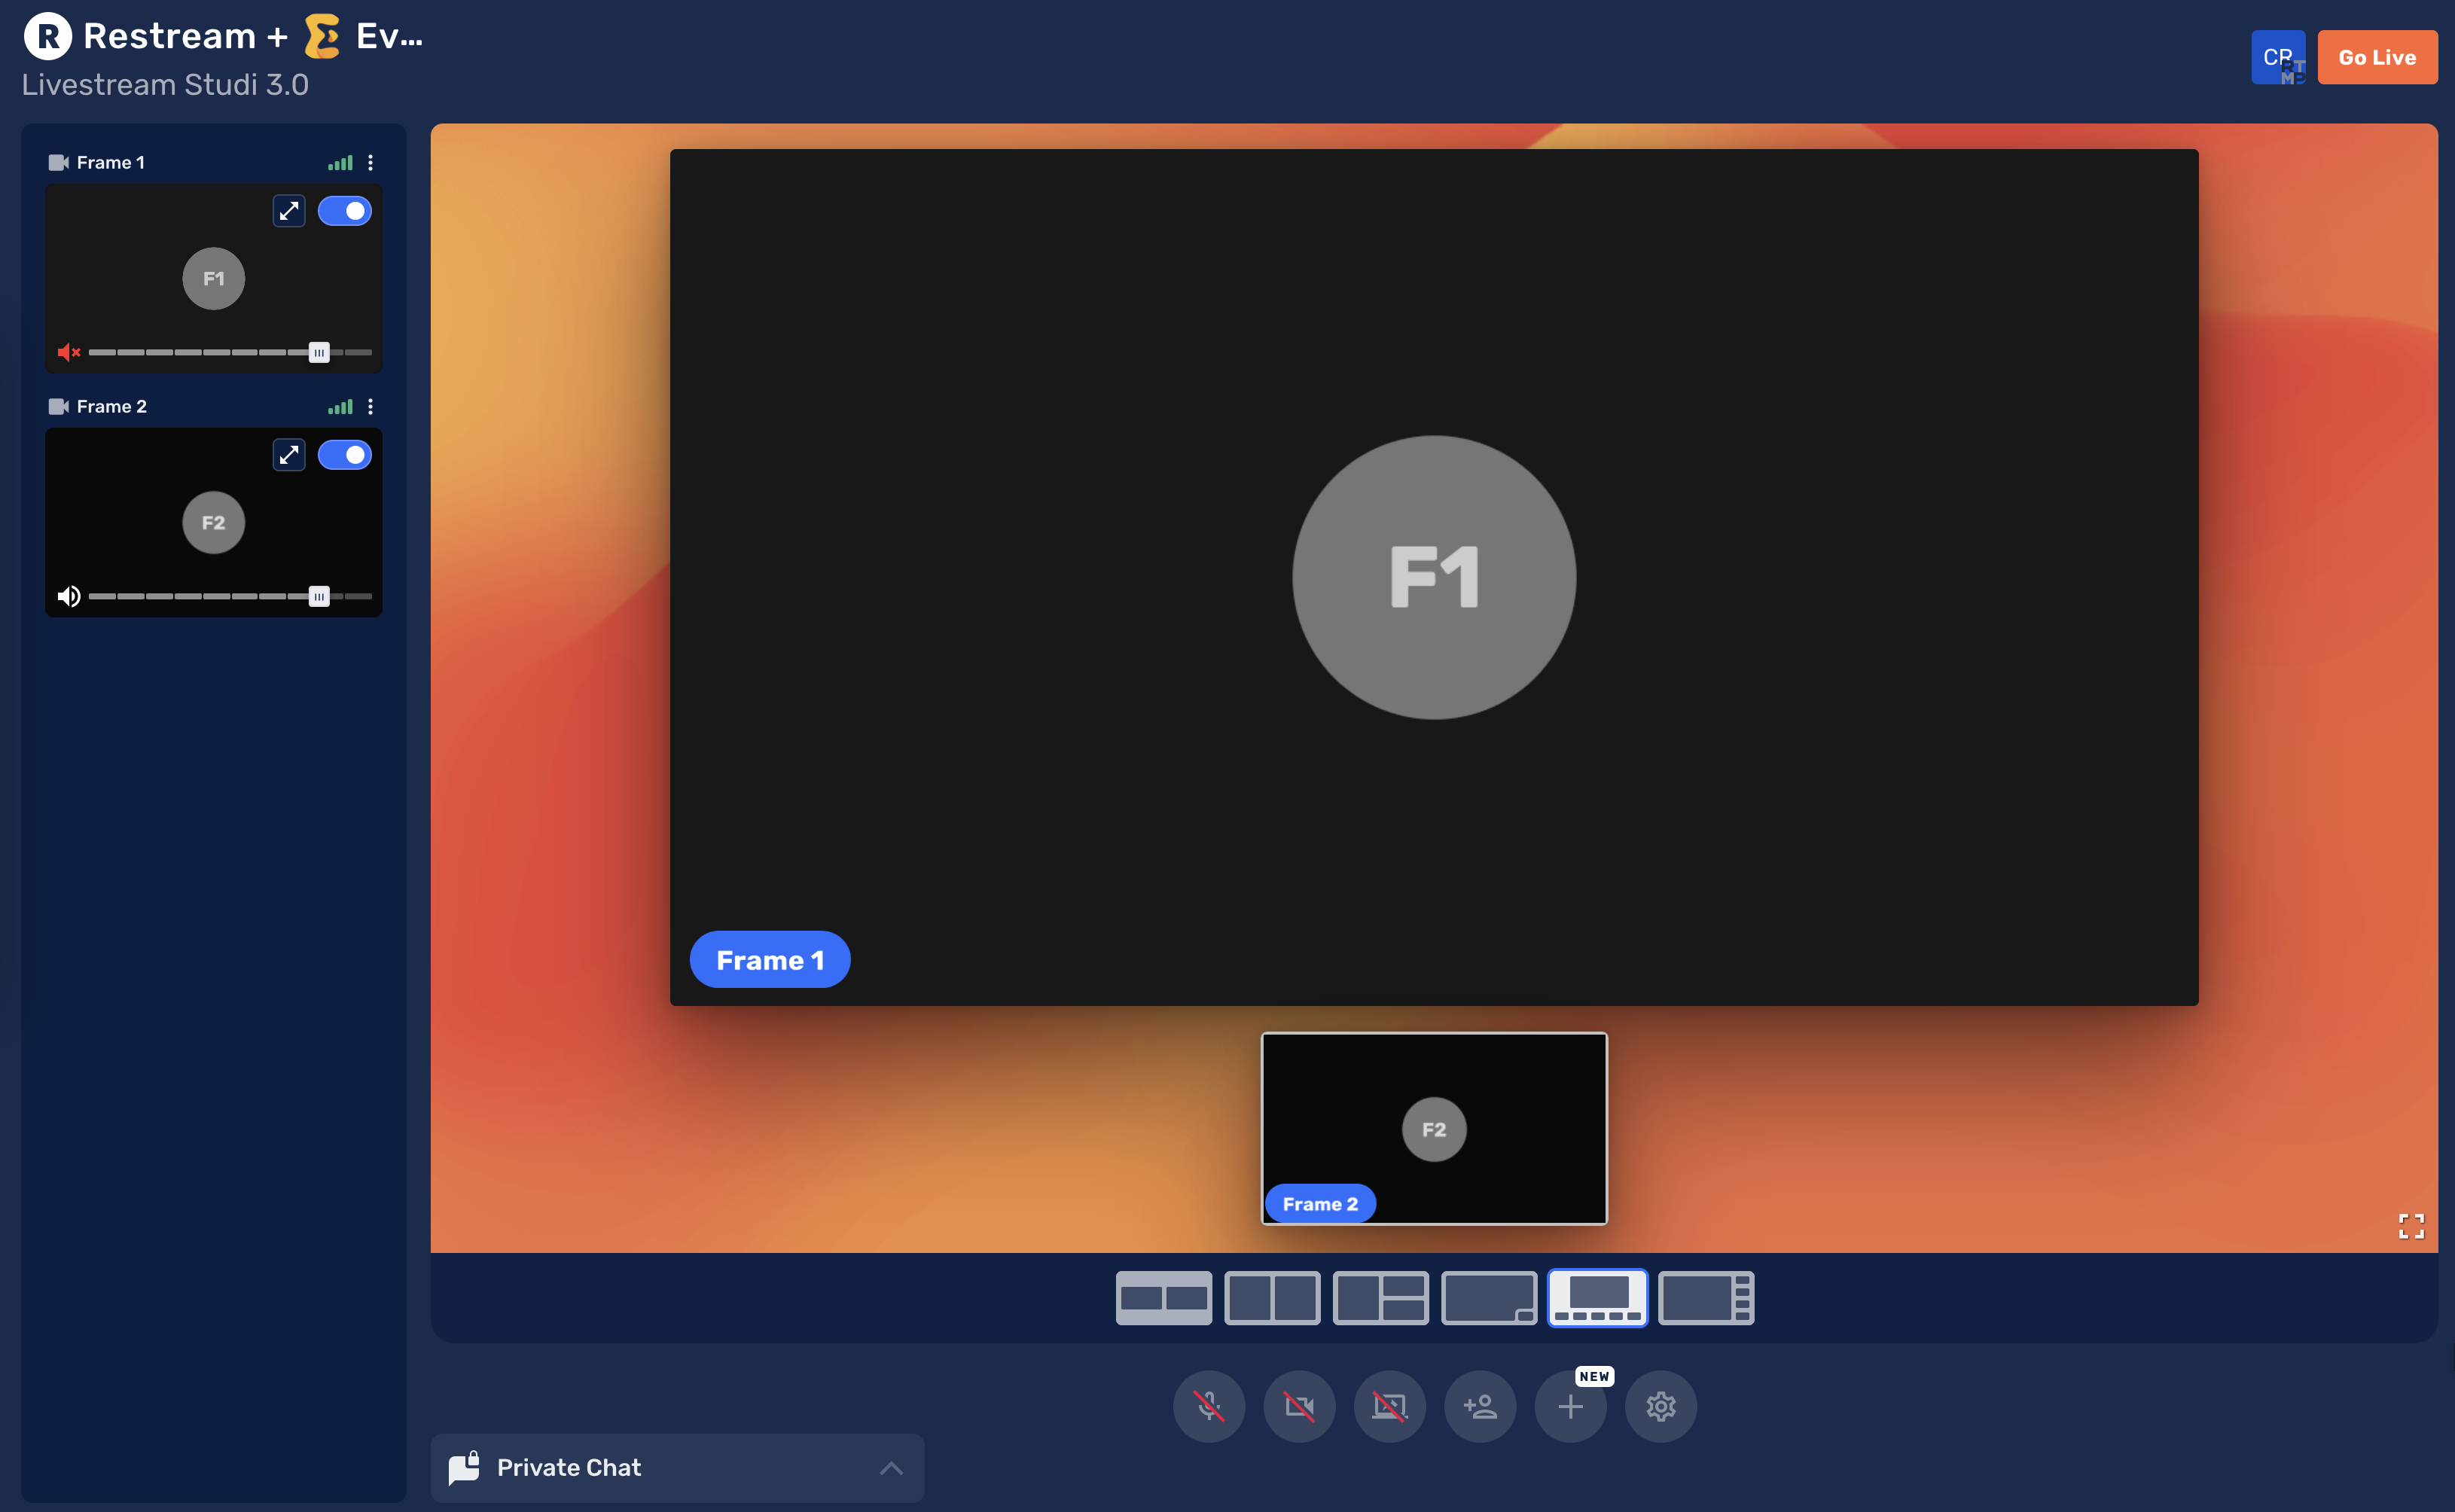
Picture-in-Picture
This is the most ideal for 1 speaker and 1 presentation as it will enlarge the presentation and show the speaker at the bottom right. This is a very similar presentation orientation to what Zoom provides and is just a great way to put full focus on the presentation as far as it can go and still show the speaker presenting.

Cinematic
Cinematic will anchor a feed to the top of the page and shrink the other feeds to go under the main feed. This will be great for presentations with multiple speakers and is an alternative to the Thumbnail layout.
Thumbnail
The final option is thumbnail. This view is great for highlighting a presentation and your speakers will be stacked on the right side and viewable at the same time.
This view also is the default to the first three layout options as they're not optimized for sharing screen. This becomes the share screen default for:
- Contain
- Cover
- Half Screen

Adjusting Layout
When you add speakers into your live stream feed, they will be automatically added in the order that you have toggled them into the room. If you would like a specific order for your speakers and presentations, you can easily drag and drop them into different locations in the live stream and it will update in real time to where you would like them to be.
Playing a Video Clip will take over the entire presentation and mute all speakers. When the clip completes, your presentation will return to the original layout that was set before the video started.
Going Live
The final step once all your participants are ready and in their respective positioning in the live stream, you're ready to Go Live! This is done by clicking the red Go Live button located at the top right of the livestream feed.
-gif.gif)
You'll know you're live when you see a live notification at the top left of the live stream with a live counter of how long you've been streaming into the session. Once the session has completed, you will click End Stream to end the session.
It is important to give a 20-30 second buffer before ending the stream to give time for the live stream to catch up in the session. There is a delay between your EventMobi studio presentation and the live stream in the session.
You can play a Video Clip for the last 20 seconds of the livestream to fill that buffer.
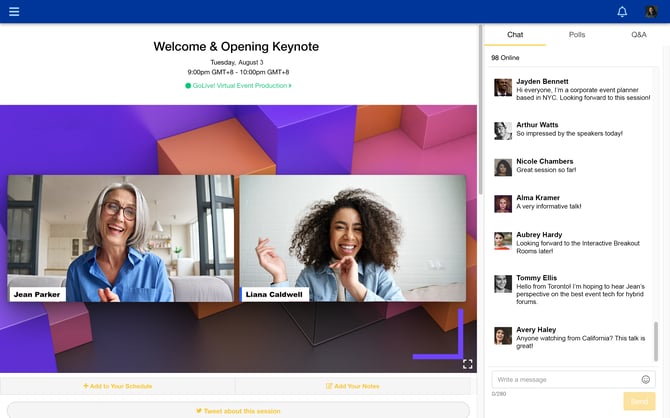
You're live!
Now that you've gone live, your feed will look similar to this inside of the EventMobi Session. If enabled, attendees will be able to live chat, answer polls, and participate in Q&A!
Download Live Stream
Every session streamed through EventMobi Studio is automatically recorded and saved to the studio to be downloaded in MP4 or MP3 file formats. Once you end the stream you will see Event Stream, this will cut the live stream connection into the Event App, once completed, your video will begin preparing for download.

Once the video is done preparing, you will then see Download recordings option. This will download the last video that was live streamed. You will see list of all the videos you've created when going live. Since all sessions that go live are being recorded and you can go live multiple times in one session - you can find all recordings you've created.

