![]()
Table of Content:
Learn how to design your Registration Website in this article!
1. Registration Details
The Registration Details section is where you define the foundational settings for your event's registration process. Below are the options and settings available in this section:
General Settings
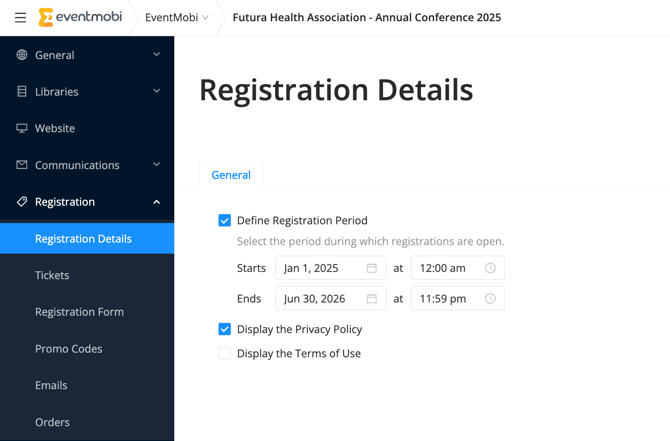
Define Registration Period
Set the time frame during which registrations will be open. This ensures attendees can only register during the specified dates and times.
-
Start Date and Time
-
End Date and Time
It is important to note that the Registration Period adheres to the Event Time Zone specified in the Event Details section of Experience Manager.
Display the Privacy Policy
Enable this option to display a link to your event’s privacy policy during the registration process. This is an important step to ensure transparency about how attendee data will be used.
Display the Terms of Use
Activate this setting to include a link to your event’s Terms of Use. This allows attendees to review the terms before completing their registration.
Must Accept Terms of Use Before Completing Registration
When enabled, this setting requires registrants to acknowledge and accept the Terms of Use before they can finalize their registration. This ensures compliance with your event’s policies and agreements.
The content for the Privacy Policy and Terms of Use can be configured within the Privacy & Terms located in the General area of the Experience Manager.
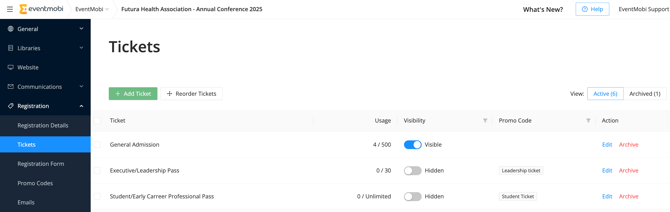
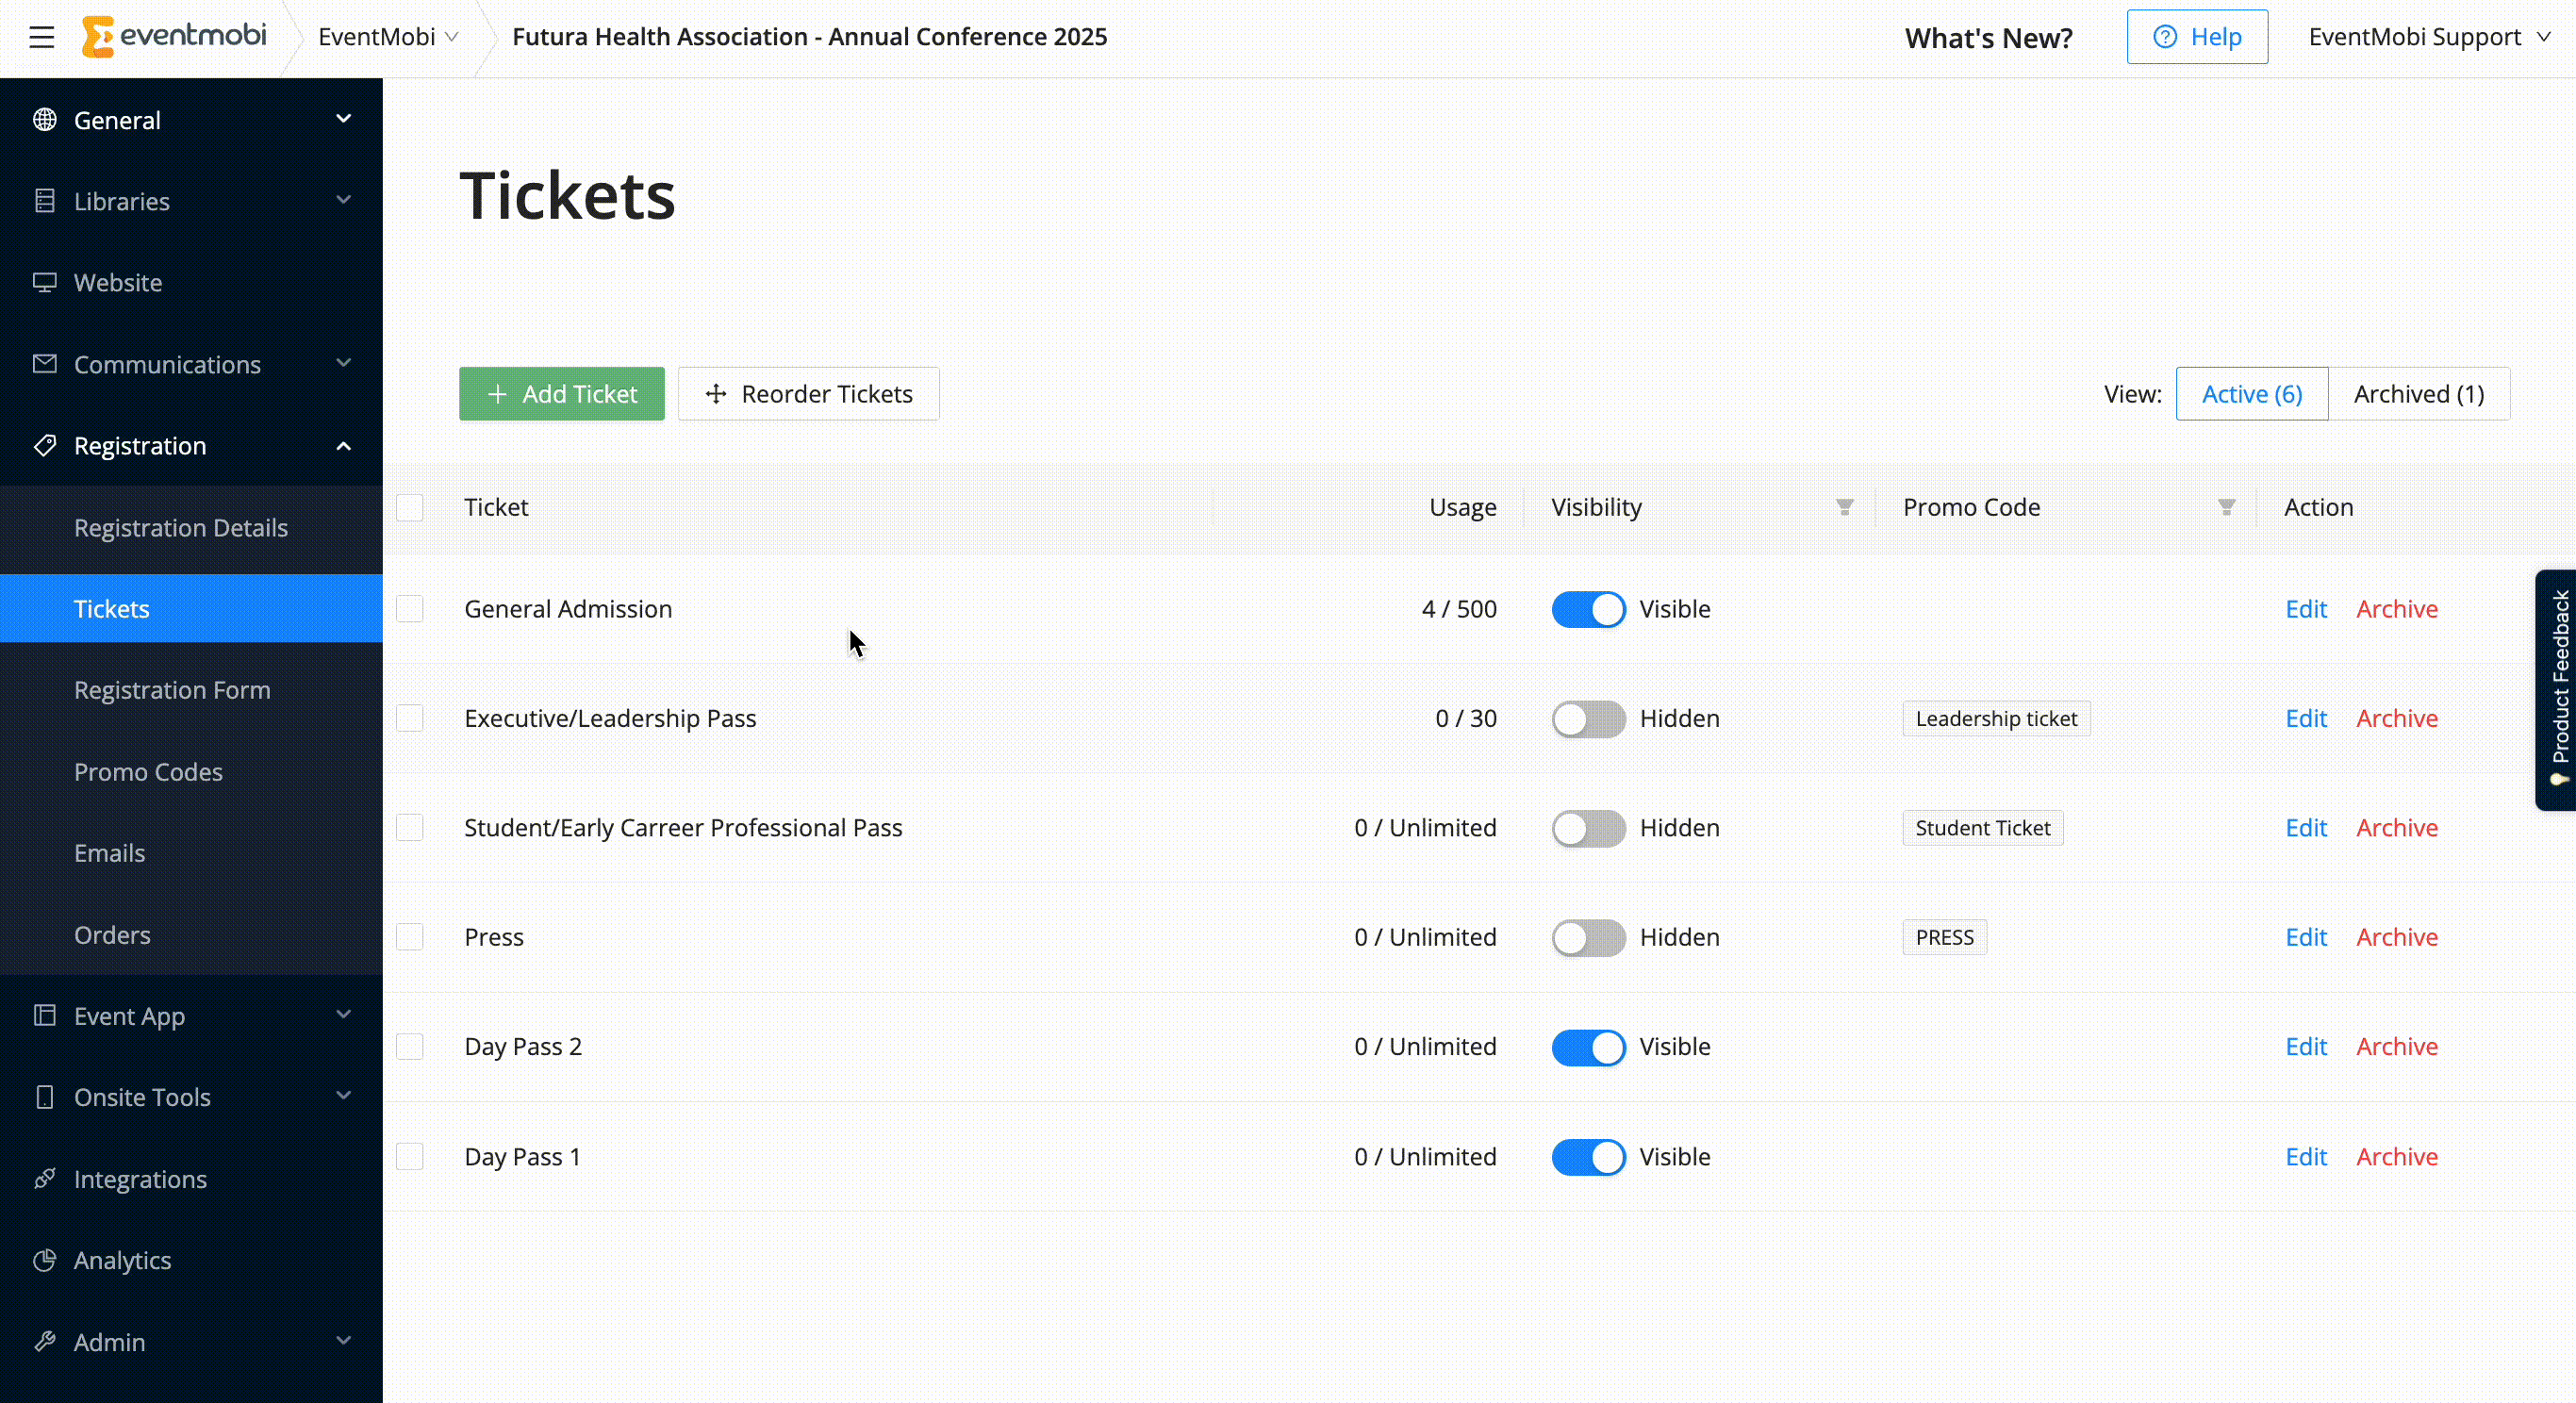
2. Tickets
The Tickets section allows you to create and manage the ticketing options for your event. Below are the key configurations available:
Add Tickets
Define the various ticket types for your event to cater to different attendee groups. This allows you to create a tailored experience for your attendees based on their needs and preferences. To add new Tickets to your registration, click on the green "Add Ticket" button. A new window will pop up to define the following ticket details:

- Name: Provide a clear and descriptive name for the ticket type. This could include names like "General Admission," "Exhibitors" or "VIP Access," which will help attendees quickly understand what is being offered.
- Description: Write a detailed description of what the ticket includes. Highlight any special benefits or features associated with the ticket type, such as exclusive access to certain areas, complimentary refreshments, or early entry. This information helps potential attendees make informed decisions about which ticket to purchase.
- Quantity: Specify the total number of tickets available for this type. Setting a limit on ticket quantities can help manage the overall attendance and ensure a comfortable experience for all participants.If this field is not filled in, there will be no limit to the total number of tickets available for this type.
- Hide Ticket: You can hide certain ticket types to keep them exclusive or limit their visibility to specific audiences. This is useful for private events or tickets, available only through special invitations or promotions, ensuring that only eligible attendees can register. Hidden tickets can be made visible with Promo Codes.
Good To Know: Upon successful registration, People Groups for each Ticket type will be automatically created and assigned. This functionality enhances communication with each group and simplifies the management of visibility settings for various sections.
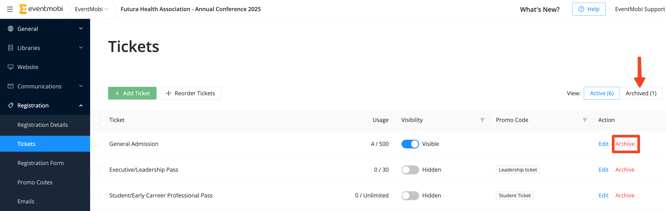
Edit & Archive Tickets
Each ticket created can be modified or archived as needed.
To edit a ticket, click the Edit button located on the right side of the specific ticket you wish to adjust. This action will open a new window that mirrors the ticket creation interface, allowing you to modify all relevant ticket details, including the name, description, quantity, and visibility settings.

Archiving a ticket is an effective way to remove it from active registration without without losing any associated orders or ticket data. Once archived, the ticket will transition from the current view to the Archived view. To access all archived tickets, simply select "Archived" from the available View options.
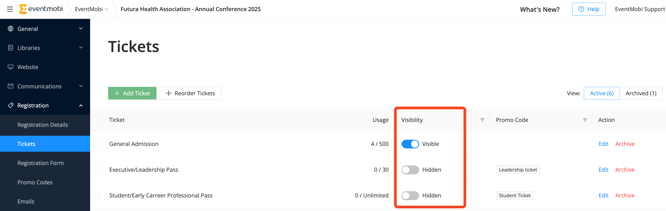
Ticket Visibility
You can control each ticket's visibility in the Tickets Overview by toggling the Visible button. Hidden tickets are suitable for private events or special promotions, allowing only eligible attendees to register. They can be revealed using Promo Codes or made available later. You can create tickets and prepare them for publication, enabling visibility when ready for registrants.
Reorder Tickets
To rearrange your created tickets, click the "Reorder Tickets" button. You can then drag and drop each ticket to your desired position. Once you have arranged the tickets to your satisfaction, select the "Save Order" button to apply your changes.
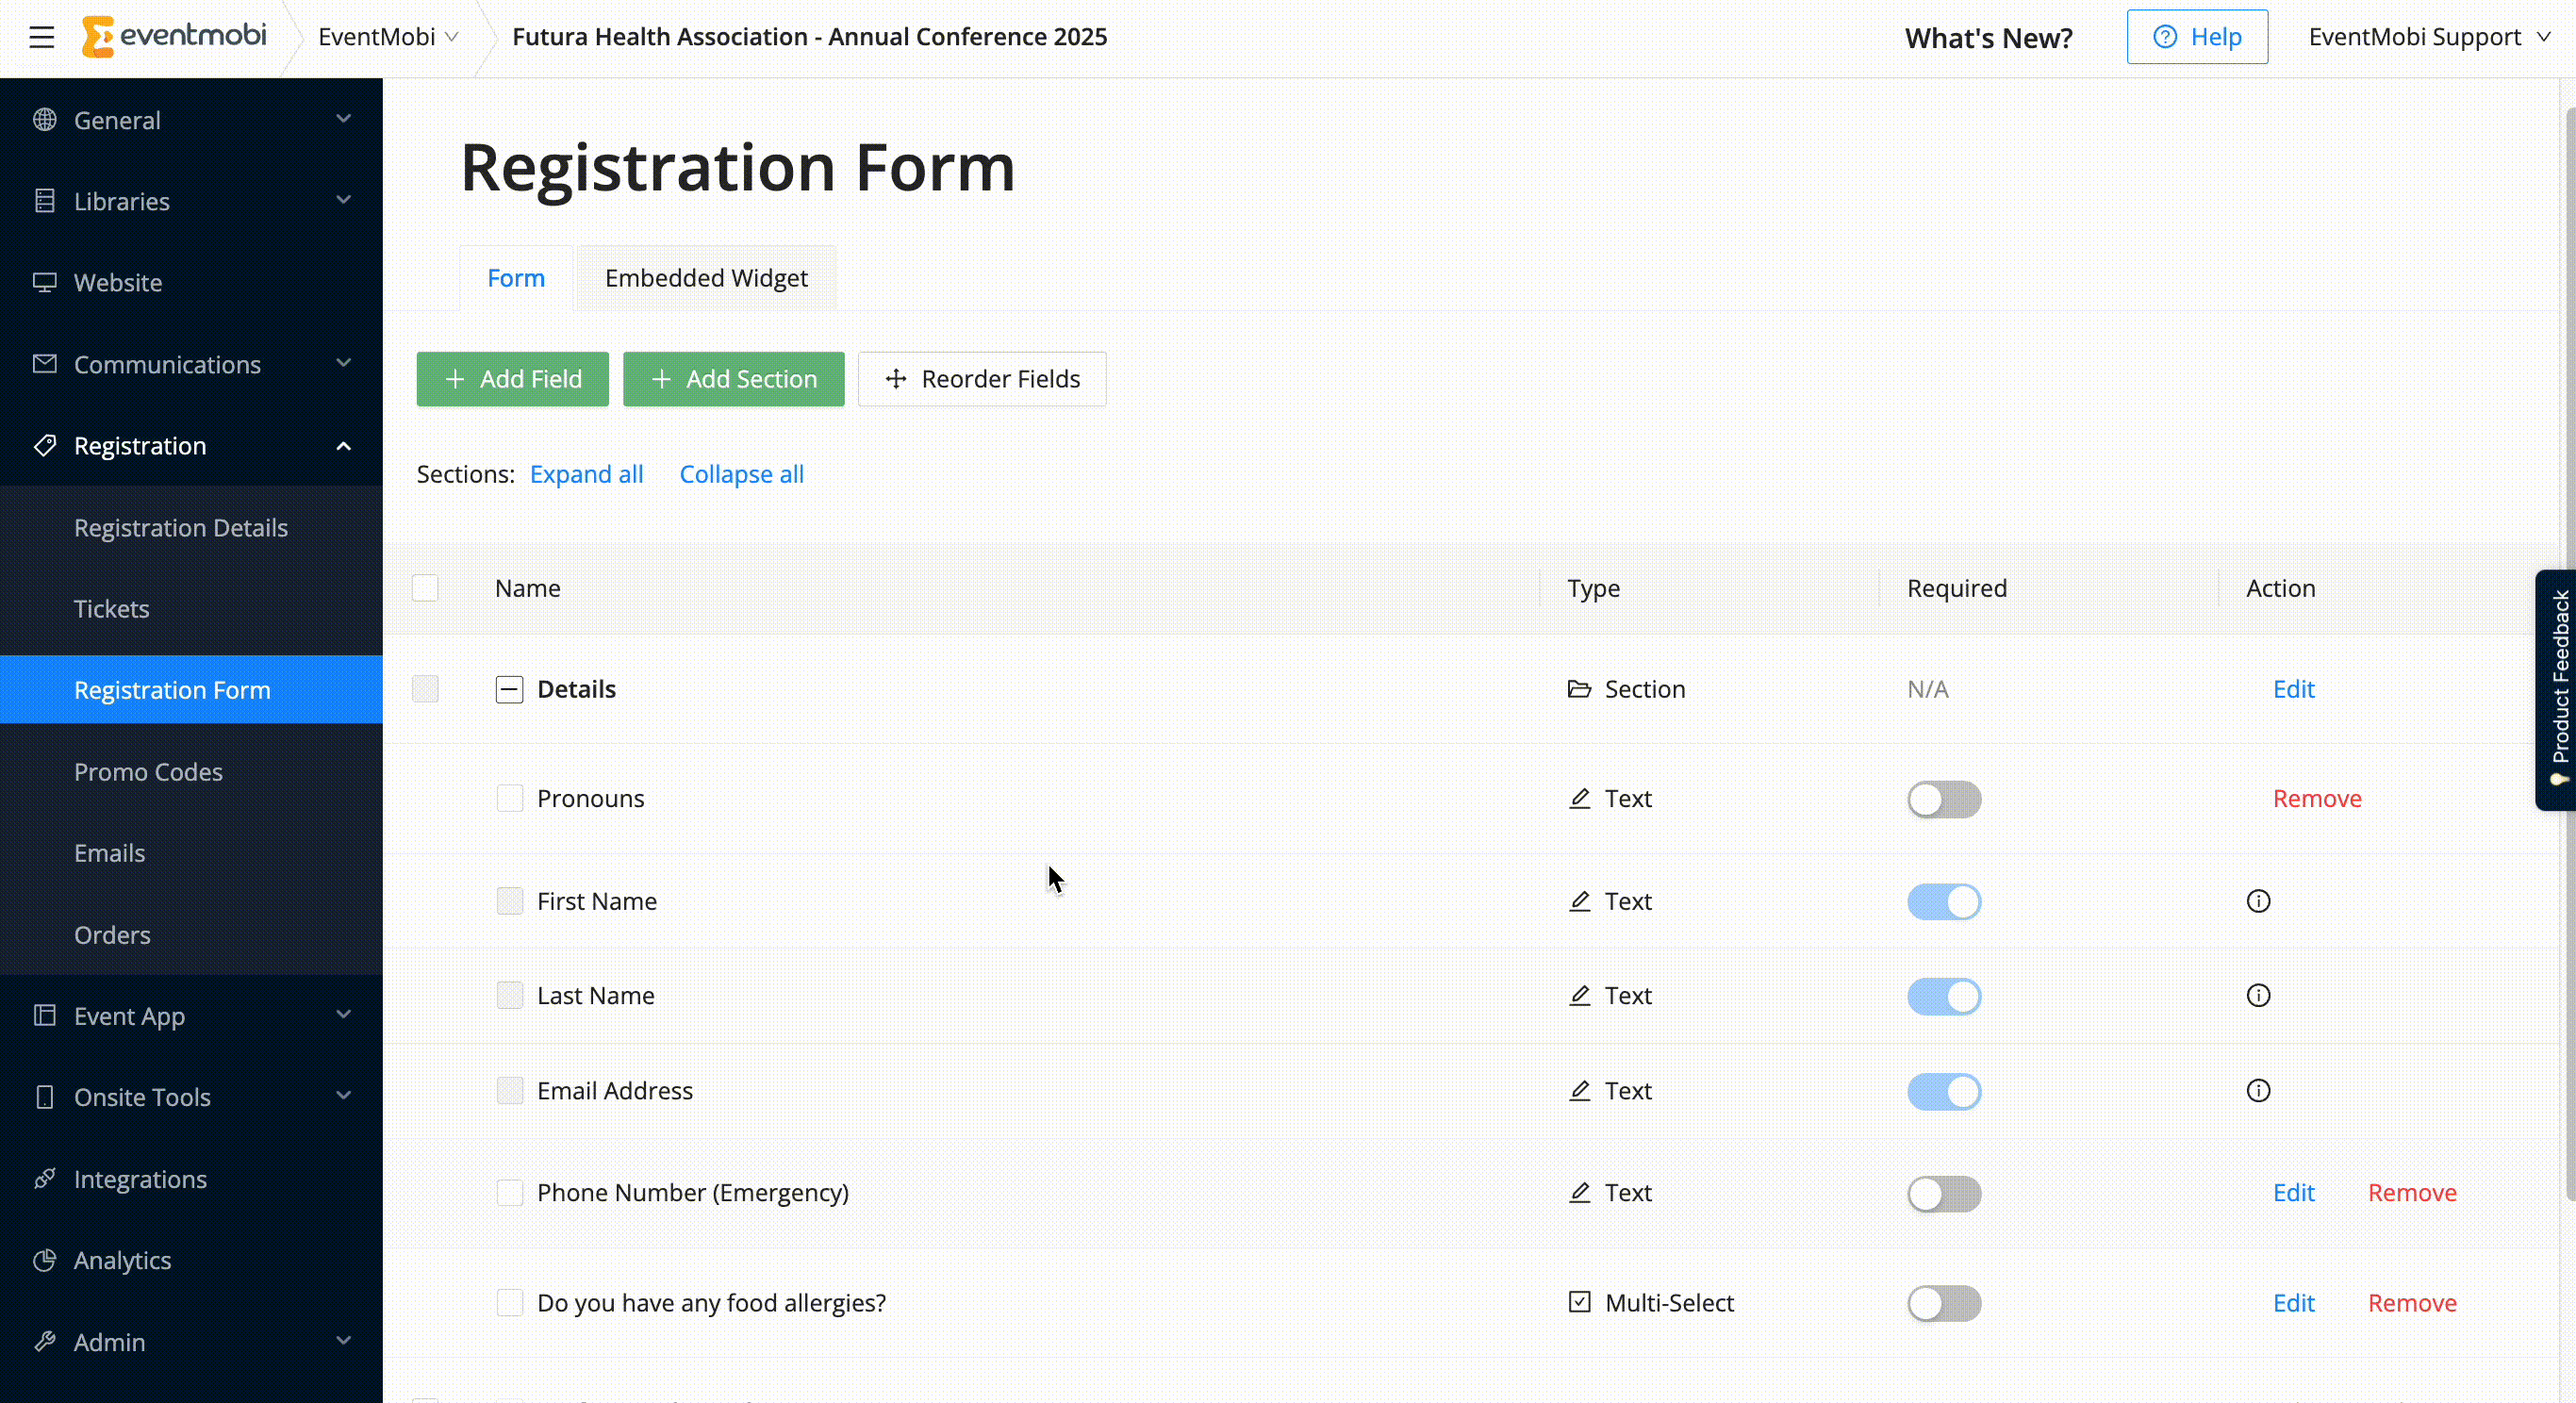
3. Registration Form
The Registration Form area of Core Registration consists of four key components:
- Form Fields: This allows you to create and manage the various fields within the registration form, ensuring you collect all necessary information from attendees.
- Form Conditions: In this section, you can establish specific conditions that connect form fields to ticket types or other fields within the form, allowing for a flexible and customized registration experience that adapts to attendees' choices.
- Embedded Widget: This feature provides options for embedding the registration form onto external websites, making it easy to reach a wider audience and facilitate smooth registration processes.
- Settings: This part is where you can see the Registration Success Screen - have the option to enable the Add-to-Calendar button and customize the registration success message.

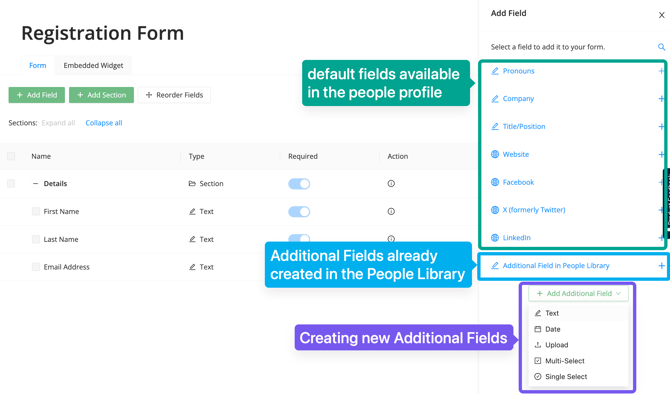
Creating and Managing Form Fields
By default, the registration form includes a section labeled "Details." This section contains the mandatory fields for First Name, and Last Name. These fields are essential for creating the attendee's profile upon successful registration and cannot be edited, removed, or repositioned.
In addition to these default fields, you can create an unlimited number of new fields and sections for the registration form. This customization capability allows you to tailor the registration process to meet the specific needs of your event and attendees.
Add Fields
To create a new field, click the "Add Field" button. This action will open a side menu on the right side of your screen.
This menu already includes all the default fields in the attendee profile, including options such as Company and Title/Position. It also features any custom Additional Fields that you have previously created in your People Library.
You can create new Additional Fields directly from this menu. The available types for Additional Fields include Text, Date, Upload, Multi-Select, and Single-Select.
To incorporate a new field into your registration form, simply select one of the existing fields from the menu or create a new Additional Field, which will also be accessible in the attendee's profile later.
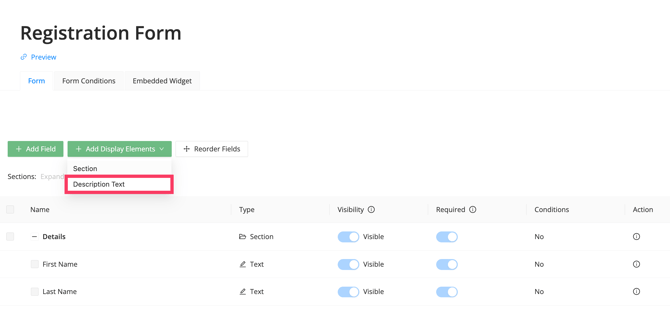
Add Display Elements:
Sections: Furthermore, you can organize these fields into logical sections, helping to guide attendees through the registration process in a user-friendly manner. By segmenting the form into categories—like Personal Information, Professional Details, and Preferences—you can streamline the registration experience and reduce the likelihood of overwhelming attendees with too many questions at once. This thoughtful approach not only enhances user experience but also helps you collect valuable data that can be used for event planning and follow-up communications.
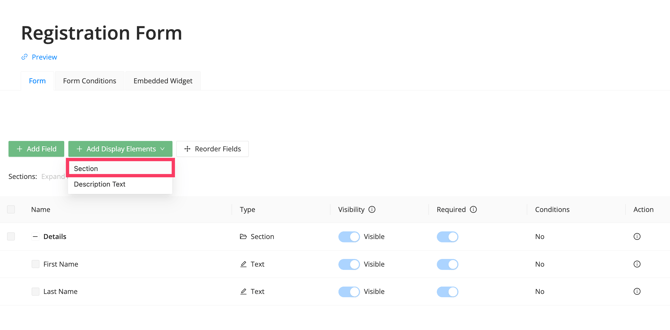
When you add a new Section to your registration form, a window will appear, enabling you to specify a Section name and optional description text.
You may opt to uncheck the box labeled "Make this a Visible section" to set this section's and all included fields' default visibility to hidden.

Please remember that the character limit for the description text when creating a new section is 280 characters. If you need additional space for a more detailed description, we recommend using a separate Display Element > Description text, which is more than 1,000 characters.
Description Text:
Reorder Fields
To rearrange your created tickets, click the "Reorder Fields" button. You can then drag and drop each field to your desired position. Once you have arranged the fields to your satisfaction, select the "Save Order" button to apply your changes.
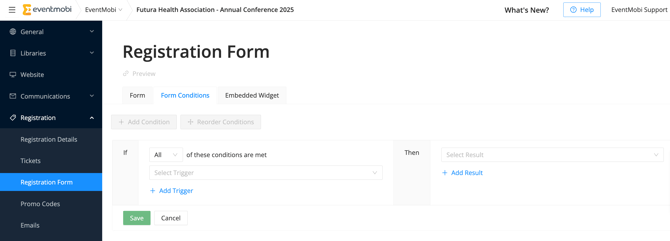
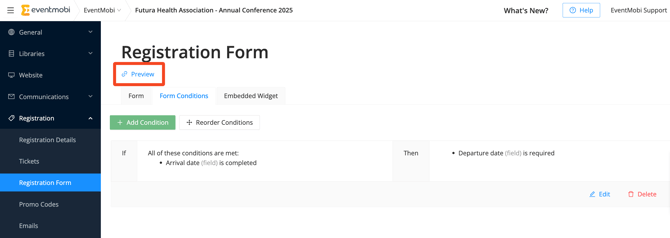
Form Conditions
Form Conditions allow you to create dynamic registration forms that adapt based on the attendee's input, ensuring a customized and relevant registration experience. You can display, hide, or require specific fields based on predefined triggers by setting conditions.
How to Set Form Conditions
-
Add a Condition:
- Click + Add Condition.
- Specify if All or Any of the conditions need to be met for the action to apply.
-
Choose a Trigger:
- Select a field to serve as the condition trigger (e.g., "First Name" or "Ticket").
- Define the specific condition, such as:
- is completed: Trigger if the field is filled in.
- is not completed: Trigger if the field is left empty.
- response is: Trigger based on an exact response entered.
- response contains: Trigger based on part of a response entered.
-
Set the Action:
- Choose the field you want to modify based on the condition and specify the action:
- is visible: Makes the field visible.
- is hidden: Hides the field.
- is set as required: Makes the field mandatory.
- Choose the field you want to modify based on the condition and specify the action:
-
Save and Apply:
- Click Save to apply the conditions.
Example Use Cases
-
Dynamic Fields Based on Ticket Selection:
- Show a "Company" field only for VIP tickets and make it required.
- Hide the "Dietary Restrictions" field for General Admission tickets.
-
Field Completion Triggers:
- Require a "Phone Number" field only if "First Name" is completed.
- Show a "Team Name" field if the "response contains" "Team Registration."
-
Customized Responses:
- Trigger follow-up questions (e.g., "Would you like to join our mailing list?") based on attendee responses to specific fields.
Managing Conditions
- Reordering Conditions: Use the Reorder Conditions button to prioritize or adjust the sequence of your conditions.
- Editing or Removing Conditions: Update or delete conditions to refine your registration logic.
- Preview: When satisfied with your setup, use the Preview option to test how your form behaves with the applied conditions.
Group Registration
Group registration enables one person (the order owner) to purchase multiple tickets and register multiple attendees in a single transaction.
Key Use Cases
- An executive assistant registering multiple team members under one invoice
- A company purchasing a bundle of tickets at a discounted rate
- A single buyer purchasing a mix of ticket types (e.g., 1 VIP + 2 General Admission)
- Exhibitors or Sponsors buying group passes
Setting Up Group Registration
When creating or editing a ticket type, the first step is to configure the ticket quantity controls.
- Maximum tickets per order — Limits how many of a ticket type a single order can include (e.g., max 5)

- Account purchase limits — Controls the maximum number of tickets a single account (account = email). This is setting the max number of tickets that can be bought through the same email.

Setting Up Bundle Pricing
Bundle pricing is enabled through minimum ticket quantity settings:
- Set a minimum purchase quantity (e.g., 3 tickets minimum)
- Offer a discounted per-ticket price for bulk purchases (e.g., $10/ticket standard vs. $8/ticket in a bundle)
- The ticket counter automatically starts at the minimum quantity — buyers cannot go below it
Using Discount Codes & Access Links
These are now two separate features that serve different purposes. Once the discount code is set up under the 'discount codes' area, select 'edit'.
Discount Codes
- Apply fixed-dollar or percentage-based discounts.
- Can be scheduled with start and end dates.
- Support usage limits and redemption controls such as which ticket types the discount applies to.

Learn more about discount codes here.
Access Links
Under Tickets < Access Links is where the option to set up a link which can be shared with your registrants which will reveal hidden tickets types to only users with the specific URL.

There are several setting that can be configured for the access link such as which tickets should be displayed with the access link along with the status settings. The status settings allow the access code to be active during a distinct period of time, or simply to have it made 'Active' or 'Inactive'. 
Once the Access Link is shared with the registrant and the URL is clicked opened, the ticket will be displayed for the user to proceed ahead with their registration.

For more information on group registration, visit the article here
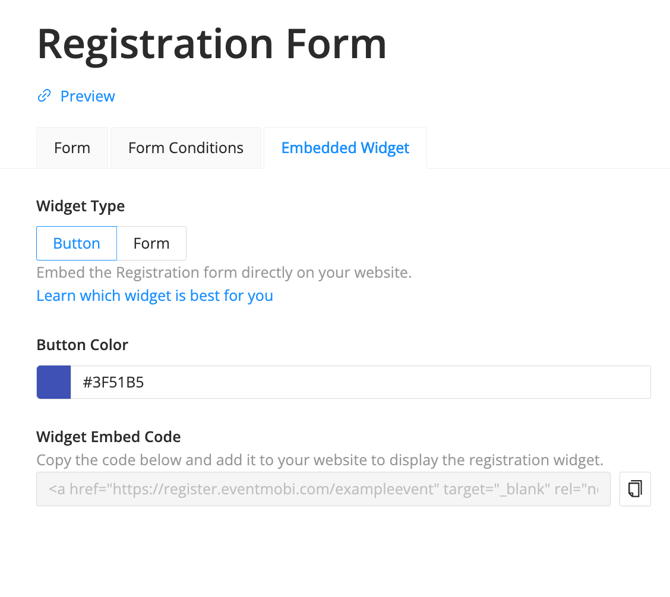
Embedded Widget
You can seamlessly embed your registration form directly into your external website. A preview of your selected Widget Type will be displayed on the right side for your convenience.
To proceed, navigate to the Embedded Widget tab and select your preferred Widget type.
- Button: If you opt for the button type, the system will automatically generate an embed code for linked text that directs users to your registration form in a new tab. You can also choose a Button Color to enhance your branding.
- Form: Select this option if you prefer to embed the registration form directly within your website for a more integrated experience.
| Button: | Form: |
 |
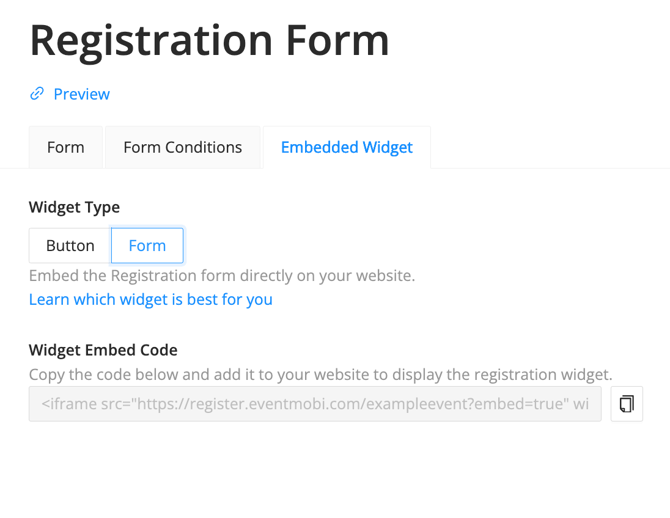 |
Once you have selected your preferred Widget type, click the "Copy to Clipboard" button next to the Widget Embed Code. You can then seamlessly integrate this code into your website.
Do you want to know which Registration Widget is best for your event?
Check out this article!
Discover helpful tips and tricks for designing your Registration Website in this article!
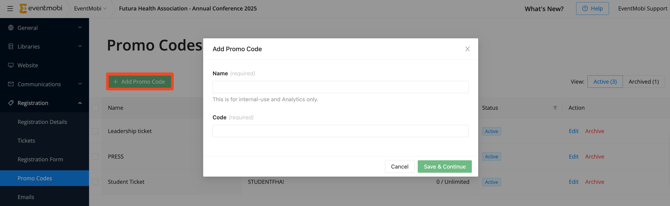
4. Promo Codes
Promo codes give you flexibility to manage ticket access and pricing during registration. They can be used in two ways:
-
Unlock hidden tickets so they only appear when the correct promo code is applied
-
Offer a discount on ticket prices, either as a dollar amount or a percentage
Creating Promo Codes
- Select Add Promo Code
- Input the Name and Code you'd like to use for the promo code, followed by Save & Continue
- Input the Quantity to set the maximum number of times a promo code can be redeemed, or leave the field blank to allow unlimited usage
- Check the Define Promo Code Period box to set the specific start and end dates and times when the promo code will be valid during registration
- Check the Apply Eligibility Settings to restrict the promo code to specific People Groups or individuals

Note: To use Eligibility Settings, you will need to set your registration to Private or Require Email as First Step.
Setting Promo Codes Behaviors
You can set a promo code to reveal a hidden ticket, apply a discount to a paid ticket, or enable both actions to occur when the code is used.
- Select the checkbox to Show Hidden Tickets, and then select which ticket you would like to be revealed when the code is used. You can select multiple tickets if applicable.
- Select the checkbox to Apply a Discount, and then select between a dollar amount or a percentage. You will also have the option to decide if the discount should apply to the Full Order or to Specific Tickets.

5. Confirmation Email & Invoices
In the Emails section, you'll find the registration confirmation email as well as the Invoice template. Click the Edit button next to the Confirmation email to dive into the Editor. At this point, the Invoice Template can't be customized.
The Emails area of Core Registration is only designed to send out the automatic confirmation email upon successful registration. If you’d like to send out other email communications, check out our Email Campaigns in the Communications Hub for more options!
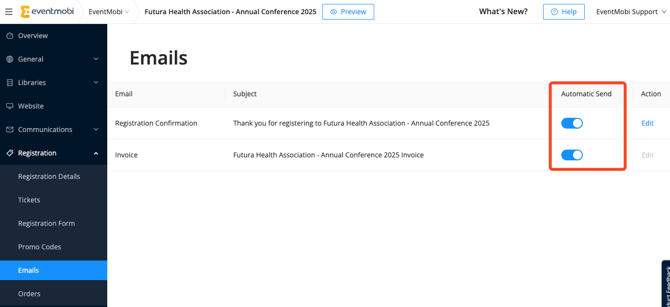
A new toggle called "Automatically Send" for Confirmation Emails and Invoices is now available. When enabled, the system will automatically send both the registration confirmation email and the invoice (if registration payments are enabled) upon successful registration.
If you are using the group registration feature, each ticket holder receives their own confirmation; the order creator receives a separate order summary listing all registrants.
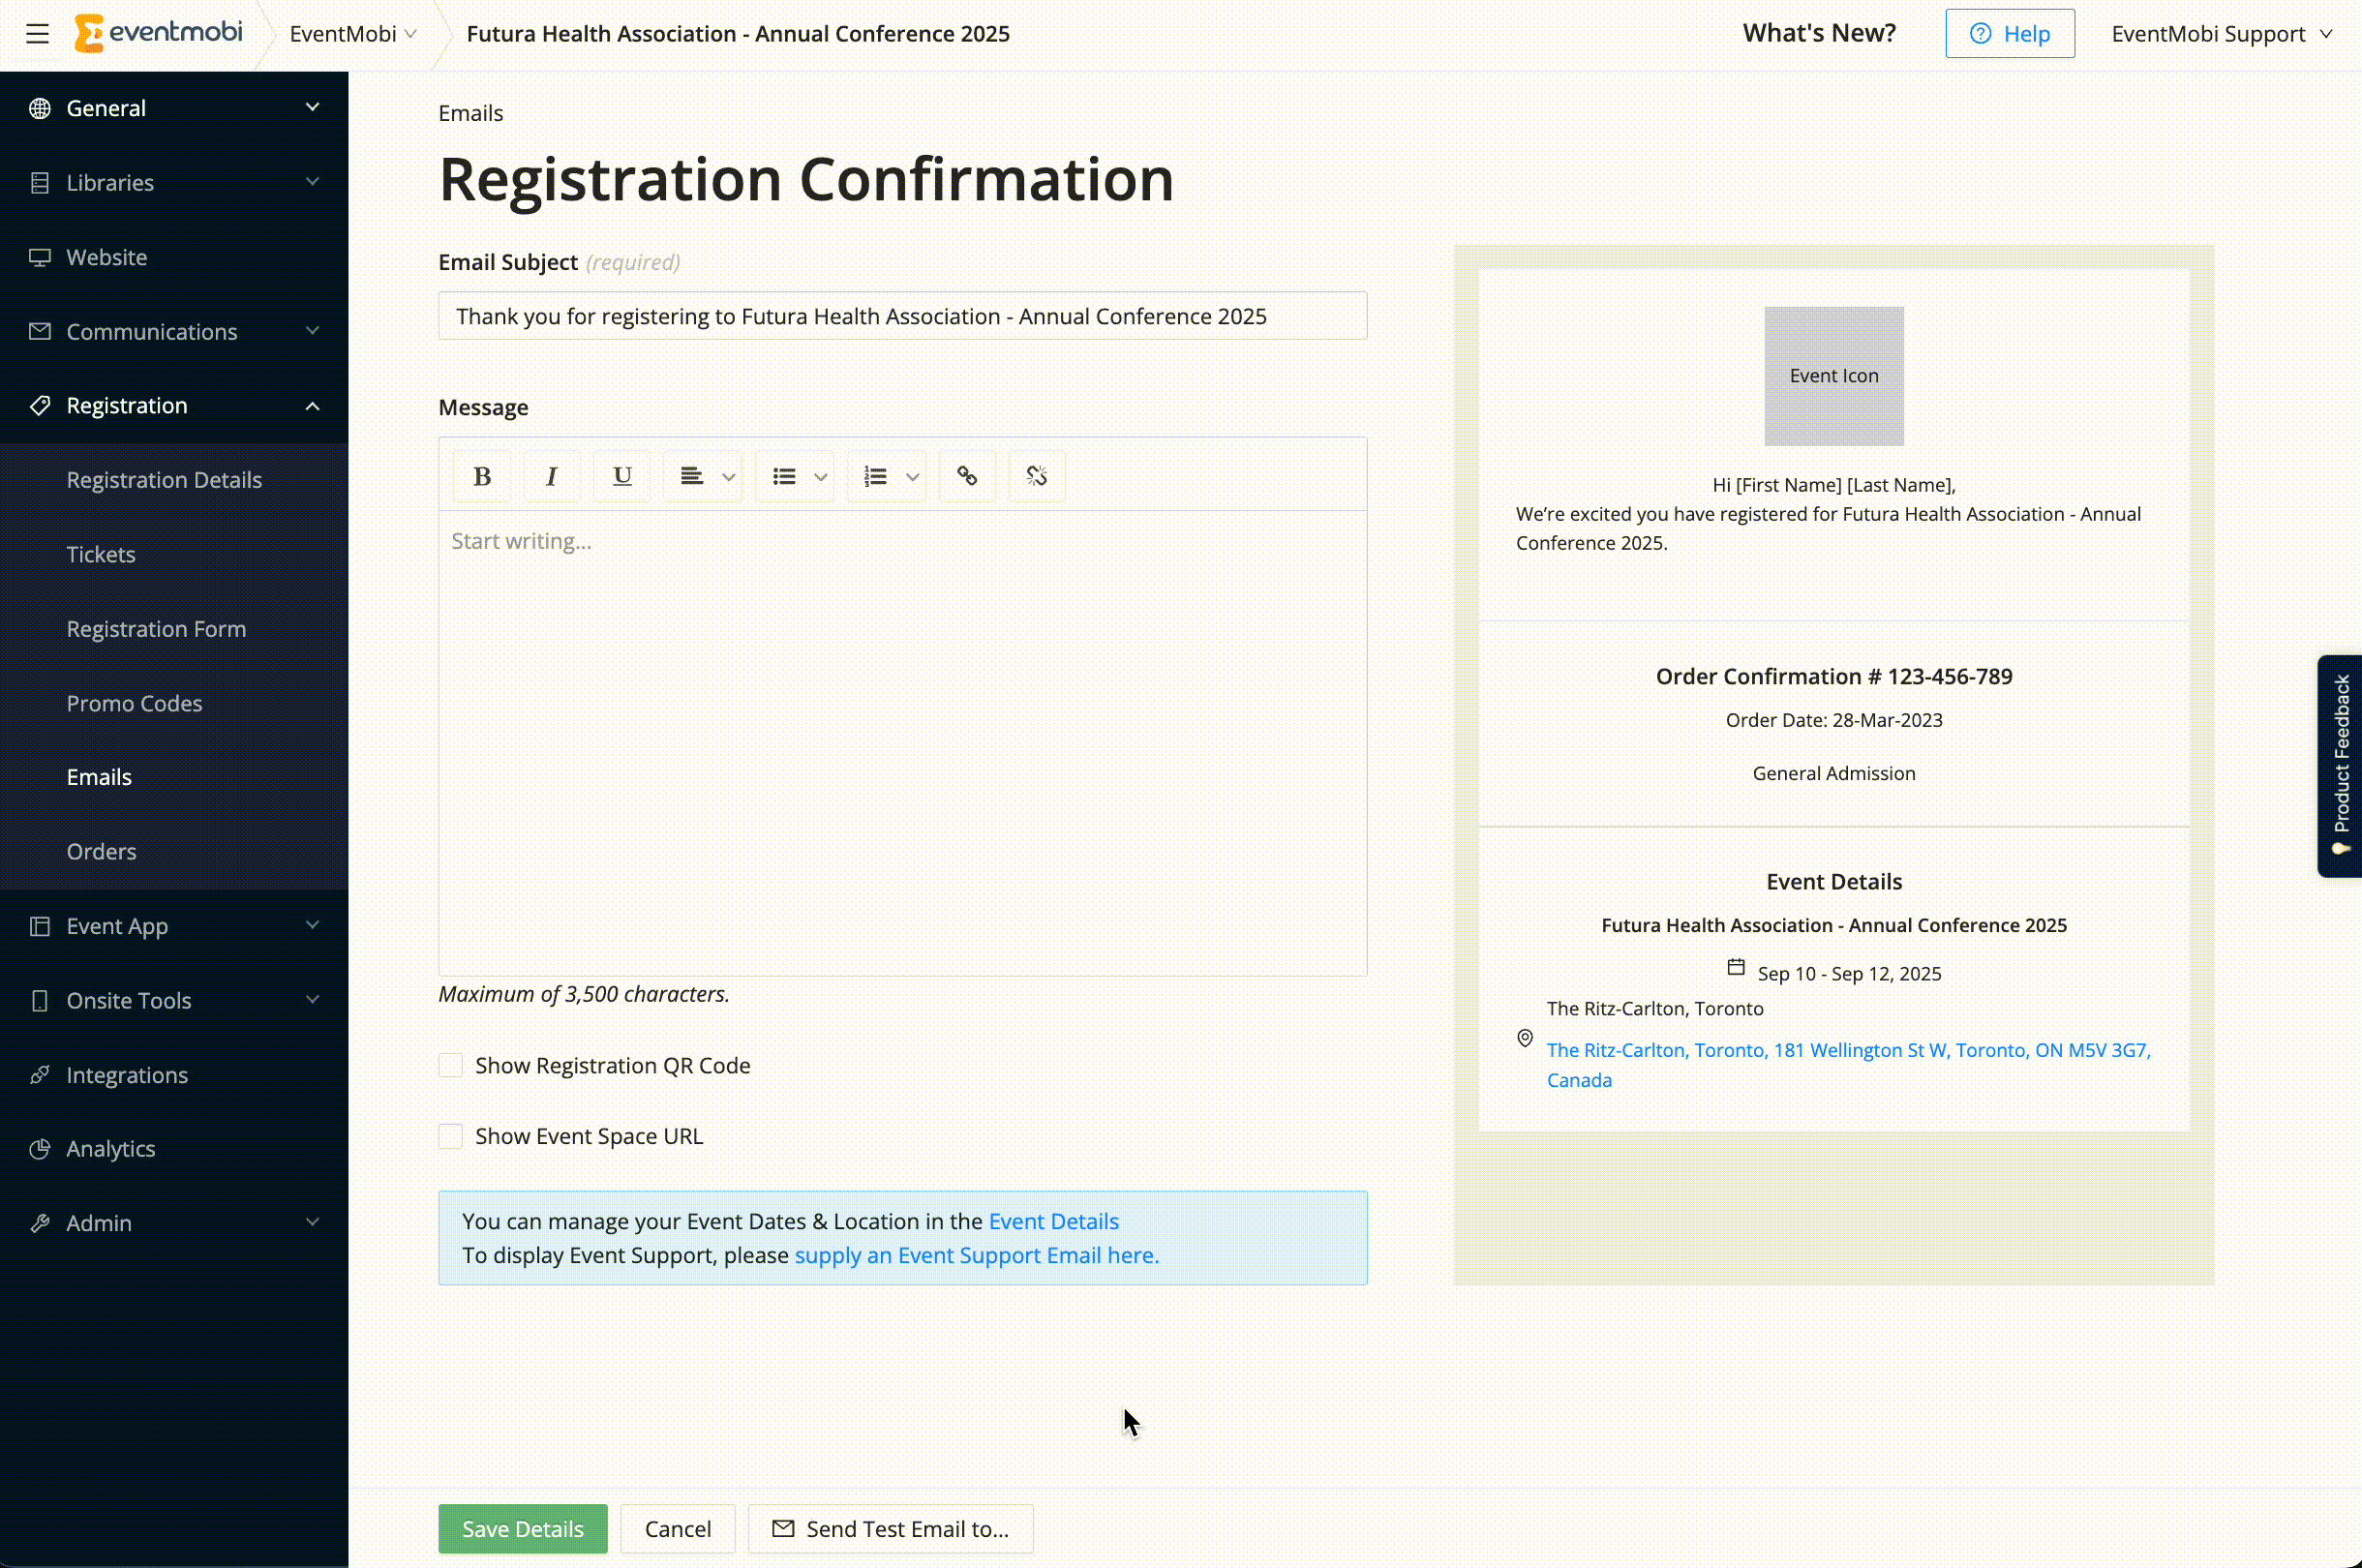
Editing Your Registration Confirmation Email
Once you enter the Email Editor for the Registration Confirmation Email, you'll find different text fields and settings to customize your Confirmation mail.
Over on the right side of the page, you can enjoy a live preview of your message, allowing you to see your changes as you make them.

Email Subject: The email subject is customizable, allowing you to personalize it to better resonate with your audience.
Custom Message: You can include a custom message that will appear directly beneath the subject line.
Show Registration QR Code: You can display the QR code, which serves the same purpose as the one found in the My Badge area of the attendee dashboard: facilitating check-in and lead capture.
Show Event Space URL: You can also include the URL of your event space at the bottom of the confirmation email.
Default Text & Details
By default, the Confirmation Email will incorporate the following elements:
- The Event Icon, as uploaded in the Event Details section of the Experience Manager.
- A personalized greeting that addresses the recipient by their First and Last Name, along with the message: "We are pleased to confirm your registration for [Event Name]."
- If the QR Code feature is enabled, the email will include the text: "Here is your Registration QR Code."
- Details of the Order Confirmation will include the Order number and date.
- The Selected Ticket type.
- Comprehensive Event Details, including the Event Name, Event dates, and Event location as specified in the Event Details section.
- Event Support information: The email will also contain the message: "If you have any questions or require assistance, please contact us at," followed by the Event Support Email provided in the Event Details section of the Experience Manager.
Send Test Email
Once you’re happy with everything, you can send a test email to yourself! Just enter your email address—make sure it's added as an organizer for this experience organization—and you’ll get a sneak peek of how the confirmation email will look.
6. Orders
The Orders section serves as a comprehensive log of all completed registrations. Here, you can review details such as the date and time of registration, confirmation numbers, selected ticket types, and the registrant's email address.
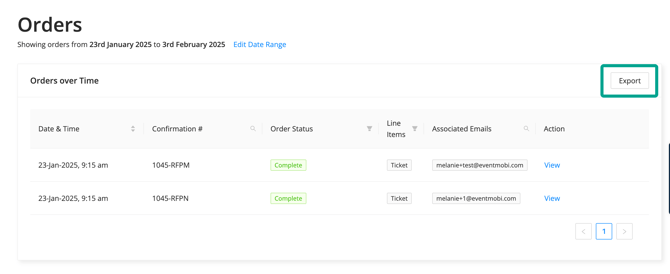
At the top of this page, you can modify the Date Range as necessary. This functionality allows you to filter orders based on a specific time frame or to exclude certain dates from your view.
You also have the option to click on any order to access its specifics.
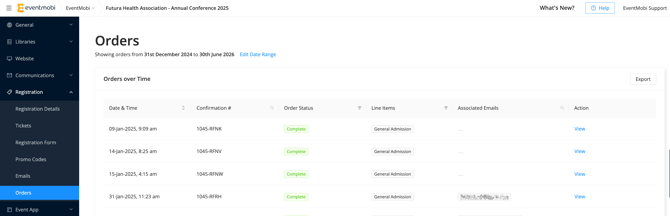
Order Details
For more details on a specific order, click the View button located on the right side of the order.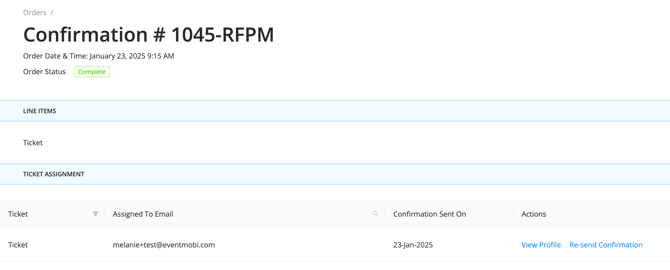
From the Orders details page, you can gain deeper insights into the registration information and navigate directly to the attendee's profile by selecting the "View Profile" option. If an attendee requests a resend of their confirmation email, this action can also be conveniently initiated from this section.
Note: Orders, including test orders, cannot be deleted since this section is primarily for reporting purposes.
Export Orders
Additionally, you can export this information as a CSV file for further analysis or record-keeping. To download the report, click the Export button in the Orders overview.
‘Registered At’ Column in the People Library
A new “Registered At” column has been added to the People Library, allowing you to see the exact date and time when a user registered for an event. This column is not visible by default and can be enabled when needed to track registration timing more easily.

To add this column, simply click Edit on the right and select Registered At
