Table of Content:
- How It Works
- Creating & Sending Announcements
- Receiving Announcements
- Best Practices: Announcement Examples
- Troubleshooting
- Analytics & Reporting
1. How It Works
Announcements are a great tool to keep your attendees in the know about any updates and reminders that will help them to get the most out of your event. These can be sent to everyone, People groups, or specific individuals to help you with targeting the right people at the event.
2. Creating & Sending Announcements
Create Announcements Manually:
- In your Experience Manager, go to Announcements under Communications
- Click on the button "Send Announcements"

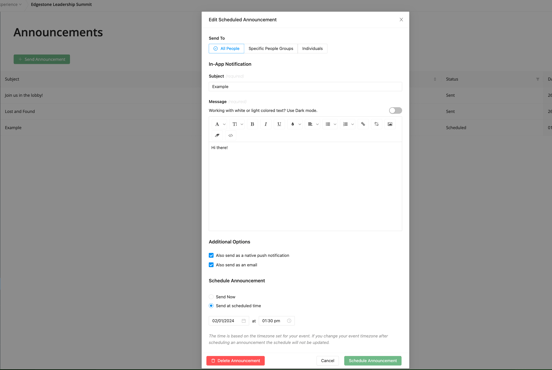
- Complete the form as shown below to create announcements:
- Send To : Choose from the following options: Select "All People" to send the announcement to everyone, pick "Specific People Groups" to target particular People Groups, or opt for "Individuals" to focus on specific People profiles.
- Subject (required): Complete the Subject field by providing a concise title that is limited to 150 characters.
- Message (required): Craft your announcement message within the character limit of 6000, ensuring that any formatting using HTML tags is included in this limit, e.g. <b>.
- Additional Options :
- Also send as native push notification: Choose this option if you wish to send a native push notification to iOS and Android users who utilize the EventMobi Universal App or Branded App.
- Also send as an email: Choose this option if you would like to send an additional email along with the in-app notification for this announcement.
- Schedule Announcement : To schedule an announcement for later, choose the date and time in the Schedule announcement box. Otherwise, the announcement will be sent immediately, and users will receive a pop-up with the announcement details.

- Click on "Send Announcement" and confirm on the subsequent pop-up to send/save your announcement.
If you're looking to send personalized announcements to specific People Groups, the first step is to set up these groups in the People library. Check out this article for a detailed guide on creating and assigning People Groups.
Import Multiple Announcements:
To efficiently create multiple announcements simultaneously, we suggest utilizing the bulk upload feature.
- Select the "Import/Export" button located at the top right corner of the page.
- Choose the "Import" option from the dropdown menu to access the template for creating and scheduling your announcements. This pop-up page is also where you will upload the completed file once it is ready.

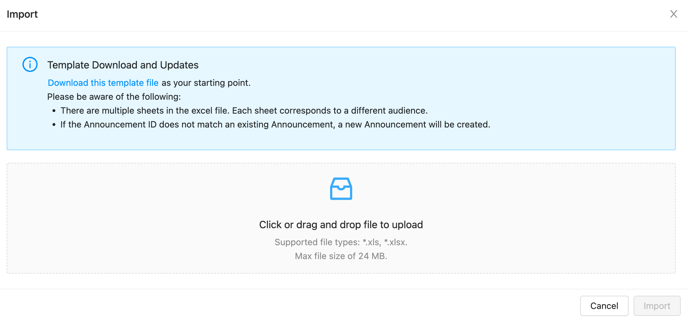
- In order to specify to whom these announcements should be sent to, there are multiple sheets in the template file. Each sheet corresponds to a different audience: Send to Everyone, Send to Specific People Groups and Send to Specific People (Individuals). Fill out the columns in each sheet that applies for your announcement target groups.
- When creating your announcements using the template, you will notice the following columns available:
- Subject (required): Provide a brief and descriptive title within 150 characters in the Subject field.
- Message (required): When creating your announcement message, make sure to stay within the 6000-character limit and include any formatting using HTML characters. You can format the text using HTML tags like <b> to make it bold, or make any adjustments to the formatting later on after importing the announcement.
- Also send as native push notification : Enable native push notifications by typing in "Yes" if you wish to send notifications to iOS and Android users using the EventMobi Universal App or Branded App. If you prefer not to use this feature, enter "No" or leave the field blank.
- Also send as an email :If you wish to include an extra email along with the in-app notification for this announcement, simply indicate "Yes" in this field. If you decide not to utilize this option, you can enter "No" or leave the field blank.
- Date (yyyy-mm-dd) (required): Provide the date in the YYYY-MM-DD format to specify when this announcement is scheduled to be sent out.
- Time (hh:mm) (required): Enter the time in a 24-hour format to ensure the system can distinguish between AM and PM.
- Announcement External ID : The system automatically assigns an Announcement External ID when importing announcements. It is important to keep this ID as it is to ensure that information is saved correctly if you plan to export your announcements for further edits later on.

The time zone that applies to the date and time fields will be determined by the time zone that you have set in the Event Details area of the Experience Manager.
Export Announcements:
The Export option will act in downloading a template that includes any announcements that you have created, but have not yet been sent out.

Delete Announcements:
Announcements can be deleted by clicking on the announcement that you would like to remove and selecting the Delete Announcement option displayed on the pop-up window that appears. After selecting this button you will receive a pop-up notification to confirm that you would like to proceed with deleting the announcement.
Note: Announcements cannot be deleted in bulk and must be deleted one at a time within the Announcements area of the Experience Manager.
3. Receiving Announcements
In-App Notifications:
Announcements will pop up when attendees access the Event App through a web browser or mobile device. They can also be found in the bell icon at the top right of the Event App and within the Announcements section for easy access.
.png?width=300&height=605&name=iPhone-13-PRO-MAX-eventmobi.com%20(5).png)
.png?width=300&height=605&name=iPhone-13-PRO-MAX-eventmobi.com%20(6).png)
Clicking on the "Alert Details" will give receivers a closer look at the announcement, allowing for a better view of its content.
.png?width=300&height=605&name=iPhone-13-PRO-MAX-eventmobi.com%20(4).png)
The latest announcement will appear as a pop-up in the Event App. To access previous announcements, click on the Bell Icon and select "View all" or navigate to the Announcement section in the left-hand menu.
Push Notifications:
Push notifications are a great way to ensure that attendees using iOS and Android devices receive your announcements and updates, even when they are not actively using the EventMobi app or a custom Branded App. Attendees who receive a push notification will receive a pop-up that includes the Event Name and Message Body. Once the attendee has clicked on the push notification, they will be directed to view the in-app notification from the event app that it was sent from.
To make sure attendees get these notifications:
- Users must download the EventMobi app or Branded App from the Apple App or Google Play stores.
- Users need to log into the Event App at least once via the EventMobi app or Branded App to start receiving push notifications.
- Users will need to allow permission for push notifications on their device in order to receive them. Upon accessing the Event App, the attendee will be asked to Allow or Deny permission, and this can later be adjusted within the Notification settings on their device.
- Keep in mind that attendees can choose to opt out of push notifications. To ensure everyone stays informed, consider sending an accompanying email with your announcement through the Announcements area.
Note: Push notifications sent to All People will still be sent to attendees that have logged out of the Event App, but will not receive those that have been sent to specific People Groups or Individuals.
Email Notifications:
If you choose the "also send as an email" option when sending an announcement, all recipients will receive an email containing the announcement's content.
4. Best Practices: Announcement Examples
General Event Announcements
-
Event Kickoff:
This announcement energizes attendees, marking the official start of the event with a welcoming overview of key activities to set the tone for the day and encourage active participation. -
Lunch Break:
A reminder about lunch break details guides attendees smoothly from sessions to lunch, preventing confusion, reducing crowding, and enhancing satisfaction through clear communication. -
Networking Opportunity:
Encourage attendees to join networking sessions or use the networking features within the Event App for valuable connections that enhance their event experience and add value. -
Event Feedback:
Inviting attendees to provide feedback through a survey emphasizes the importance of their opinions. Gathering feedback helps organizers understand what worked well and what improvements are needed for future events. - Lost & Found:
Providing updates and guidance to assist attendees in quickly recovering their belongings, enhancing their overall experience.
Session Announcements
-
Session Reminder:
Timely reminders of upcoming sessions with essential details ensure attendees stay informed and make the most of the event content. -
Session Change:
Alert attendees of any changes in the session schedule to keep everyone informed and avoid confusion. Prompt announcements minimize disruptions and maintain a positive experience amidst common unexpected changes during events. - Virtual Event Link:
Access virtual sessions or content with clear instructions for seamless participation, regardless of location, in hybrid or fully virtual events. -
Session Highlights:
Highlighting key sessions ensures attendee awareness of standout moments and boosts participation in valuable sessions.
Special Announcements
- Exhibition Announcement:
Exhibition announcement encourages attendee interaction with exhibitor booths, driving traffic and enhancing networking opportunities.
- Safety Announcement:
Safety announcement with health measures, social distancing guidelines, and emergency procedures reinforces trust and demonstrates commitment to attendee well-being.
Closing Announcements
-
Event Closing:
Closing announcement thanks attendees, provides post-event info, and promotes future engagement. -
Final Reminder:
Ensure attendees have necessary information for check-out, material return, and final instructions to prevent issues and enhance overall satisfaction. -
Post-Event Survey:
Encourage attendees to complete a post-event survey for valuable feedback.
5. Troubleshooting
Why am I not receiving push notifications on my mobile device?- Push Notifications have been disabled in the app settings:Users must grant permission for the app to send push notifications in their device settings. If permission is not granted or is revoked, the user will not receive push notifications.
| For Android | For iOS |
|
|
- Push Notifications are disabled in the Event App Preferences:
Attendees will be opted-in to receiving push and email notifications that you are sending for the event by default, but will have access to make adjustments to the permissions for both push notifications and email from the Preferences area of the Attendee Dashboard if needed.

- An App Update is required:
Push notifications may not be received by the attendee in cases where an app update is needed. If the app is not up to date, then push notifications may not work as intended. - Bad Network Connection:
Push notifications require an active network connection to be received. If the user's device is not connected to a network, or has a poor connection, they may not receive notifications. - Battery Saver Mode:
In battery saver mode, some devices restrict app activity to save power. This can prevent push notifications from being received.
6. Analytics & Reporting
Navigate to the Analytics section within the Experience Manager to access a report on Page Views, located under the People tab.
Within the Page Views section, click on the first Drop-Down menu and select "Announcements." Then, in the second drop-down menu, you can choose between all announcements in the main section or select a specific announcement from the list for more insights.

Once you've applied your filter, a graph will appear, illustrating the total number of visits (clicks) and unique viewers (devices) that have viewed this page.
Below the graph, you will also discover a list of individuals who have viewed this page.
Clicking on the Export button allows you to download this report in a .CSV file format.