![]()
Conditions help to ensure that you are capturing all of the necessary data from your registrants, while making the registration process as seamless as possible.
Creating Your Registration Flow
The registration process can be broken down into four different steps, depending on the information that you are looking to capture from your registrants. These steps include:
- My Information will include all registration fields you have enabled or created
- Ticket will offer registrants the various registration options, including session selection
- Hotel will allow registrants to confirm if they will require accommodations for the duration of the event, and will offer any necessary booking links.
- Payment & Checkout will allow you to capture payment for registration, and will offer a summary of the registration details that have been captured.
Your registration flow will be restricted to these four steps, however, you will have the option of disabling any that are not required for your event. Additionally, you will have the option of adjusting the registration flow by determining if attendees should be required to complete the My Information or Ticket page as the first step.
To adjust your registration flow, follow these steps:
- Go the General area of the EventMobi Registration platform
- Visit the Essentials page
- Navigate to Registration Flow

Registration Fields
Your registration flow can also be determined based on the selections that are made from the registrations fields during the My Information step. Conditions, as we will see later, will allow you to set what options will be made available to the registrant during the registration process.
Conditions, however, do not determine the order that your registration fields will appear. To ensure your conditions work as intended, you will want to visit the Form page found in the Registration area of the EventMobi Registration platform to drag and drop your fields into the correct order required for your desired registration flow.
Ticket Types
Tickets serve as an additional means to defining your registration flow. Using categories, you can determine which specific options will be made available to registrants, based on the ticket type that they have selected. To set the registration flow based on registrant type, visit the Category page found under Tickets.
Please go to this article to learn more about how to set up your Tickets and integration with the Experience Manager.
When creating your tickets, you will also have the option of grouping registrants to People Groups in the Experience Manager based on the ticket type that they have selected. When editing a category, you will notice a field for Groups located under the EventMobi area where you can select any People groups you have created within the Experience Manager.
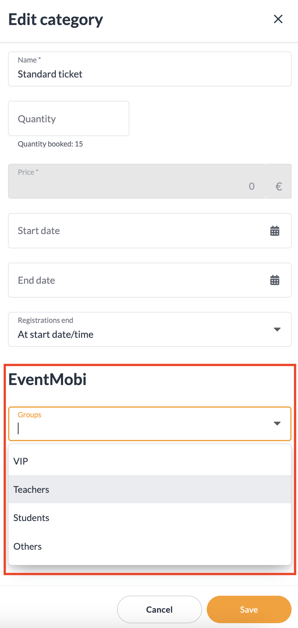
Registrants will automatically be added to the Attendees Group when they are synced over to the Experience Manager. Any additional groups that you would like to assign to registrants will first need to be created in the Experience Manager for your event so that they can be made available from the Groups dropdown menu from the category.
If changes are made to Groups within a Category after attendees have already registered, you will want to select the Settings option (gear icon at the top right) followed by Send all guests to EventMobi.
Note: Default Groups for Attendees and Speakers will not be displayed from the dropdown menu. Only custom Groups that have been created will be available to select.
Setting Visibility Conditions
The visibility of your registration fields can be determined based on the registrant types that you will be offering. Under Registration you will find a page dedicated to Form Conditions where you can disable specific fields from appearing to registrants until specific conditions are met.

Defining Conditions
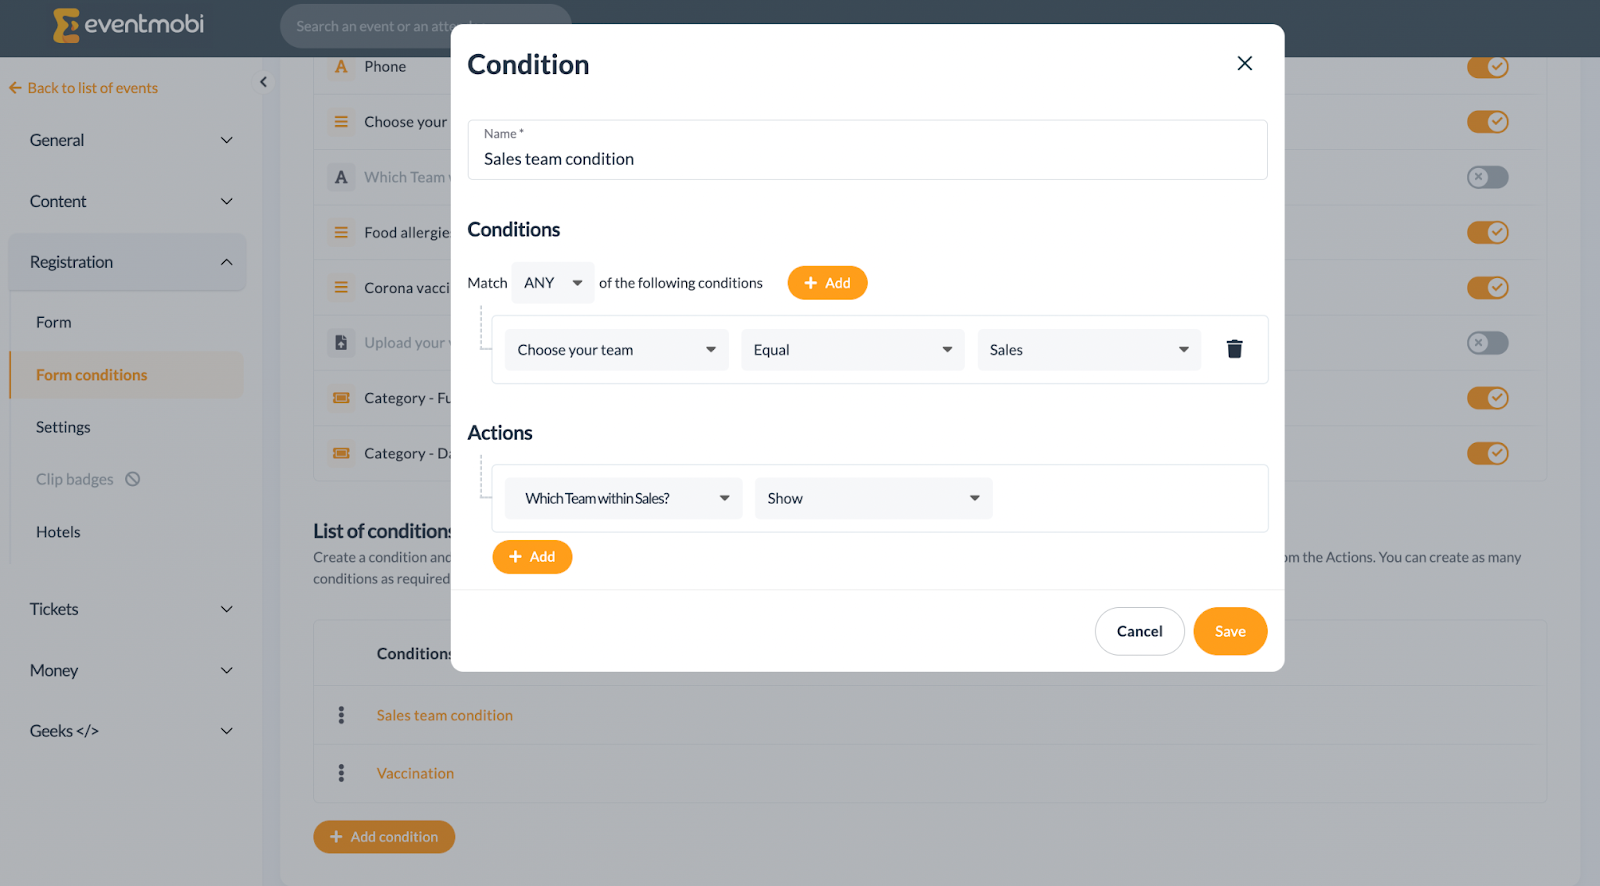
Conditions allow you to trigger an action based on the selections that are made during the registration process. These conditions are what help to create a personalized experience to those that are registering for your event.
To create conditions, follow the steps outlined below:
- Go to the Registration area of the EventMobi Registration platform
- Visit the Form Conditions page
- Select Add Condition at the bottom of the page
- On the pop-up page that appears, input the answer that will trigger the next set of actions
When creating your conditions, you will notice that form fields and categories are automatically populated and available for you to select from the Actions option. This is how you will determine if the action is triggered based on a ticket category selection or a registration field response.
If needed, you can set multiple conditions to apply by selecting the Match All or Match Any options.
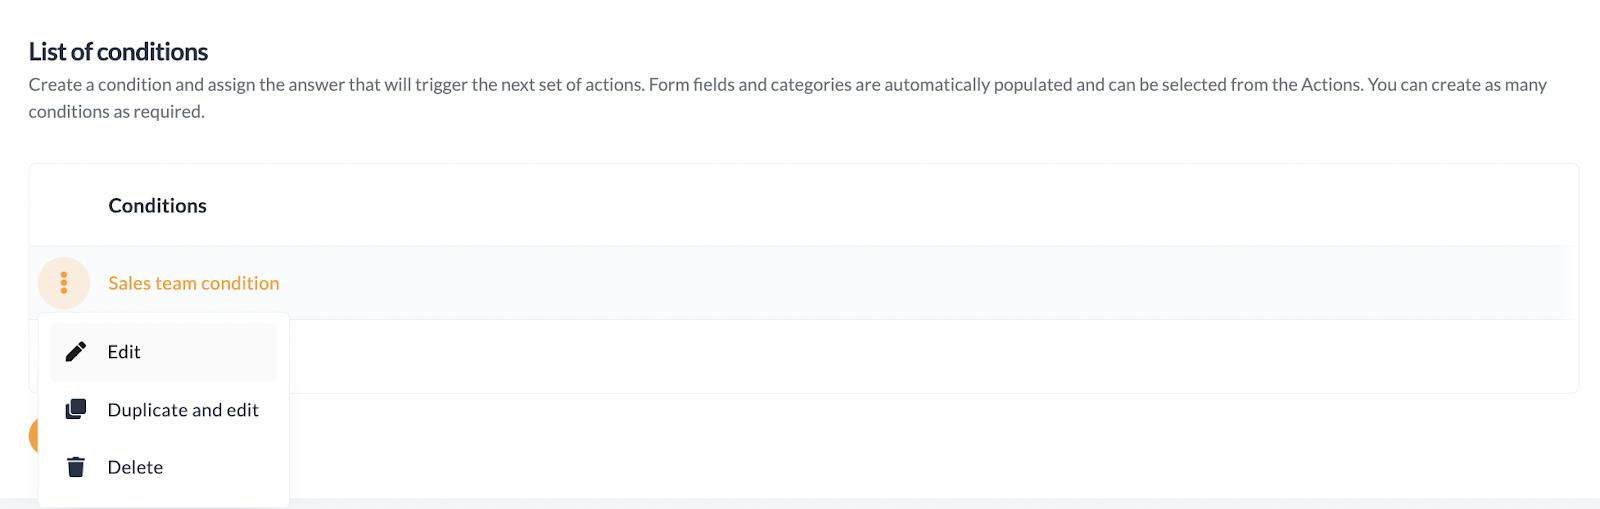
You will need to follow the steps above for each condition that you are looking to create. If your condition is very similar (i.e. but is being applied to another category) then you can use the icon with three dots located to the left side to duplicate and edit the condition as needed.
Tip: You can easily arrange and adjust form conditions using the Drag & Drop feature in the menu. This allows you to create dynamic and responsive conditions with ease, simplifying the form-building process.
Test Out Your Conditions
Before launching your registration site, make sure to test out each condition that you have created to confirm that it is displayed and working as intended.