Your EventMobi Registration site can be set to restrict registrations only to specific people when needed.
Restricting Registration based on Email Domain
One of the easiest ways to set a restriction for registration is to define a list of email domains that will be permitted to complete the registration process.
To restrict registration to specific email domains, visit the Form page found within the Registration area of the EventMobi Registration platform. Here you will find an Allowed Domains field where you can input the list of domains that should be permitted to register for the event.
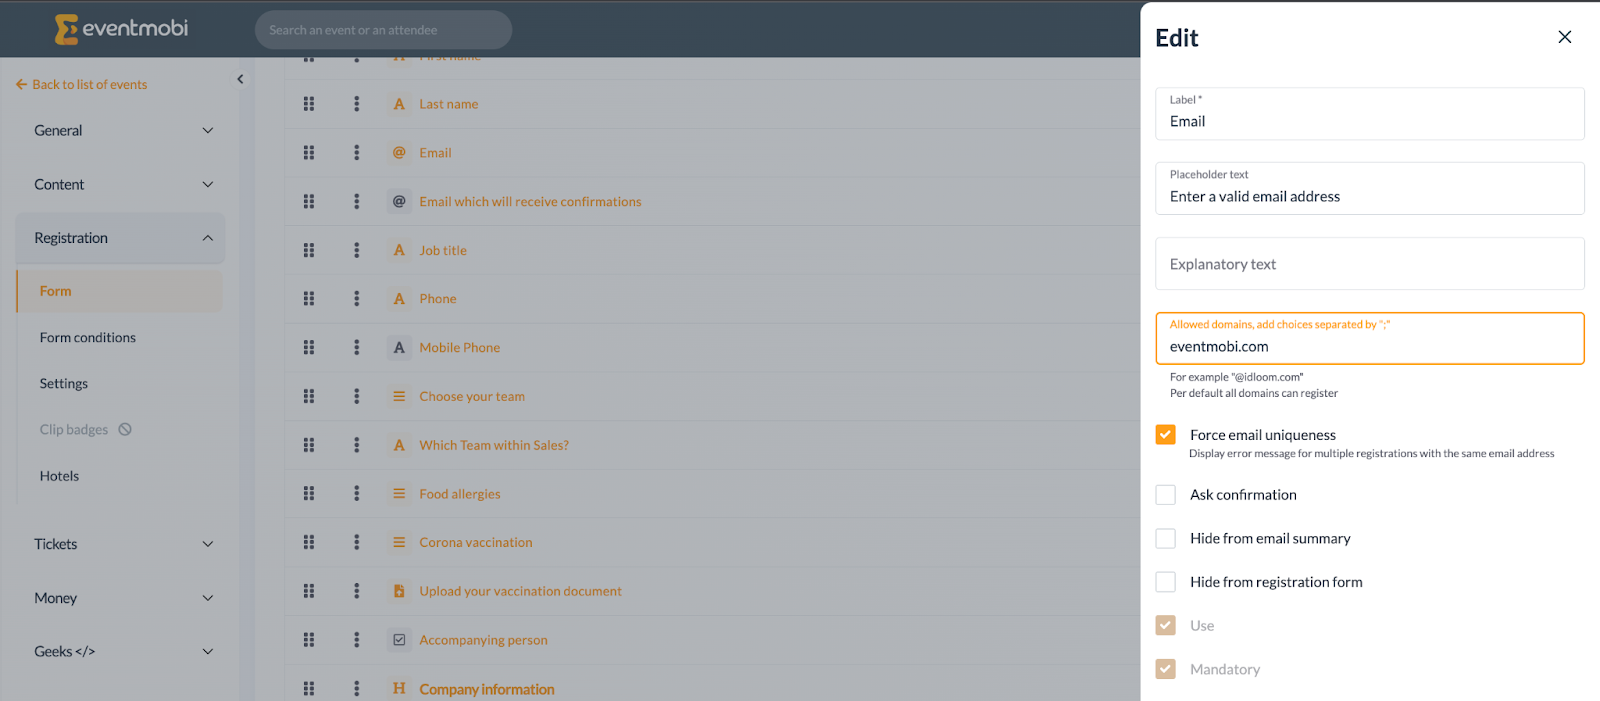
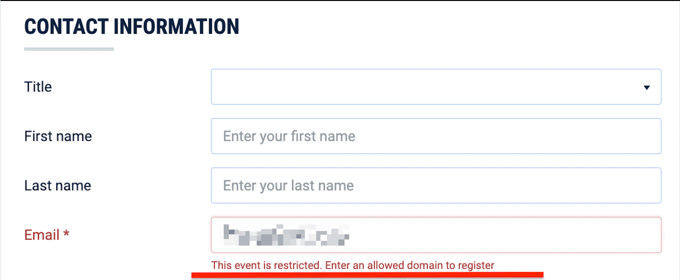
Once your list of Allowed Domains has been saved, it will restrict registration accordingly. People who are attempting to register with a domain that is not present on the Allowed Domains list will be notified that registration is restricted.
Restricting Registration using a Registration Code
Another way that you can restrict access to your registration site is using a code. When using this option, attendees will be asked to input a code before they can complete the registration process for your event - this can be a code that applies to all registrants, or it can be a personal code that has been assigned to each registrant.
To create your registration code visit the Settings page found under the Registration area of your EventMobi Registration platform. On this page, you will find a toggle to Activate Restricted Registration. To make this code a mandatory step in the registration process, make sure to also select the checkbox to Make code mandatory.
Select the option Use the same code for all registrants to create a single code that will be distributed to all registrants for your event.
Select Use one personal code for each registrant to create a unique code for each registrant using a template that can be downloaded and imported into the platform.
When activating your registration code(s), you will also have the option of adjusting the Pop-Up Text that will displays when someone is registering for the event.
Assigning Personal Registration Codes Using A Template
When opting to use personal codes for each registrant, you will need to work with an Excel template that is offered to outline the codes that will apply to each person that will be registering for the event. Each registration code that you assign will need to be unique for each person, as it can only be used once.
Once the Excel template is complete, you can upload the information using the Upload list of personal codes button available. Once the upload is complete, you will receive an email notification.
Note: You may notice additional registration fields that you have created on the template that is downloaded. These fields do not need to be populated, and can be left blank.
Accessing your List of Attendees / Pre-Registrants
Beside the Upload button you will also see the number of codes that have been imported - this will represent the number of people that are not yet registered, but pre-registered for the event.
People that you have included in your uploaded list will appear in your List of Attendees which can be accessed within the Attendees page of the General area of your EventMobi Registration platform.
Your list can be narrowed down to display those that have been uploaded by filtering based on the status Imported/Pre-Registrations.
Note: Once a person has registered for the event, their status will be updated to Registration Complete.
Tips for Using Registration Codes
- A unique code can be anything of your choosing. A few common examples are: Email Address, Badge Number or Student/Employee ID.
- Registration Codes should be shared with your registration invitations.
- Codes that you have uploaded will include a unique URL that can be used to directly open the pre-filled form without having to input the code first.
- Codes can be used to allow a limited number of registrations for a select group (i.e. 10 tickets available to an organization).
Sending Invitation Emails
Once your list of attendees and codes has been uploaded to the EventMobi Registration platform, the next step will be to prepare the invitation email that you will send.
- Visit the Emailing page of the General area of the EventMobi Registration platform
- Select the Add Campaign option at the top righthand side
- On the page that appears, update the Filter by Status field to Imported/Pre-Registrations
Note: All imported attendees will be set to Imported/Pre-Registrations status, so updating this field will allow you to ensure you are capturing all attendees that should be invited to register.
- Depending on the information that you have pre-filled in the Excel template that was uploaded, you can also choose to filter the email by Ticket Category and Options
- When inputting the content of your invitation email, select the {} icon and selecting the Registration Code option from the menu available - this is especially important if you have set the registration code as mandatory
- Using the {} icon, you can also include other personalized details such as first and last name
- Use the Source tab with HTML to incorporate other elements, such as a header image
- Make sure to Save your updates