Table of Contents:
- Introduction Check-In feature
- Download the EventMobi BadgeON App
- Manage Access for Check-In
- Kiosk Mode
- Check-in Settings
- Using The BadgeON App for Check-In and Badge Printing
- Analytics & Check-In Report
1. Introduction Check-In feature
EventMobi's Check-In feature is a comprehensive tool that simplifies event management for organizers. By utilizing the BadgeON App, organizers can effortlessly manage and monitor attendee check-ins and check-outs with the option of manual or self-service methods.
The BadgeON App offers a range of features such as QR code scanning, a search function, and a self-service option (Kiosk mode) for checking in attendees, providing flexibility in the check-in process.
Organizers have the ability to tailor the check-in experience to suit their event, manage access through unique access codes, and access real-time attendance data for valuable insights into participation levels.
Additionally, the feature seamlessly integrates with attendee profiles and offers multilingual support, making it a versatile and user-friendly tool for enhancing the overall attendee experience at both in-person and hybrid events.

2. Download the BadgeON by EventMobi App
To download the BadgeON by EventMobi App, simply click on the provided links or scan the QR codes using your mobile device.
 |
 |
| Apple App Store | Google Play Store |
Before you can begin using the Check-In feature, you will need to define a list of People who will be attending the event. This will determine who can be checked into and out of your event or sessions.
To create your People list, add profiles to the People Library using one of the following methods:
- Add profiles manually using the Add Person button
- Add profiles by importing our Excel Template
- Sync profiles from your registration or another integration
3. Manage Access for Check-In
To access the BadgeON by EventMobi App, there are two options available:
- Organizer Login: If you are already listed as an organizer for the event, you will automatically have access to the Check-In feature for all events within your Experience Organization. Simply log in using your Experience Manager credentials (email and password).
- Via Access Code: In the Onsite Tools section of your Experience Manager, you can send invitations to individuals who will be managing the check-in process for your event. These invitations will be sent via email and will include a unique Access Code for logging into the BadgeOn App for the specific event.

Note: Invitations to access the BadgeON App will need to be sent on a per event basis.
Sending Invites to the BadgeON App:
- Open the BadgeON App menu located under Onsite Tools
- In the Users tab, select the Invite button
- Input the Email Address of the person that you would like to invite, followed by the language that the invitation should be sent in

- Once an invite has been sent, an email will be received to the email that you had indicated. This email will include an Access Code that will need to be used to log into the BadgeON App to access the Check In feature.

View all Access Codes
Organizers within the Experience Manager will have access to see the Access Codes that have been assigned by selecting the Eye Icon available. Additional options to Send Email and Delete will be available to assist you with resending or removing access to the invitation as needed.

Resend Access Codes
To resend invitation emails with the access code for the BadgeON app to an individual, simply click on "Send Email" located on the right side.
If you need to resend multiple invitation emails at once, select the checkbox for each Staff Member you wish to resend the access code to, and then click on "Send Email" at the bottom of the page.
Send Email Individually:
Send Email in Bulk
Remove Check-In Staff/Access Codes
To remove a single access, simply click on the "Delete" option located on the right side of the Staff Member to revoke their access to the BadgeON App.
If you need to delete multiple accesses, you can select the checkbox for all users you want to revoke access for and then choose "Delete (X) Users" at the bottom of the page.
4. Kiosk Mode
In the Kiosk tab of the BadgeON App area of the Experience Manager, you will find additional options to help in enabling and customizing the Kiosk Mode for your Check-in devices.

Enable Kiosk Mode
The Kiosk mode in the Check-In feature provides a convenient self-service option for attendees to check in and out on-site. Attendees can simply scan their unique QR Code from the Attendee Dashboard of the Event App or use the search option for a seamless process.
Kiosk Color
When Kiosk Mode is activated, you have the option to choose a color for the Kiosk display. You can either input a HEX code for your desired color or simply click on the color picker icon to select a color visually.
Kiosk Welcome Screen Wallpaper
The image will serve as the background when Kiosk mode is active. Recommended dimensions vary by device, so please test the image in the BadgeON App: Kiosk to ensure proper display.
Upload supported file types: *.jpeg, *.jpg, *.png, *.bmp, and *.webp, with a maximum size of 24 MB per image.
Kiosk Badge-Printing Screen Image
If badge printing is enabled, this image will display while the badge is printing. Recommended image dimensions vary by device; please test in the BadgeON App: Kiosk to ensure proper display. For more details, refer to our guidelines.
Supported file types: *.jpeg, *.jpg, *.png, *.bmp, and *.webp. Maximum file size per image is 24 MB.
5. Check-in Settings
In the Settings tab of the Check-In area of the Experience Manager, you will find additional options to help in customizing the Attendee Check-In feature that will be used for the event.

Enable Check Out
In the Settings tab, you can also enable the Check-Out feature if needed. This feature provides a deeper insight into attendee participation levels, allowing you to track how much time each attendee spent at the event and in individual sessions, rather than just their presence.
Enable Search by Name or Email
Additionally, within the Settings tab, you can choose to enable a Search feature as an alternative method for attendees to check in and check out without using a QR code. By activating the search feature, users can easily locate their name or email address to complete the check-in or check-out process.
The QR Code option will still be available when the Search option has been enabled - this feature is meant to act as a secondary method of checking attendees in or out of the event/sessions.
6. Using the BadgeON App for Check-In and Badge Printing
Each person managing check-in at the event will need to start by downloading the EventMobi BadgeON App onto a recent Apple device.
Note: Badge label printing is currently only supported on iOS devices (iPhone or iPad). Android devices can still be used for check-in with the BadgeOn App but do not support badge printing at this time.
Logging into the BadgeON App
Organizers listed within the Experience Manager organization for the event will have automatic access to log into the BadgeON App.
- Choose the login method you would like to use:
- Login with Password: Use the same credentials that you use to log into the Experience Manager
- Login with Access Code: Use your email address and the Access Code shared in the email invitation that you received.
- Next, select the event you'd like to use the BadgeON App for
- Choose which option you wold like to do from the BadgeON App:
- Event Check In and Check Out (and badge printing)
- Session Check In & Out
- Print Badges Only
- Set up Kiosk (for attendees to self check-in)
Updating the BadgeON App Settings
The hamburger menu (≡) located at the top left-hand side of the screen provides users with the option to adjust the Language displayed on the BadgeON App.
If there are multiple events with the EventMobi Check-In Feature available, users can switch between events by selecting "Event - Select Event" to navigate back to the list of events.
 .
. 
Event Check In & Out
Attendees can be checked in and out of the event by scanning their attendee badge QR code. If you've pre-printed your attendee badges in advance, you can scan the QR code directly from the badge. If you don't have printed badges for the attendee onsite, you can scan the digital badge available from the My Badge area of the Event App.
You can also search by attendee name or email if you've enabled this option in the Check-In settings of Experience Manager.
If you are using Badge Label Printing at your event, you can select the toggle to Turn on Badge Printing, which will allow you to check in the attendee and print their badge at the same time.
Check out this article for instructions on how to set up Badge Label Printing at your event.

Attendees can be checked out of the event by selecting the Check Out option in the bottom menu, and scanning the attendee's badge, or using search to find them in the People list.

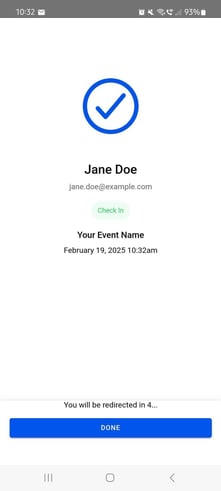
Once the check-in or check-out process is completed, a confirmation page will display important attendee information:
- Attendee name
- Email address
- People Groups that the attendee has been assigned to (Up to 3 People Groups are displayed by default; select the + icon to view all applicable groups for the attendee)
Please note that our Check-In system allows for multiple scans of the same QR code without issuing duplicate notifications or alerts. This ensures a smooth and uninterrupted check-in process. Furthermore, the system allows attendees to check into any session without requiring it to be on their personal agenda, ensuring a more open and adaptable check-in process.
Using Self Check-In and Check-Out through Kiosk Mode
Once Kiosk Mode is turned on in the Experience Manager's BadgeON Settings, you can activate the Kiosk feature on a device being used onsite. Upon logging in, you can decide whether you will be checking in attendees for the main event or for specific sessions by choosing between Event Check-In or Session Check-In. To activate the Kiosk Mode for your device, simply follow these steps:
- Select the Kiosk option found in the bottom menu of the App
- Enter in a name that will represent the particular Kiosk you are creating (this will be represented in your event Analytics)
- Select the type of kiosk that you would like to create, Check-In or Check-Out
In order for the Kiosk Icon to be visible, it is important to disable the "Enable Search by Name or Email" setting for the Check-In feature.

.jpg?width=275&height=597&name=File%20(1).jpg)
Note: Attendees will not have access to exit the Kiosk mode. To navigate back to the BadgeOn App, an invited user will need to select the Lock Icon located to the top left hand side and enter their credentials (Access Code or Username & Password).
7. Analytics & Check-In Report
Event Attendance Analytics
The analytics related to your event attendance rates can be found within the People tab of the Analytics area in the Experience Manager.
Select the Onsite option at the top left hand side of the page to access the following details:
- Total number of People that have been added to the event
- Total number of unique check ins
- Check ins and check outs over time
- Breakdown of attendee check ins and check outs including date and timestamps

Session Attendance Analytics
The analytics related to your session attendance rates can be found within the Sessions tab of the Analytics area in the Experience Manager.
Here you will find details related to:
- Total number of sessions
- Total number of checkins
- Total number of checkouts
- Breakdown of session check ins and check outs including date and timestamps
To narrow down the analytics related to a specific session, use the dropdown menu provided at the top left hand side.

Please be aware that all reports will display the time zone in UTC and not in the event time zone.
If you are looking to efficiently convert time zones in Excel, we recommend checking out our article 'Converting Time Zones in Excel.' This resource will help you master the process of converting UTC time to the event time zone seamlessly.