Learn How To Create and Manage Sections
Learn to share event data through your Event App sections and manage content visibility and access settings effectively.
Table of Content:
- Video Tutorial - Creating and Managing Sections
- Creating and Managing Sections
- Library Sections (People, Agenda, Companies, Documents, Videos)
- Content Sections (Designer Page, Page, Link)
- Grouping Sections (Folders, Divider)
- Reorder Sections
- Default Sections
- Preview Your Event
- Best Practice: Link Sections (iFrames)
1. Video Tutorial - Creating and Managing Sections
2. Creating and Managing Sections
To add new sections to the left-hand menu of your Event App, go to Event App > Menu Sections in the Experience Manager. Click on the green Add Sections button, and a dropdown menu will appear, displaying all the different types of sections you can create.

Sections can be categorized into three distinct types: Libraries, Content, and Groupings. Below is a concise overview of each type and its intended purpose.
| Library | People Agenda Companies Documents Videos |
display information from your library's content, including profiles, sessions, and more. |
| Content | Designer Page Page Link |
show content that is not associated with any Library. This includes Designer pages, the ability to create new pages using the Rich Text editor, or to link directly to external websites. |
| Grouping | Folder Divider |
These section types can be utilized to effectively organize the left-hand menu of your Event App. |
2a. Libraries Sections
Library section types are designed to display various content from your library, including profiles of individuals, event agendas, company information, documents, and videos.
The People section is designed to highlight profiles of speakers, attendees, and other key participants associated with the event. Any data uploaded to the People Library within the Experience Manager will be showcased in this section.
The Agenda section plays a vital role in showcasing the schedule of sessions, workshops, and activities during the event. Any data uploaded to the Sessions Library within the Experience Manager will be displayed in this section.
The Companies section serves to showcase sponsors, partners, and exhibitors linked to your event. Any data added to the Companies Library within the Experience Manager will be displayed here.
In the Documents section, you have the opportunity to provide essential materials such as brochures, presentations, and reports that attendees may require before, during, or after the event. Any documents uploaded to the Documents Library within the Experience Manager will be accessible in this section.
The Videos section allows you to showcase recorded sessions, promotional materials, and tutorials, thereby enhancing the attendee experience with dynamic multimedia content. Any videos uploaded to the Video Library within the Experience Manager will be accessible in this section.
Section Settings:
All Library sections have the following Section settings in common:
|
Section Icon |
Choose an icon to accompany the section name in the Event App's menu. When you click on the icon selector, you will see 15 options displayed initially. However, you can utilize the search bar to explore additional icon choices. |
| Section Name | Assign a name to this section that will be visible in the left-hand menu. |
| Section Content | Select the data from the corresponding library that you would like to display in this section. You can opt for either "All" content or "Specific content," allowing you to filter based on categories or groups as needed. |
| Section Visible to | Indicating whether the section is accessible to all users or restricted to specific groups within the Event App menu. |
| Hide Section |
Use this checkbox to toggle the visibility of the section in the Event App menu. When a section is hidden, it will not be accessible to any users. |
2b. Content Sections
Designer Page Sections provide an efficient way to present event-related information through a custom-designed page. Before you can create a Designer Page Section, you must first design your pages in the EventMobi's Page Designer. For detailed guidance on creating Designer Pages, please refer to the corresponding article.
Page sections allow you to incorporate information into your Event App's menu using the Rich Text Editor. While the Rich Text Editor provides a straightforward way to add content, please note that its design options are somewhat limited. For a comprehensive understanding of the capabilities of the Rich Text Editor, we encourage you to consult the related article.
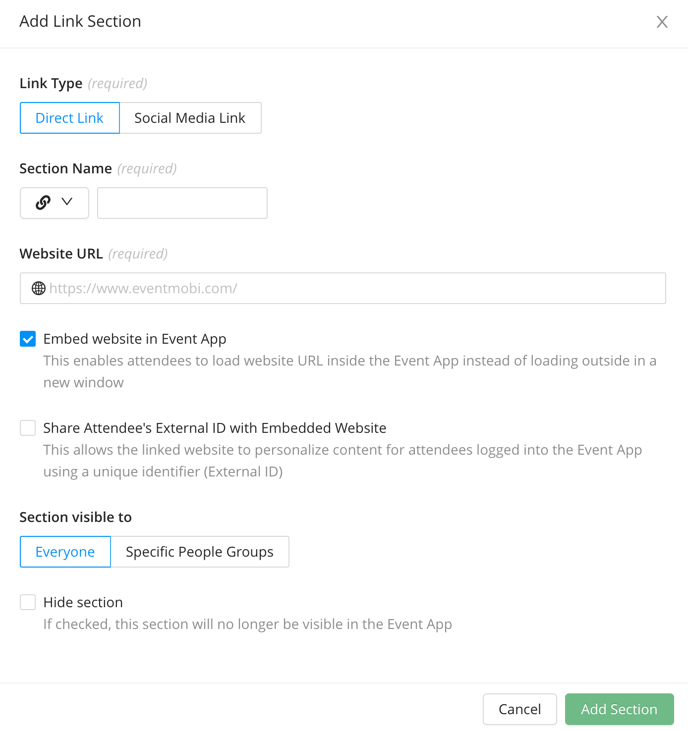
The Link section type will allow you to link to external websites or social media channels.
| Website | Social Media Link | |
| Section Icon |
Choose an icon to accompany the section name in the Event App's menu. When you click on the icon selector, you will see 15 options displayed initially. However, you can utilize the search bar to explore additional icon choices. |
Select the desired Social Media icon you wish to link. This will ensure that the corresponding Social Media icon appears automatically in the Event App menu for easy access. |
| Section Name / Link Name | Assign a name to this section that will be visible in the left-hand menu. | Assign a link name to this section that will be visible in the left-hand menu. |
| Website URL (only of Website Link Type) | input the external URL that you would like to link in the Event App menu. | - |
| Link to Social Media (only for Social Media Link Type) | - | Provide the necessary information for your social media account, such as a profile URL or your X handle. |
| Embed website in Event Space (only for Website Link type) | By default, links to external websites will open in a new browser tab. However, you can enable embedding to display the website within the Event App, provided the target site allows it. | - |
| Section visible to | Indicating whether the section is accessible to all users or restricted to specific groups within the Event App menu. | |
| Hide section |
Use this checkbox to toggle the visibility of the section in the Event App menu. When a section is hidden, it will not be accessible to any users. |
|
-1.png?width=334&height=315&name=Screenshot%20(10)-1.png)

2c. Grouping Sections
Folder sections allow you to add a multitude of pages and direct links to your Event App. Although these section types are generally used to provide helpful information that attendees may need to access to help with their event experience, they can also be repurposed to suit any purpose relevant to your event.
3 Types of Sections can be included in Folders: Designer Pages, Pages and Links.
Creating Your Folder Sections
- Select the Sections option found under the Event App area of the Experience Manager.
- Click on Add Section, and select the Folder option from the dropdown menu.
- Choose an Icon and set the Section Name.
- Update the Section Visible To area to determine if Everyone or Specific People Groups should see this section in the Event App menu.
- Select the Hide checkbox, if applicable.
- Click on Add Section

Adding Designer Pages to Folders
- Select the Add option found to the right-hand side of the page next to your Folder.

- Choose the Designer Page option that appears in the drop-down menu.
- Choose an Icon and input a Section Name for your page.
- Select a Page to use from the drop-down menu. The Designer pages need to be created first by going to "Page Designer" under the Library options on the left hand-side menu.
- Select the Hide Section checkbox, if applicable.
- Click on Add Section to save your changes.
Adding Pages to Folders
- Select the Add option found to the right-hand side of the page next to your Folder.

- Choose the Page option that appears in the drop-down menu.
- Choose an Icon and input a Section Name for your page.
- Input your page content into the Rich Text Editor field.
- Select the Hide Section checkbox, if applicable.
- Click on Add Section to save your changes.

Adding Links to Folders
- Select the Add option found to the right-hand side of the page next to your Folder.

- Choose the Link option that appears in the drop-down menu.
- Select the Link Type, Direct Link or Social Media Link.
- Choose an Icon and input a Section Name for your link.
- Enter the Website URL (make sure to include https://)
- Select the Embed Website in Event Space option if you would like to embed the link.
- If applicable, select the Share Attendee's External ID with Embedded Website option for your embedded link.
- Select on the Hide Section checkbox, if applicable.
- Click on Add Section to save your changes.
Not all websites allow its content to be embedded - this will depend on the permissions of the site itself. It is a good idea to test beforehand to confirm that the site will display and function as intended.
Divider
| The final section type, you'll notice, is the divider, this is used to create a bit more visual separation between different sections of the menu. | -1.png?width=239&height=479&name=Screenshot%20(3)-1.png) |
3. Reorder Sections
The order that the sections are displayed within the Experience Manager is the order that they will also display within the Event App. To adjust the order, select the reorder sections option and drag and drop the sections into place. Don’t forget to click save after you’ve finished!

4. Default Sections upon Event Creation
To get started, navigate to the Sections area of the Experience Manager by selecting Event App ⇒ Menu Sections from the left-hand menu. Here, you'll find a variety of default sections, including Attendees, Speakers, Agenda, Companies, Gamification, Surveys, Announcements, Maps, Group Discussions, Activity Feed, and Event Information.

Each default section connected to your event libraries will automatically display all added content, but you can edit these sections anytime according to your needs. If needed, default sections can also be hidden or deleted.
Some sections, including Gamification, Maps, Announcements, Polls & Surveys, Activity Feed, and Group Discussions, are automatically generated upon event creation, and only one instance of each can exist. While these sections cannot be deleted, you have the option to hide them if they are not required for your event.
5. Preview Your Event
Once your sections are complete, use the View in your Event Space link to see how they're being displayed from the Event App.
Keep in mind that sections may or may not display for you based on the groups that your username has been assigned to.

6. Best Practice: Link Sections (iFrames)
Jump to:
Content can be seamlessly embedded into the Event App using our iFrames feature, and will prevent attendees from having to navigate outside the Event App to access the information you are looking to share. This feature offers a great solution to embedding content such as:
- Web-hosted videos (example: YouTube)
- Maps (Google Maps, Direction, or other maps)
- Google Presentations
- Custom website content
iFrames can be enabled using a Link section type that will display in the Event App menu, using the Embed Link in Event Space checkbox.
Security & Privacy
To ensure the security and privacy of your attendee's personal information, please consider the following before using the iFrames feature:
- Only embed URLs that you trust. Users may not be aware that they are navigating a third-party destination and will need to be protected from phishing and related attacks.
- Be careful of providing the user's External IDs, especially if they contain personal data such as their e-mail addresses and names.
- URLs that include a payment form should not be offered through the iFrame feature. If linking to this page is necessary, please do not use the embedding feature.
I Received an Error Message
The URL that you are looking to embed (iFrame) into the Event App will need to have specific permissions that allow for it to be used in this way. In some cases, an error message will display to notify you when the URL cannot be embedded or to indicate that there is an issue with the URL that you entered.
When a URL that you have entered is incorrect or does not allow embedding, one of the following error messages will be displayed to notify you.


Embedding Websites
To embed a website into your Event App, you will want to first check that it meets the following requirements:
- The external website allows the content to be iFramed.
- The link is HTTPS (HTTP links cannot be used).
- The link is not designed to open in a new window (this will not work for iFrames).
- The external website being embedded is responsive for Android and iPhone devices (for Event App usage)

Once you have confirmed that the website you are looking to use for the iFrame is compatible, you will want to follow these steps:
- Copy the HTTPS website link.
- Visit the Menu Sections area of the Event App area in the Experience Manager.
- Select Add Section, and choose the Link option.
- Paste the URL into the new Link section that you have created.
- Enable the “Embed Website in Event Space” checkbox.
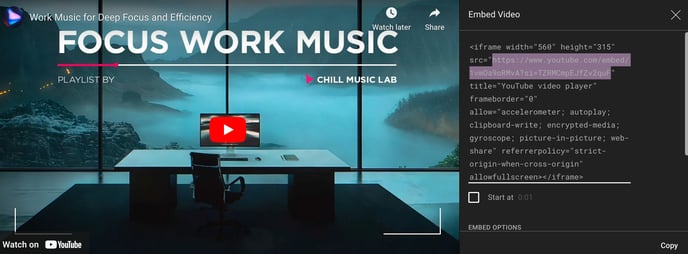
Embedding YouTube Videos
- Access the video you would like to link to from YouTube.
- Select the Share option found at the bottom of the video.
- On the pop-up that appears, choose Embed.
- Copy the https-link only (not the whole embed code).

Embedding Google Slides
- Access the Google Slides you would like to share.
- Select File from the top menu.
- Select the Publish to Web option from the list.
- Select Start Publishing.
- Copy the https-link that displays (not the entire embed code).

Embedding Google Maps
- Access the Google Map you would like to display.
- Select the Share option.
- Select the Embed a Map tab on the pop-up that appears.
- Copy the https-link only (not the entire embed code).
A few limitations to note:
- Maps are not interactive within the iFrame (clickable content will not work, but zooming and dragging the map will be available).
- Directions cannot be adjusted from content that was saved by an organizer.

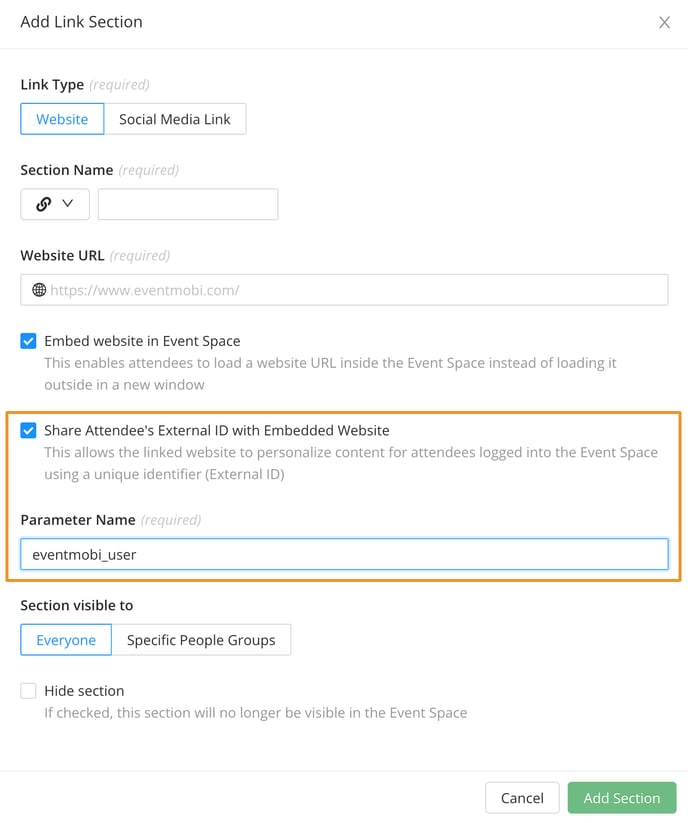
Including Attendee External IDs

Our iFrame feature can also be used to provide customized experiences to your Event App users
by offering their external ID. This option can be enabled simply by selecting the Share Attendee's External ID with Embedded Website box and defining the parameter - by default this will be set to eventmobi_user, but can be modified based on the needs of the external website.

