Maps: Guide Attendees with Linked Maps for Sessions, Companies, and Beyond
Easily direct your attendees to the right place by linking sessions, company profiles, and external locations with the Maps feature. Whether it’s guiding them to a session room, booth, or external site, Maps ensures seamless navigation.
Table of Content:
1. How It Works
When uploading an image map, keep in mind that most people will view it on their mobile devices. There is no strict size limit, but we recommend 1200px in width and 1500px in height (the average width of an iPhone screen is approximately 300-400pxl). The accepted file formats are JPG, JPEG, or PNG.
- From the Maps library, click + Add map.
- Select Image Map from the dropdown menu.
- Enter a Map Name and upload the image of the map.
- Click Add Map to save it.

Google Maps:
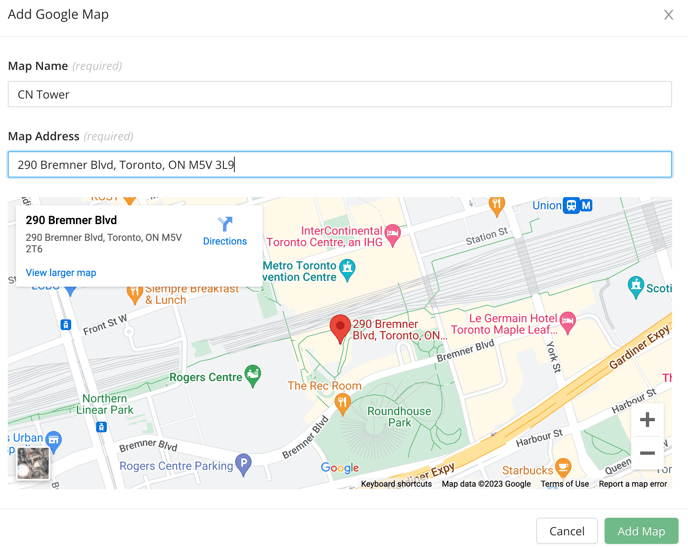
You can easily add a Google Map into your Maps library.
- From the Maps library, click + Add map.
- Select Google Map from the dropdown.
- Enter a Map Name.
- In the Map Address field, enter the address of your location.
- Click Add Map to save it.

3. Placing Location Pins on Maps
Once you have uploaded an image map, you have the option to place individual location pins anywhere on the map. Follow these steps to add new pins to your map:
- Choose the specific Image Map on which you would like to place Location pins.
- On the Location tab, select the Add Location option to create a new pin drop

- Enter the location name and then click on the desired spot on the image where you want the pin to appear.
- Save your changes.

Continue adding location pins by following the same steps for each new pin you want to place on the map.
Change an existing Location Pin:
To update a location pin, simply click on the 'Edit' option located on the right side of the pin. A window will pop up, allowing you to modify the name of the pin. You can also adjust the position of the pin by clicking on the desired spot on the image map. Remember to save your changes once you're finished.
Delete a Location Pin:
To delete a specific Location Pin, just click on the delete button next to the Pin's name. Confirm the deletion in the pop-up window to remove it from the map.
4. Connecting Maps & Location Pins to Sessions and Companies
You have the option to associate Maps and Location Pins with either sessions or company profiles. This can be done manually through the backend or by utilizing the Excel template to import the location data. It's important to note that before linking them to a company or session, Maps and locations must be created first.
Manually linking Maps & Locations
- navigate to the session or company profile from the related library to access it's details page
- Scroll to the Location area on the company profile or session details page
- Select the Map option under Location Type
- First, choose the relevant Map from the dropdown menu offered.
- After selecting a Map, another dropdown menu will be displayed to choose a Location Pin, if available
- Save your changes.

Linking Maps & Location Pins using the Excel Template
- Select the Import/Export option in the relevant library (sessions or companies)
- Choose the Export option to download an Excel Template with all of your sessions or company profiles
- In the Map column, input the name of the relevant map you want to associate with this specific entry.
- In the Location column, input the name of the relevant location pin

- Save your changes on the Excel file.
- Select the Import/Export option, but this time choose the Import option
- Upload the template that you just made changes to and import it back to Experience Manager.
Note: The Map and Location names that you are entering into the Excel template will need to be entered in the exact spelling that they are listed in the Maps library. These names are also case sensitive, so we recommend copy and paste if possible.
5. View all Maps through the Map Section
To easily access all uploaded maps, including Image Maps and Google Maps, you can utilize the Map section. This section is automatically available under Event App > Menu Sections directly after creating an event , with only one map section per event. You have the option to rename this section, select another icon, set visibility for specific user groups, or hide it if not needed.


Please note that each event can only have one Map section, which means that this section cannot be deleted. If you prefer not to display the Map section in your Event App, you have the option to hide it instead.
In the front end, the map section can be found in the left-hand menu of the Event App. It will display all maps uploaded in the Maps library, sorted alphabetically by the name given during upload.

Kindly be informed that Location Pins are exclusively visible when accessing the Location through a Session Details Page or Company Profile, and are not displayed in the Map section.
6. Navigating Maps within your Event App
Once you connect Maps and Location Pins to a session or company profile, the location will appear on its details page. By clicking on the hyperlinked location, you will be redirected to the corresponding map and see the location pin displayed, if applicable.
Example of how a Google Map is connected to a session and displayed in a web browser view:
Example of how a Company Profile can be linked to a Map with a Location Pin, displayed on a mobile device: