Handling Online Payments with your Extended Registration
What Payment Gateways Are Supported?
EventMobi Registration offers 24 online payment gateways that you can use for accepting payment during the registration process:
- Authorize.net
- Adyen
- Bambora
- Bit2Me
- CASHNet
- Crédit Agricole
- CCV
- Elavon
- Elavon US
- HiPay
- Igenico
- Mollie
- Monetico
- NelNet
- Opayo, formerly Sage Pay
- Paybox by Verifone
- Paypal
- Paypoint
- SIX Payment by Worldline
- Stripe
- Tap
- VR Payment
- Worldline
- Xolvis Pay
NOTE: Please view the following set up instructions if you are using Elavon US as your payment gateway.
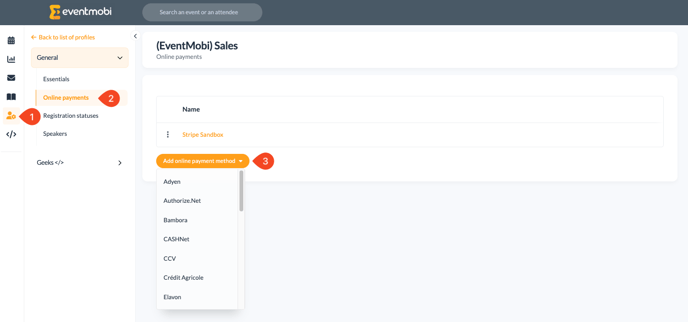
How to set up?
- Visit the Profile area of the EventMobi Registration platform to access the Online Payments page
- Select Add Online Payment Method

- Choose the payment gateway you would like to work with and insert the account information requested to establish the connection
Enabling Payments for your Registration Site
Once your Payment Gateway has been established, you will want to make sure that your registration site is set to accept payments.
- Visit the Essentials Area for your event
- Select the Paid option under Pricing Plan
- Choose the Currency that should apply
Note: This will also allow ticket Categories and Options to be charged.
Setting Up Elavon US As Your Payment Gateway
Beyond adding your "Merchant Account ID", "Merchant User ID", "Pin" and selecting your mode (Sandbox = Demo, Live = Production) you will also need to configure your account.
To do so, connect to your Converge UI/Portal via the following URLs:
- Converge Next Gen Demo: https://demo.convergepay.com/converge-webapp/#!/login
- Converge Next Gen Production: https://www.convergepay.com/converge-webapp/#!/login - Demo credentials will not work in this environment
Once connected, via the left-hand side menu, go to "Settings" and select "System Setup".
Scroll down to the bottom of the "System Setup" page, until you reach "Export Options".
Lastly, be sure to follow these 3 steps:
- Check the "Enable Export Script" box
- Copy and Paste the following URL: https://idloom.events/webhooks/elavonus into the "Approval URL", "Declined URL, and "Error URL" fields
- Save your changes