Table of Content:
- How People Get To Your Event App
- Setting Up a Custom Domain for Your Organization
- Domain Verification Status
- Linking a Custom Domain to Your Event
- Redirect URL
- Additional Details & Explanations
How People Get To Your Event App
Your EventMobi Event App can be accessed on any current internet browser and on the EventMobi Universal App.
Browsers
When accessing the Event App from a browser, attendees will enter your event's unique URL. Event App URLs usually follow this format: eventmobi.com/EventCode (where "eventmobi.com" is the domain and the Event Code is the part of your app's URL that distinguishes your event from others).
Your Event Code is set when you first activate your event, and we recommend that you keep it simple and easy for attendees to enter. If you need to change your Event Code after it has been saved, simply contact Support to let us know what you would like to change it to.
EventMobi Universal App
Your event can be accessed on iOS and Android devices by downloading the EventMobi app from each respective app store. Once the app has been downloaded to the device, attendees can access your Event App by searching for the unique Event Code that you have assigned.
Custom Branded Apps
If a Custom Branded App is included as part of your app package, then users will have access to download your event information directly from the Apple App Store, or Google Play through an app listing under your developer account. This is done using a file that our Branded Apps Team has created and provided to your team.
Updating the Event Code of your event app URL will impact users' ability to access your information once they have downloaded the app from the store. If a change to the Event Code is necessary, then a resubmission to the app store will be required.
Setting Up A Custom Domain for Your Organization
By default, EventMobi events can be accessed through URLs formatted as eventmobi.com/EVENTCODE. When you set up a custom domain, this replaces the eventmobi.com part of the URL, resulting in a format like subdomain.yourdomain.com/EVENTCODE.
It’s important to include the /EVENTCODE in your communication to ensure attendees are directed to the correct event page.
For organizations that utilize a single custom domain for multiple events, each event's URL will feature a distinct event code to differentiate between them. For example:
- Event 1: subdomain.yourdomain.com/eventcode1
- Event 2: subdomain.yourdomain.com/eventcode2
To replace “eventmobi.com” with your preferred domain name, you will need to create a subdomain (such as event.yourdomain.com or www.yourdomain.com) by adding the required CNAME records, which will be provided to you during the setup process outlined below.
- Select the Custom Domain option displayed in your organization.
- Click on the Add Custom Domain button.

- Enter the custom subdomain you wish to configure, then click "Next" to begin generating the necessary CNAME records.

- Retrieve the CNAME records generated by EventMobi, which typically takes up to one hour. You will receive a notification via email once the CNAME records are ready for use.
- Once you have retrieved the CNAME records, the next step is to add them to your DNS provider. This process can take anywhere from 1 to 48 hours, depending on your DNS provider's settings, and must be completed within 72 hours of generating the CNAME records. If you wish to share the records and setup instructions with your IT team for assistance, simply click on "Copy records & set up instructions" to easily distribute all necessary details.

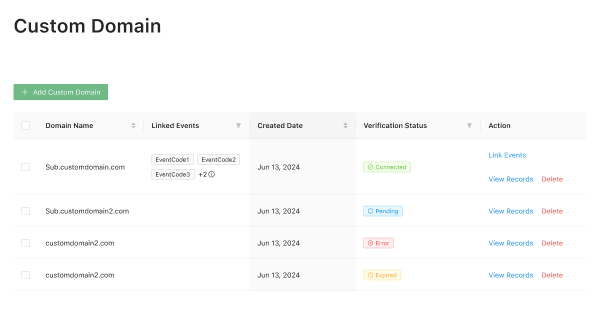
- Re-visit the Custom Domain area in the organization to confirm the verification status of the domain.

|
Status
|
Explanation
|
Additional Notes
|
|---|---|---|
|
Connected
|
Setup is complete, and the domain is working.
|
Organizers will receive an email confirmation.
|
|
Pending
|
Waiting for DNS setup or verification.
|
|
|
Error
|
DNS records were not verified.
|
Click “View Records” to identify and resolve issues. Organizers will be notified via email.
|
|
Expired
|
Domain expired due to inactivity (6 months without use).
|
Linking a Custom Domain to Your Event
- Visit the Custom Domain area of your organization.
- Make sure the domain status is Connected, and then click on the Link Events option.

- Select any of the events that you would like to use the domain for, and then click Save.

Alternatively, you can link a custom domain from the Experience Manager to an event.
- Navigate to the General > Event Details > Settings area of the specific event you wish to associate with your Custom Domain within the Experience Manager.

- Select the domain from the Event URL Address dropdown menu.

Redirect URL
Handling Custom Domain Access Without /EVENTCODE in the URL
If a user accesses the custom domain without specifying /EVENTCODE (e.g., sub.customdomain.com), you can configure a Redirect URL in the Custom Domain tab.
This redirect can lead to any page, including the intended EventMobi event (e.g., sub.customdomain.com/EVENTCODE).

Additional Details & Explanations
Please note:
- A CNAME is a record type that you add to your DNS to maps a domain name to another. The record is builds-up from a Name and a value part that could after you set up your DNS be displayed as the following example:
event.yourdomain.com CNAME abc123.event.yourdomain.com - At some domain DNS service providers, you will eventually not need to copy the whole name we provided and the step how to configure the DNS setting may vary. If you are getting trouble configuring the CNAME entry, we provide for you. Please reach back to our technical support team over support@eventmobi.com
- Once we show you the CNAME records you have to add at your DNS Configuration, it will need to be created within 72 hours, after which time the request expires, and you’ll have to start this process again.
How To Configure Your Custom Domain in Your DNS Settings
To use your custom domain, you will have to go to your domain host to point the domain to EventMobi using the steps below, e.g., event.yourdomain.com.
- At your domain provider, or web hosting service, go to the DNS section to create your CNAME
- Add the two CNAMEs provisioned in Experience Manager for your custom domain.
e.g., first entry: _c28cc2ea43a03ce1a38029e8278627c7 CNAME _71ab90b8d01614e8ffcebbabcd3a8c51.btkxpdzscj.acm-validations.aws.
e.g., second entry: event CNAME 580d6124-db60-4529-9163-e42a8360fca3-49809.eventmobi.live.
Note: we use event.yourdomain.com as an example. Your subdomain can be whatever you like. We recommend using either your event code, or event.
- Each DNS provider has its own configuration process, the steps, and term used to add or update a CNAME record may vary.
- Once the CNAME records have been created, our system will check and once these are detected, both entries will show a green indicator and the domain will be ready to use. Depending on your provider, this can take anywhere from 1 hour to 48 hours.
- If you have a website for your top-level domain (event.com), then go to your web host (where your website is hosted) to create the CNAME record. If you don’t have a website for the top-level domain, go to your domain provider.