These features allow you to:
- Limit the number of attendees who can register for a session.
- Prevent attendees from adding overlapping sessions to their personal agenda.
Step 1: Navigate to Your Session Library
- Log in to your Experience Manager account.
- From the left-hand navigation, select Libraries > Sessions.
- Open the session you want to manage.

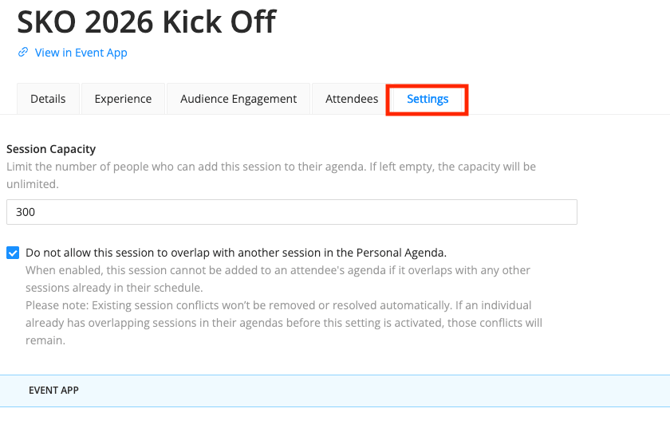
Step 2: Set a Session Capacity
- Open the Settings tab for the selected session.
- Under Capacity, enter the maximum number of attendees allowed (e.g., 300).
- If the session has no capacity limit, leave this field blank.
- If the session has no capacity limit, leave this field blank.
- To prevent attendees from adding overlapping sessions, enable Do not allow this session to overlap with another session in the personal agenda.
- Click Save Session.
This ensures attendees cannot add multiple sessions occurring at the same time to their personal schedules.
Step 3: Repeat for Other Sessions
- Return to your Session List and open any additional sessions scheduled at the same time.
- For each session, choose to:
- Allow unlimited capacity, or
- Set a specific capacity limit.
- Enable Do not allow this session to overlap with another session in the personal agenda if you want to block double-booking.
Click Save Session for each update.
Step 4: Manage Session Capacity in Bulk
If you want to update capacity or conflict settings across multiple sessions simultaneously, use the bulk management tool in your Sessions list.
- In Libraries > Sessions, use the checkboxes to select specific sessions.
→To select all, click the checkbox in the header row. - Click Manage Settings at the bottom of the page.

- In the pop-up window, choose one of the following:
- Update Session Capacity – Assign a universal capacity to all selected sessions.
- Update Session Overlap – Apply Conflict Management settings to all selected sessions.
- Click Save to apply the changes.
⚠️ Important: Bulk updates override any capacity or conflict settings already configured for individual sessions.

Step 5: Test in the Event App
- Open your Event App or Attendee View.
- Attempt to add overlapping sessions (for example, “Rise & Shine Breakfast” and “Sales Kickoff” both at 8:00 AM).
- You’ll see a warning message such as:

This confirms that Conflict Management is functioning correctly.
Enforcing Session Sign-Up Rules During Onsite Check-In
Do you have limited or restricted access to sessions? Now you can enforce it.
If you need to ensure that only attendees who signed up for a session are allowed to attend, you can now enforce sign-up rules directly through a new session setting. This applies whether you are checking attendees in onsite, managing high-demand sessions, or controlling access to specialized content.
To enable this setting:
-
Open a session in the Experience Manager.
-
Go to Settings → Onsite App.
-
Enable Require Session Sign-Up for Check-In.

When this setting is turned on:
-
Only attendees who are signed up for the session will be permitted to check in at the door.
-
If an attendee is not registered, the Onsite App will prevent check-in and display a message indicating they are not eligible.
-
This helps enforce capacity rules, pre-registration requirements, and conflict-free agendas onsite.
This feature works together with Session Conflict Management to ensure that attendees can only enter sessions they are eligible for based on their signup choices.
Troubleshooting
If attendees experience issues adding sessions or encounter unexpected conflicts, verify the following:
- Session Times: Even minor overlaps (e.g., one session ending at 10:01 and another starting at 10:00) can trigger conflicts.
- Capacity Limits: Confirm that limits are applied only where needed. When a session is full, attendees cannot add it.
- Conflict Settings: The Do not allow this session to overlap option should be enabled only for sessions where overlap restrictions are intentional.
- Attendee Awareness: Remind attendees that they can replace a conflicting session if they wish to attend another scheduled at the same time.
Best Practices
- Use session capacity for high-demand sessions or rooms with limited seating.
- Apply conflict management for sessions that occur simultaneously or are mandatory.
- Review all session times carefully before enabling overlap restrictions to prevent unnecessary conflicts.