---
title: Emailing Module & Campaigns for Event Marketing
description: Extended Registration’s emailing module, all event communication lives in one place. Invitations, campaign emails, and follow-ups are created, sent, and tracked directly from your profile.
---
[Skip to content](https://help.eventmobi.com/en/knowledge/emailing-module-campaigns-for-event-marketing#main-content)
English
Show submenu for translations
[![1589391206704.png\]](https://help.eventmobi.com/hs-fs/hubfs/1589391206704.png?width=40&height=40&name=1589391206704.png)](https://help.eventmobi.com/?hsLang=en)
- [EventMobi Knowledge Base](https://help.eventmobi.com/)
Open main navigation
Close main navigation
- [EventMobi Knowledge Base](https://help.eventmobi.com/)
- English
Show submenu for translations
- [Product Updates & Feedback](https://updates.eventmobi.com/)
[Product Updates & Feedback](https://updates.eventmobi.com/)
What can we help you with?
- There are no suggestions because the search field is empty.
1. [EventMobi Knowledge Base](https://help.eventmobi.com/en/knowledge?hsLang=en)
2. [Event Organizers](https://help.eventmobi.com/en/knowledge/event-organizers?hsLang=en)
3. [Extended Registration](https://help.eventmobi.com/en/knowledge/event-organizers?hsLang=en#extended-registration)
July 23, 2026
# Emailing Module & Campaigns for Event Marketing
## With Extended Registration’s emailing module, all event communication lives in one place. Invitations, campaign emails, and follow-ups are created, sent, and tracked directly from your profile. You can see how recipients interact with your emails, adapt your messaging accordingly, and build communication to your attendees from the first invite to the final follow-up.
Table of Content:
1. **[Navigating Through the Emailing Module](https://help.eventmobi.com/en/knowledge/emailing-module-campaigns-for-event-marketing#how-to-export-bounce)**
2. **[Create a Campaign](https://help.eventmobi.com/en/knowledge/emailing-module-campaigns-for-event-marketing#create-a-campaign)**
3. **[Designing Your Email](https://help.eventmobi.com/en/knowledge/emailing-module-campaigns-for-event-marketing#design-your-email)**
4. [**Test your Campaign Email**](https://help.eventmobi.com/en/knowledge/emailing-module-campaigns-for-event-marketing#Test-your-Campaign-Email)
5. **[Tracking & Managing Performance](https://help.eventmobi.com/en/knowledge/emailing-module-campaigns-for-event-marketing#tracking-managing-performance)**
6. **[How to Export Bounce & Unsubscribe Data in Extended Registration's Mailing Module](https://help.eventmobi.com/en/knowledge/emailing-module-campaigns-for-event-marketing#how-to-export-bounce)**
---
### Navigating Through the Emailing Module
First step is to navigate to the 'Mail' section module.
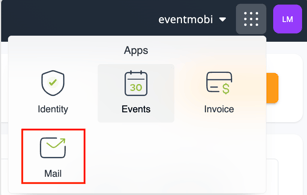
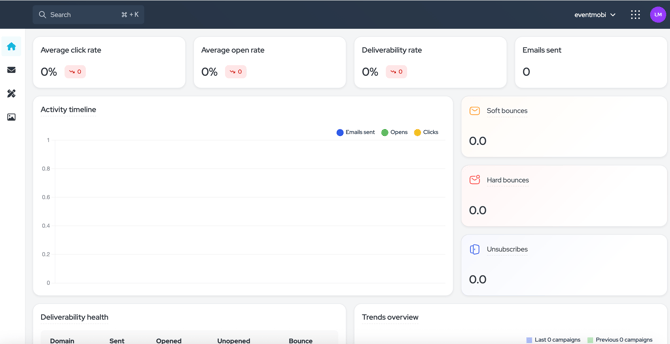
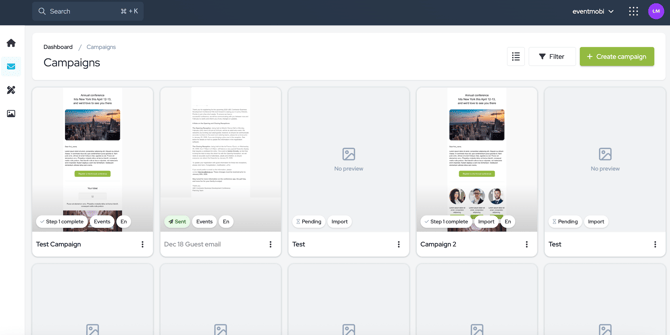
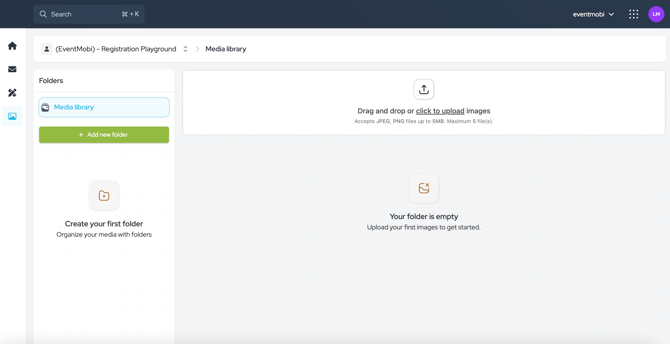
All your event emails live in one place from invitations to follow-ups, you can create, send, and track emails. The emailing module is divided into four main sections:
1. **Dashboard & Reporting** – View account-wide stats: open rates, clicks, bounces, and trends.
2. **Campaigns List** – Manage all campaigns with previews, status, type, and language. Switch between card and list views.
3. **Email Templates** – Use default templates or create your own to maintain brand consistency.

4. **Media Library** – Store images in organized folders for easy reuse across campaigns.
---
### Create a Campaign
When creating an email campaign the first step is deciding who should receive the email and when it should be sent. This foundational step determines whether the campaign is a standalone message or an ongoing communication connected to an event.
#### Campaigns Based on Imported Contacts
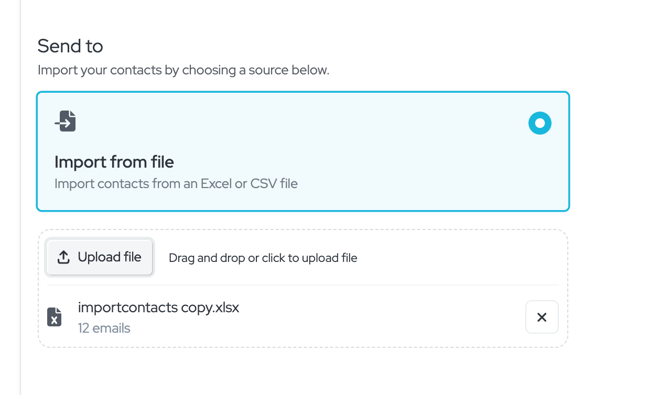
This campaign works best when your recipients aren’t connected to a particular event. Just upload a list of email addresses to set your audience—great for sending invitations, announcements, or follow-ups to external contacts.
1. Upload a file with email addresses.
2. The first row should include column headers (merge tags like `First Name`, `Last Name`, `Email`).
3. Subsequent rows contain the corresponding contact data.
4. Only the contacts in your file at the time of sending will receive the email (static audience).
### Event-Based Campaigns
Event-based campaigns are tied directly to an event and its attendees, with no need to upload separate contact lists. Simply choose an event and a segment—a dynamic group of attendees defined by registration data, preferences, demographics, or custom fields.
Segments give you precise control over your messaging, allowing you to send highly personalized emails such as VIP-only messages, language-specific campaigns, role-based communications, or targeted follow-ups, ensuring each message reaches the right audience.
1. Select an event and a **segment** (a dynamic group of attendees based on registration info, preferences, or custom fields).
2. Segment your audience for VIP-only emails, language-specific messages, or role-based communication.
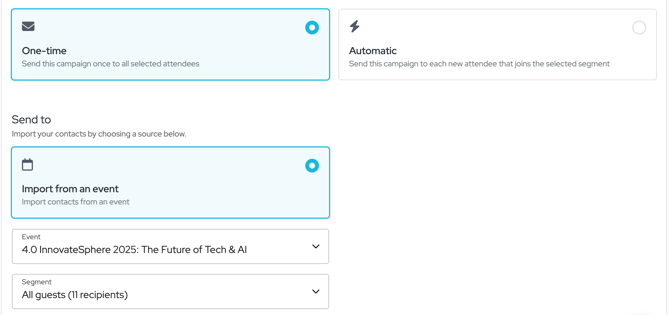
This campaign type is more dynamic and offers two distinct behaviours:
- **One-time campaign:** Sends a single email to everyone in the selected segment at that moment. It’s ideal for reminders, announcements, or last-minute updates where timing is critical and the message should only go out once.
- **Automatic campaign:** Sends the email when you first activate it and then continues running in the background. Any new attendee who later joins the selected segment automatically receives the same email. This is perfect for confirmations, onboarding messages, or information that every new registrant should receive without manual follow-up.
To conclude, one-time campaigns target a fixed audience at a specific moment, while automatic campaigns grow with your event, keeping communication consistent as new attendees register.
---
### Design Your Email
Use the drag-and-drop editor to create branded emails easily:
- Add blocks: text, headings, buttons, images.
- Start with a template or from scratch.
- Insert images from the media library.
- Use merge tags (`%first_name`, `%company_name`) for personalization.
- Preview, send immediately, or schedule for later.
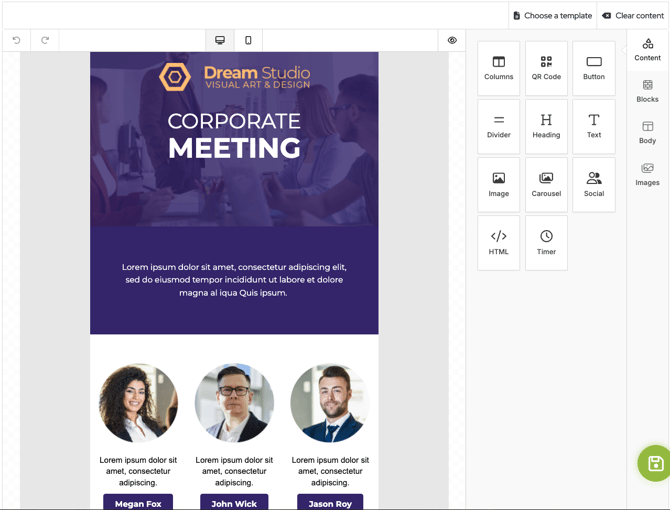
Images can be added directly to a campaign or chosen from shared folders in the media library. Once your content is ready, you can send the email right away or schedule it for later.
---
### Test your Campaign Email
Add the email address of everyone who should receive the test to the **Test recipients list**.
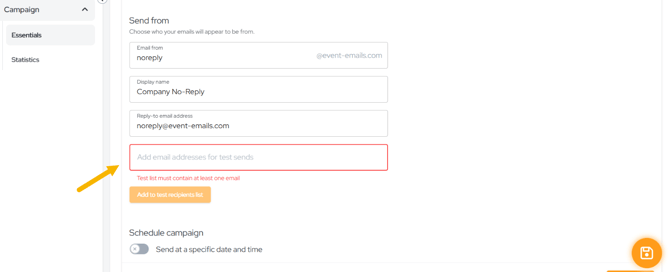
**Step 1: Check that all details are filled in**
Both the **Essentials** and **Content** sections must be completed. You can check their status by the indicator light next to each:
- **Green** – the section is complete
- **Yellow** – some details are still missing
Fill in anything marked yellow before continuing.
**Step 3: Send the test**
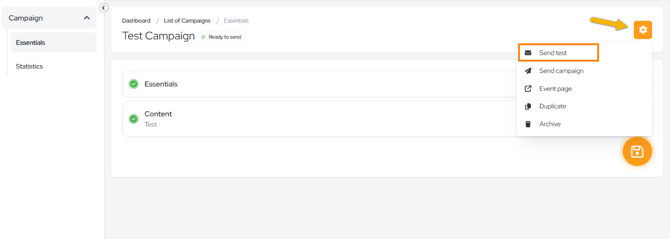
Once both sections show green, click the **gear icon** in the upper-right corner and select **Send test**.
---
### Tracking & Managing Performance
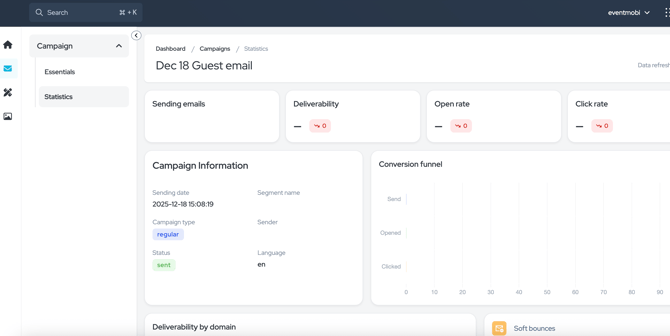
Each campaign includes a dashboard with insights on delivery, opens, clicks, bounces, and engagement. **Data updates every 6 hours**, giving a clear snapshot of performance. From the campaign list, you can quickly monitor status, duplicate campaigns, or archive completed ones for future reference.
---
### **How to Export Bounce & Unsubscribe Data in Extended Registration's Mailing Module**
You can export contact-level data (who bounced, who unsubscribed, delivery details, and more) as a file for further analysis or list cleanup.
Here's how to do it from two places: the main Dashboard and an individual Campaign's Statistics page. You can trigger an export from two locations, depending on how broad you want the data to be:
1. **Mailing Dashboard** — for account-wide data across all campaigns (e.g., everyone who bounced in the last 90 days, or everyone who unsubscribed).
2. **A specific Campaign's Statistics page** — for data tied to just that one campaign.
Both use the same gear-icon export menu, just scoped differently. Check your sending health on the Dashboard before exporting anything, the Dashboard gives you a quick pulse check on your account
- **Go to the Mailing Dashboard or Campaigns → Statistics for a specific campaign.**
- **Click the gear icon** (top-right) and select **Export contacts.** This opens an export panel.
- **Choose a data Type:**
- **From the Dashboard**, your choices are:
- **Bounced (90 days)**
- **Unsubscribes**
- **From an individual campaign's Statistics page**, you get more granular options:
- **Hard bounces**
- **Soft bounces**
- **Unsubscribes**
- **Delivery details**
- **Click Export**. When the export is ready, you will receive an email to download the file containing your selected data.
- [Event Organizers](https://help.eventmobi.com/en/knowledge/event-organizers?hsLang=en#main-content)
- [Experience Manager](https://help.eventmobi.com/en/knowledge/event-organizers?hsLang=en#experience-manager)
- [Attendee Engagement](https://help.eventmobi.com/en/knowledge/event-organizers?hsLang=en#attendee-engagement)
- [Branding & Design](https://help.eventmobi.com/en/knowledge/event-organizers?hsLang=en#branding-design)
- [Creating Profiles & Sessions](https://help.eventmobi.com/en/knowledge/event-organizers?hsLang=en#creating-profiles-sessions)
- [Event Communications](https://help.eventmobi.com/en/knowledge/event-organizers?hsLang=en#event-communications)
- [Onsite Events](https://help.eventmobi.com/en/knowledge/event-organizers?hsLang=en#onsite-events)
- [Virtual Events](https://help.eventmobi.com/en/knowledge/event-organizers?hsLang=en#virtual-events)
- [Core Registration](https://help.eventmobi.com/en/knowledge/event-organizers?hsLang=en#core-registration)
- [Extended Registration](https://help.eventmobi.com/en/knowledge/event-organizers?hsLang=en#extended-registration)
- [Reporting](https://help.eventmobi.com/en/knowledge/event-organizers?hsLang=en#reporting)
- [Sharing Resources](https://help.eventmobi.com/en/knowledge/event-organizers?hsLang=en#sharing-resources)
- [Sponsorship](https://help.eventmobi.com/en/knowledge/event-organizers?hsLang=en#sponsorship)
- [Launch the Event App](https://help.eventmobi.com/en/knowledge/event-organizers?hsLang=en#launch-the-event-app)
- [Event Services](https://help.eventmobi.com/en/knowledge/event-organizers?hsLang=en#event-services)
- [Event Information & Settings](https://help.eventmobi.com/en/knowledge/event-organizers?hsLang=en#event-information-settings)
- [Privacy & Security](https://help.eventmobi.com/en/knowledge/event-organizers?hsLang=en#privacy-security)
- [What's New](https://help.eventmobi.com/en/knowledge/event-organizers?hsLang=en#whats-new)
- [Call For Speakers](https://help.eventmobi.com/en/knowledge/event-organizers?hsLang=en#call-for-speakers)
- [Attendees & Speakers](https://help.eventmobi.com/en/knowledge/attendees-speakers?hsLang=en#main-content)
- [Using the Event App](https://help.eventmobi.com/en/knowledge/attendees-speakers?hsLang=en#using-the-event-app)
- [Access Resources as an Attendee](https://help.eventmobi.com/en/knowledge/attendees-speakers?hsLang=en#access-resources-as-an-attendee)
- [Share Resources as a Speaker](https://help.eventmobi.com/en/knowledge/attendees-speakers?hsLang=en#share-resources-as-a-speaker)
- [Manage Event Communications](https://help.eventmobi.com/en/knowledge/attendees-speakers?hsLang=en#manage-event-communications)
- [Connect With Others at the Event](https://help.eventmobi.com/en/knowledge/attendees-speakers?hsLang=en#connect-with-others-at-the-event)
- [Sponsors & Exhibitors](https://help.eventmobi.com/en/knowledge/sponsors-exhibitors?hsLang=en#main-content)
- [Exhibiting at an Event](https://help.eventmobi.com/en/knowledge/sponsors-exhibitors?hsLang=en#exhibiting-at-an-event)
- [Integration Hub](https://help.eventmobi.com/en/knowledge/integration-hub?hsLang=en#main-content)
- [EventMobi Integration Hub Solution](https://help.eventmobi.com/en/knowledge/integration-hub?hsLang=en#eventmobi-integration-hub-solution)
- [Simplify Your Processes with Automations](https://help.eventmobi.com/en/knowledge/integration-hub?hsLang=en#simplify-your-processes-with-automations)
- [Integrations from EventMobi to your solution](https://help.eventmobi.com/en/knowledge/integration-hub?hsLang=en#integrations-from-eventmobi-to-your-solution)
- [Integrations from your solution to EventMobi](https://help.eventmobi.com/en/knowledge/integration-hub?hsLang=en#integrations-from-your-solution-to-eventmobi)
- [Registration](https://help.eventmobi.com/en/knowledge/registration?hsLang=en#main-content)
- [Content](https://help.eventmobi.com/en/knowledge/registration?hsLang=en#content)
- [Design](https://help.eventmobi.com/en/knowledge/registration?hsLang=en#design)
[.png?width=147&height=34&name=EMI-logo-colour-dark-letters%20(1).png "EMI-logo-colour-dark-letters (1)")](https://www.eventmobi.com/)
© 2025 EventMobi™ A Trademark and Tradename of 5Touch Solutions Inc.
[Change your cookie preferences](https://www.eventmobi.com/cookie-declaration/)